Are you looking for a step-by-step guide on how to start a blog?
I have compiled a detailed and easy-to-follow guide for starting your first blog. Starting a blog is a good starting point to learn digital marketing.
Blogging is one of the businesses you can start with no money.
So, let’s begin the journey.
Here is the step-by-step method we will be following.
Let’s start building a blog now.
Chapter 1: How To Start a Blog in Easy Steps?
What is a Blog?
Know Your Why?
Choose Your Niche
Set Your Goals.
Set Up Blog in 5 Easy Steps.

So what exactly is a blog?
What is a Blog?
A blog is a short form of a weblog. It is basically an online diary. The online diary entries are in reverse chronological order. These entries are called blog posts.
Here is the first step of how to start a blog?
Know Your Why?
Before you start your blogging journey, Here are some of the important questions that you should answer:
- Why do you want to start a blog?
- What’s the greatest purpose for you to start blogging?
- To whom do you hope to help with your blog content?
- How will you help them?
- Why do you want to do so?
Remember: Your why has to be strong. A stronger why keeps you up and working, even when you feel like quitting.
It’s your why that will keep you going on days you don’t want to, It will motivate you for consistent action, which is a prerequisite to succeed in the blogosphere.
Here are a few reasons why people start a blog.
- Make money online
- Learn writing
- Earn fame or popularity
- Gain knowledge
- Help others / Charity
- Grow Business
- Learn digital marketing
- Share your story
- Create a community
Choose Your Niche
If you are planning to create a blog for fun. You can skip this step if you don’t want to monetize your blog.
However, if you are planning to monetise your blog. Then this is the most important step:
- You have to find your who.
- For whom you are going to start a blog?
- What is your target audience or niche?
What is a Niche?
A niche is a narrow segment of a broader market segment. E.g, Clothing is a broad term whereas “Clothing for women” is a narrower market segment. You can further drill down to narrower terms like “plus size clothing for women”.
How To Select a Profitable Niche?
It’s a two-step process.
Step 1. Prepare a list of niches.
Step 2. Filter out the profitable niches.
Here are a few questions that you can use to start off with step 1:
- Your expertise/talent.
- What things do you enjoy doing?
- Trending topic offline/online?
In step 2 you have to check out the competition within the niche. If competition is high try further drilling down to sub-niches that have low competition and good search volume, which will make money blogging a profitable venture.
I am not able to come up with a niche.
No problem! Sometimes you may not be able to come up with a niche idea, That is perfectly normal. Most individual bloggers started that way until they found their passion.
You should begin with anything you find interesting to write about. In due course of time as you learn more about blogging. You will be able to get your focus. You can even start a blog to learn about blogging.
Here are a few popular and profitable categories.
- Online Marketing
- Health and Fitness
- Investing
- Personal Finance
- Careers
- Exam Preparation
- Productivity
- Real Estate
- Freelancing
Again these are broad niches. You should drill down as discussed above to find profitable sub-niches you can dominate.
Set your Goals
Goals are dreams with a deadline. Having a deadline helps focus all of our energies on a specific task.
You should have short-term goals for your blog e.g. 1, 3, 6 months and long-term goals e.g. 1, 2, 3 years etc.
Goals have to be specific for e.g.
- Earn $1000/month in the next 6 months.
- Write 30 unique posts in the next 2 months.
- Have 10k subscribers within 1 year
Characteristics of a Good Goal. It should be a SMART goal
- S – Specific
- M – Measurable
- A – Achievable
- R – Relevant
- T – Time-bound
Set Up a Blog in 5 Easy Steps
- Selecting a Blogging Platform.
- Choose a Domain Name.
- Set Up Web Hosting.
- Install Blogging Software.
- Customize Blog Design and Layout.
Selecting a Blogging Platform
When you start looking for blogging platforms you have a lot of options. It becomes difficult and confusing to select a particular platform.
So hold on we a
What is a Blogging Platform?
A blogging platform is a software we use to publish content on the internet. It is a content management system (CMS) for text, images, audio and videos.
When considering the blogging platform we have two options.
- Free Blogging Platforms
- Self-hosted Blogging Platforms – [Recommended]
Free Blogging Platforms.
There are a bunch of free blogging platforms like Blogger.com or wordpress.com. The free platforms are normally hosted on a sub-domain. Being a sub-domain your site URL will be something like “mysitename.blogspot.com”.
If you don’t want to monetise your blog you can start a free blog. But if you are serious about blogging and would like to earn money blogging then you should check the next option.
Self-hosted blogging platform.
The self-hosted blogging platform gives you full control of the blog. It also allows you to run a blog with your own domain name e.g. “mysite.com”.
There are many self-hosted blogging platforms, and the most popular of them is WordPress. WordPress powers 30% of all the websites on the internet.
The best part is it’s free and open source. You don’t have to pay a dime to buy WordPress.
You only invest a small amount in the domain name and hosting only.
READ: How To Choose The Best Blogging Platform?
Choose a domain name.
Your domain name is the address of your blog. It is how people access your blog on the internet.
You can access any blog/website by typing a domain name or URL in the browser address bar.
Your domain name is your brand on the web. Choose something that is memorable and defines your presence on the internet.
A lot of beginner bloggers are not able to figure out the domain name. The best option, in that case, is to use your personal name.
You have a lot of flexibility if you are using your personal name as a domain name. If in future you would like to change your niche. Takedown your old content and replace it with fresh content related to your new niche.
How to register a domain name?
Most web hosting companies offer domain registration. You have the option of buying a domain name and hosting from different companies. But It is advisable to buy both from a single hosting company as it is easy to manage both in a single place.
You will have to point your domain name to the place where your blog is hosted. In this case, is Hostinger.
Check the following post where we compare of best domain name registrars
READ: How to Choose the Best Domain Registrar (Comparison) [2020]
Set up web hosting.
After the selection of domain names, the next important step is to get blog hosting. Web hosting is a place of residence for your blog.
READ: How To Choose The Best WordPress Hosting?
As discussed earlier you should get the hosting from the same company from which you bought the domain name for hassle-free management.
Most bloggers prefer Hostinger for starting a blog. So we will go with it, you can check out the following other prominent players in this field
- Bluehost
- HostGator
- WP Engine
READ: How To Install WordPress For Beginners?
Let us see the step-by-step tutorial for setting up a domain name and hosting.
Step 1. Visit the Hostinger website. Scroll down to check its hosting plans.
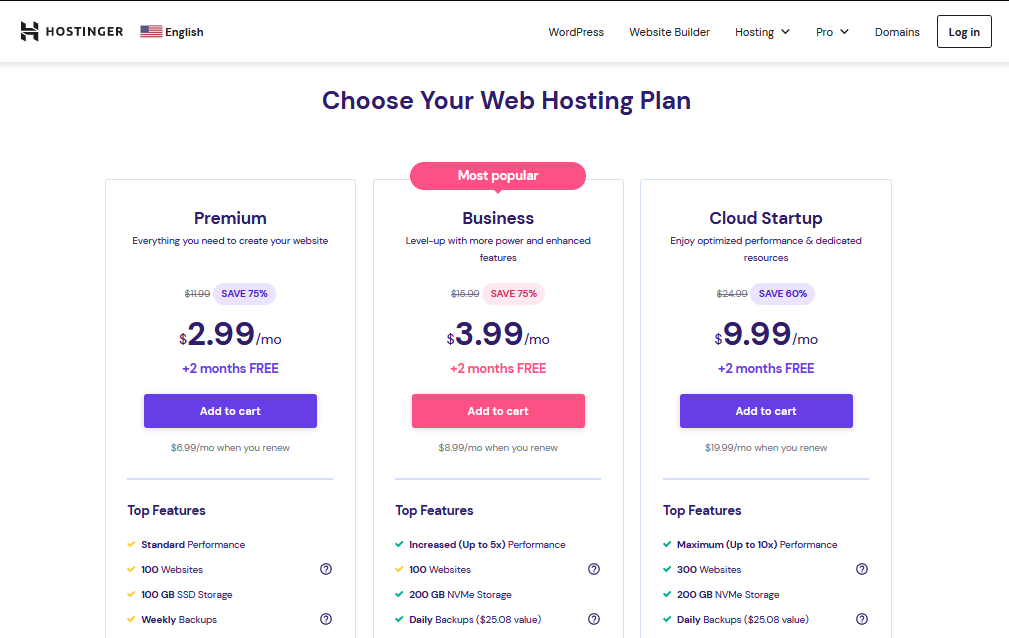
Step 2. Hostinger offers three shared hosting plans. They are Single, Premium and Business Shared hosting. Choose a hosting plan that suits your needs and budget.
I recommend choosing a Premium Shared Hosting plan. Premium Shared hosting offers better performance and speed. You get more features such as daily backup and Cloudflare integration.
Click on the Add to Cart button to start the signup process.
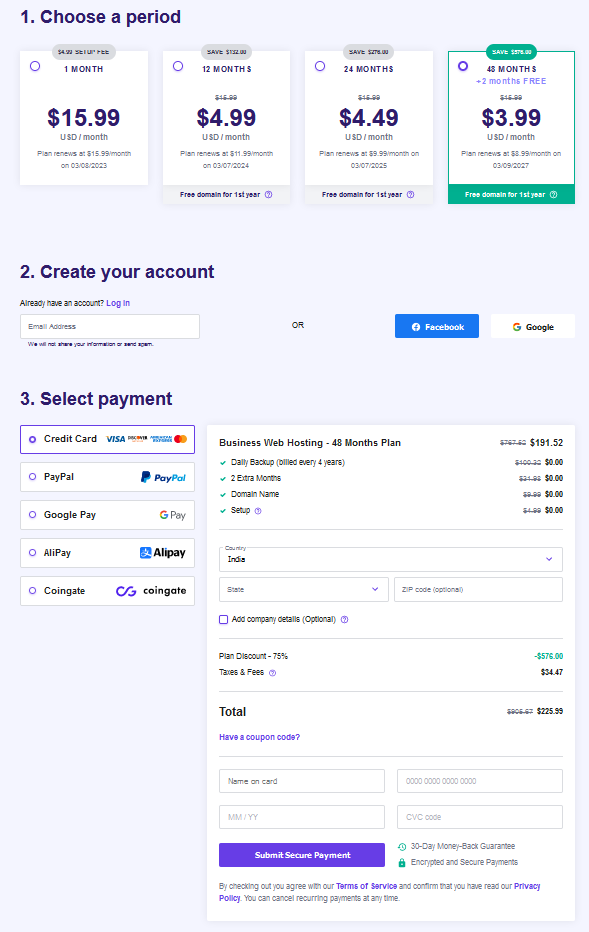
Step 3. In the next step, you’ll have to choose the billing period. Then, sign up for a Hostinger account. Finally, choose your preferred payment method.
You can pay using any of the following methods.
- Google Pay
- PayPal
- Visa, MasterCard
- American Express
- Discover
- Alipay
- CoinGate
After providing the payment details, click on the Submit Secure Payment button.
Step 4. After completion of payment. You’ll receive an email confirming your purchase. Another email will ask you to create an account password and claim your free domain.
Install blogging software and blog setup.
Login to your Hostinger account. On your hPanel dashboard, you will see the Claim your free domain option. Click on the Claim domain to set up your free domain.
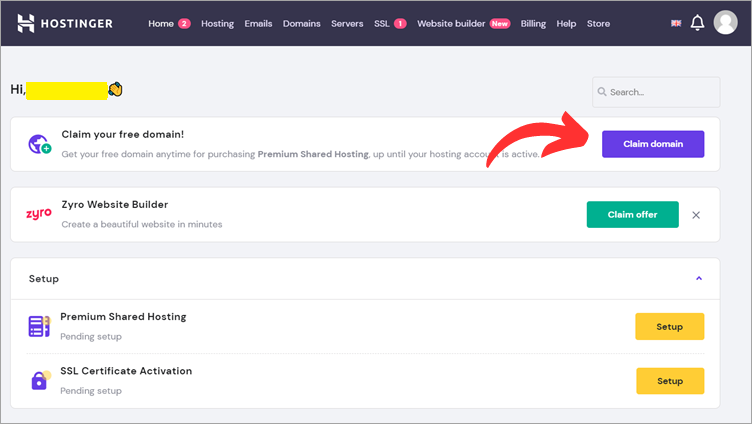
On the next page, enter your name, address and email to register your domain name.
w go ahead and set up your WordPress hosting account.
Click on the Setup button on the Setup section of your Hostinger dashboard. In the next two steps, it will ask you to choose WordPress Plugins and a WordPress theme.
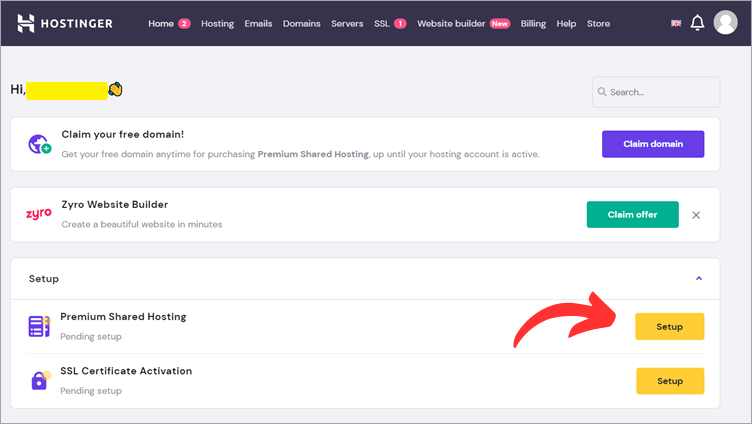
Now, it’ll ask you to choose a domain name. Click on the drop-down button under the Choose a Domain section. If you have an existing domain, choose the second option.
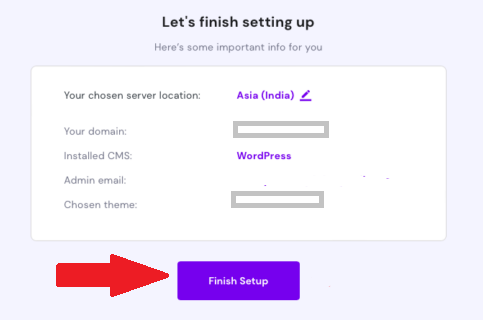
Finally, It will show you some important information. Click on the Finish setup button. This begins the automatic installation of WordPress on your chosen domain.
Customize blog design and layout.
Log in to your WordPress admin area.
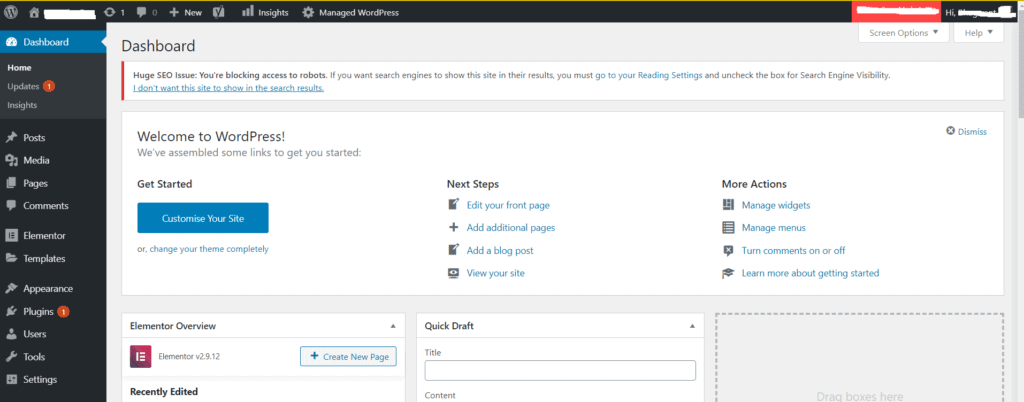
Click on the big blue button “Customize your site“.
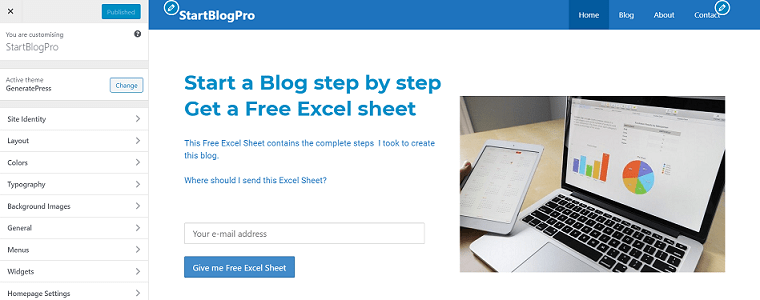
The following page will load where you can tweak your site using menus on the left panel. You will see a live preview of the tweaks on the right side of the screen.
Create a logo for your blog.
You can create a logo online, Several online websites can help you create your logo.
If you want to do it yourself you can use a free tool called Canva. Check out the 7 best logo makers and logo generators for your blog.
One of the best ways is to hire a freelancer from Fiverr for $5 or $10 for logo creation.
You can now fill in the title and description for your blog. Upload the Logo and Site Favicon.
The next thing that you have to select is the design and layout of your blog. The design includes the colour scheme, typography, etc.
Your blog layout should be practical and in line with the type of content, you are planning to add to the blog. At the same time, it should be eye-catching and user-friendly.
So to fulfil all these requirements you can select the required theme.
Themes are of two types:
- Free themes
- Paid themes
Free themes
There are a lot of free themes on WordPress.org. You can search for all the available themes in the admin area of your WordPress blogging platform.
You can preview the theme, read the description of the theme, and check the rating before activating it on your blog. Choose an easy-to-customize WordPress theme.
The theme you select should be responsive, that is it can render well on all devices including mobile devices.
Paid themes
If you are a perfectionist and not satisfied with free themes. You can buy paid themes.
Here is a list of prominent names in the paid themes category.
- Elegant Themes
- MyThemeShop
- ThemeForest
- StudioPress
- Zigzagpress
If you want to customize a WordPress theme, you can contact a WordPress developer on freelancing sites.
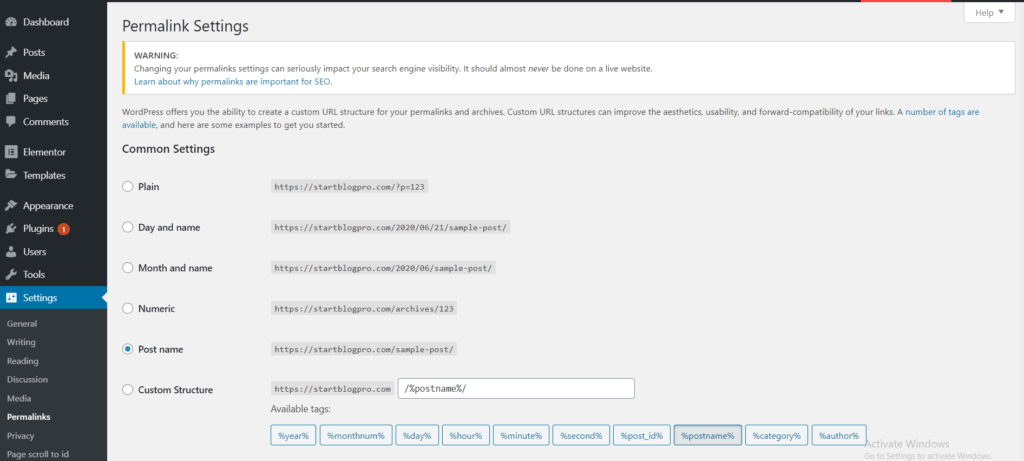
Next, we change the Permalink Settings from custom structure to Post name.
Dashboard >> Settings >> Permalinks
In common settings select “Post name“.
How to change themes in WordPress?
- Log in to your WordPress admin panel and locate “Appearance” on the left dashboard menu. In the drop-down menu click on the “Themes” option.
- On the themes page, you can activate any theme by clicking on “Activate”. You can preview the theme and then activate it on the blog.
How to install a plugin in WordPress?
- You can extend and add different functionalities to your blog using plugins. Just like themes here also you have a lot of free plugins as well as paid plugins.
- To install a plugin in WordPress. Navigate to the WordPress dashboard and locate the “Plugins” menu item on the dashboard menu. On clicking the plugins menu further, click on the “Add New”
- You are now on the Add Plugins page. On this page, you can check some of the free plugins. You can search for the plugin using the search bar on the right side top panel.
- Now locate the desired plugin and click on the “Activate” button.
READ: How To Install WordPress Plugins For Beginners?
READ 10 Must-Have WordPress Plugins for Bloggers!
How to install Google Analytics Plugin?
- Google Analytics is a free service from Google. It can be used to analyze website data like visitors etc.
- As your blog engagement increases you would like to analyze the visitor’s data to optimize your blog. You will thank yourself for this step then.
- Moreover, it is so exciting to watch the visitors trickling into your blog. It acts as a motivation as you can see your efforts being rewarded in the form of blog visitors’ data.
- Visit Google Analytics and set up an account.
- On completion of the account setup, you will get a unique JavaScript tracking code for your blog. You should copy the code and paste it into your blog.
- Now Google Analytics will start collecting data from your blog.
Read: 9 Best Google Analytics Plugins for WordPress.
How to install the Yoast SEO Plugin
On WordPress Dashboard left menu hover over “Plugins“. Click on Add new.
On the right side of the plugins page, there is a search bar. Type Yoast SEO and enter.
Locate the Yoast SEO Plugin to install it and don’t forget to activate it.
READ: How To Use Yoast SEO For Beginners?
Set up Google Search Console.
For quick indexing of your site on Google. We have to submit it to Google Serch Console
You can follow the steps in this article to set up your GSC.
Set Up a Content Delivery Network (CDN)
You can easily set up Cloudflare for WordPress step by step.
Here is a step-by-step tutorial on setting up a Content Delivery Network
Chapter 2: Learn the Basics of WordPress.
To create content on a WordPress blog, you should learn about the WordPress interface:
WordPress Dashboard Basics.
The Dashboard is the first screen that you will see when you log into the admin area of WordPress.
The dashboard has 3 main sections.
Toolbar

The toolbar is a vertical bar at the top of the page. It consists of the most commonly used admin functions e.g comments, visiting a site and a new menu.
Main Navigation Menu
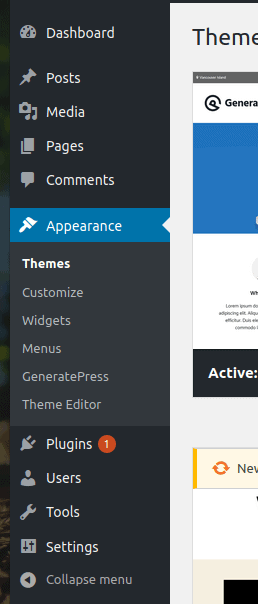
The Main Navigation Menu is on the left side of the page. It is a cluster of administration menu items. These menu items when hovered over will show you the related sub-menus.
Main Work Area
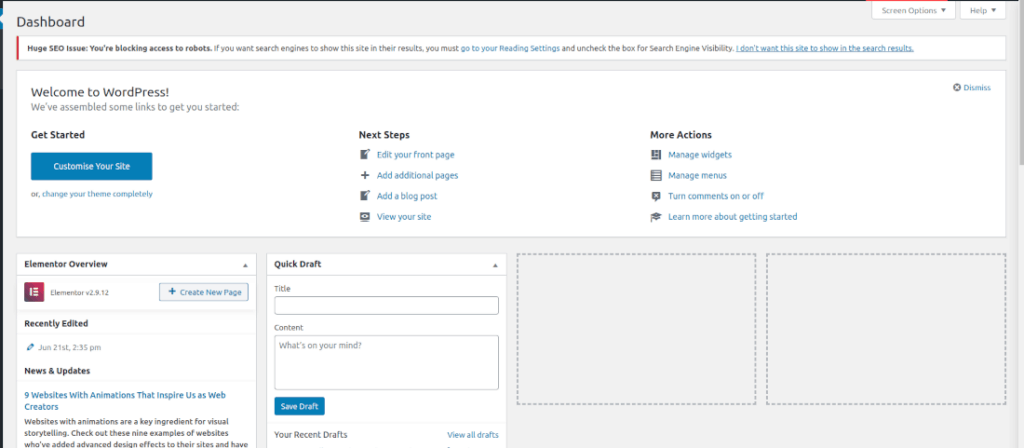
The main work area is the major component of the dashboard to the right side of the page.
When you log in for the first time into the admin area. You will be greeted by a welcome message and a list of useful links that will help you get started. To get familiar with the admin area, you can click around the links. Then you can click Dismiss to hide the page.
The other sections that you see are
At a Glance.
At a glance Informs you about how many pages, posts, and comments are there on your blog. It will also show you the WordPress version and the theme you are using.
Activity.
The activity area gives you more information regarding your latest posts and comments
Quick Draft.
The quick draft area gives you a quick way to start a new post. You cannot publish your post from here. It is just for noting down your ideas quickly.
WordPress News
The area is self-explanatory; it displays the latest news about WordPress.
Each subsection has little arrows to quickly hide the area. These subsections are drag and drop you can manipulate them as per your requirement.
How To Publish Content on WordPress?
To publish content in WordPress. You should create a new page or a new post.
Is there any difference between blog posts and blog pages?
Yes, it is a good question. As you will see both of these are used for creating content. However, the key differences are:
Pages
Pages are normally used for static content e.g About Us and Contact Us pages
Posts
The posts are generally for time-sensitive content. This content can be categorized, Archived, and tagged based on topics.
How to Create a Blog Post?
Login to your WordPress admin area. You can choose the New >> Post option from the toolbar at the top of the admin area or Hover on the left side Posts menu and then click on the Add New option.
The new post section will load with the following options.
Title – In this text area you should enter the title of your new post.
In the text area below you will enter the actual body content of your blog post. There are a lot of text formatting options similar to the one you use in MS Word.
Don’t forget to check the article on how to create a catchy blog post title for your blog.
On the right side of the text area, there are meta boxes. The functions of meta-boxes are described below.
Publish – The publish button will make your post live on your blog. You also have the option to delete the post or change its visibility.
Categories – You can assign your posts to categories. You can even create new categories using the Add New Category button.
Tags – This option helps you add new tags to your blog posts
Featured Image – This option helps you to select an image that is prominently visible at the top of your post depending on your theme.
How To Create a New Page?
You can add a new page from the left-side Pages menu. Hover over the Pages menu and click on the Add New option or from the top toolbar click on the New >> Page button.
You will be greeted by the WordPress block editor.
Rest all the options are the same except for the absence of Categories and Tags meta-boxes. You will see a Page Attributes box. In this box, you will be able to set parent pages and also change the order of the pages.
Check out the post on 19 WordPress settings after you install WordPress.
In the next step, we will start populating our blog with interesting content.
Chapter 3: How To Create Blog Content?
In this step, you will populate your blog with content:
Adding the Static Pages
Before you start writing blog posts, you have to add the following static pages.
About Us
A page to introduce yourself or your company to the visitors. You should add your social media links in the end.
Contact Us
This page allows your visitors to contact you. The page should have your email/contact no / social media handles etc.
If you have installed the Contact Form 7 Plugin. You will see a “Contact” menu item in the left menu of the admin panel. Click on contact and then select Add new
Name your contact form and save the form.
Navigate to the “Contact” menu item on the left and now click on Contact Form. You will see the contact form you just created. Copy the shortcode you see there.
Now go to the Contact Page Editor and click the ‘+’ button on the editor, choose the Shortcode and paste the one you have copied.
Save your page and click ‘Publish”. You will now receive an email message whenever a visitor types in this contact form.
Terms and Conditions Page
Use this tool to create your terms and conditions page.
Copy and paste the text generated by this page to a new page on your blog
Disclaimer Page
If you are planning to monetise your blog, you have to declare how you will be generating income for example if you are endorsing products you stand to benefit via affiliate links
Privacy Policy Page
Again use this tool to create your privacy page. Edit and copy the text generated by this tool and paste it onto a new page on your blog.
Navigate to Settings and then Privacy and in the field “Change your privacy policy page”. Select the page that you have just created.
How To Plan Blog Content?
Writing content is the most challenging and difficult part of running a blog.
Nope! It is just a new skill and the best part is you can acquire it within a short period.
The four-step content writing process will make you a pro.
Plan your topics for at least a month or 3 months in advance. You can easily come up with a ton of content ideas. For a start check how to generate unlimited content ideas for a blog.
Use a blog post structure and begin with a selection of main points (Subheadings) then elaborate on the Subheadings. You can use sub-subheadings.
The content that you create must match the search intent of the visitor
Finally, write the Introduction and conclusions
Create different variations of Blog post titles. Use the Blog title analyser to select the best one
Basic Blog Post Template.
You can start with the following template
[Title]
[Introduction]
[Subheadings]
[Sub-Subheadings]
[Conclusion]
Better Blog Writing Tips
- Read a lot about your subject matter.
- Make writing a daily routine.
- Check out the writing styles of famous bloggers
- Do not copy from other blogs, take inspiration and come up with unique content
- Use odd numbers at the beginning of the blog post e.g 43+ ideas for content creation
- Try to keep the title within 60 characters or it will cut off in search results
- Create an editorial calendar.
- Blog posts should be at least 1200 words, informative and engaging.
- Add eye-catching images to your blog post. Here are 21 free blog image sources for your blog.
- Images reduce the page loading time. Reduce the image size without reducing quality.
- Ensure your blog post has a proper structure like the use of subheadings, bullet points, tables etc. Google loves structured content and will reward your site with traffic by generating featured snippets.
Check out the list of 29 best content writing tools for SEO.
READ: Is Editorial Calendar Must For Bloggers? How to Start one?
Blog Pre-Launch Checklist.
- Check your blog’s URL in the General Settings of the blog admin panel.
- In Settings uncheck the box “Discourage search engines from indexing this site”.
- Ensure submission of your primary sitemap is in Yoast Plugin.
- Check your blog’s rendering on multiple browsers and devices.
- Enter your blog’s domain in Blue-Host and turn off the Coming Soon Page.
- Set up the posts and pages that are to be published.
Ensure you have 5-10 blog posts before the launch.
You can also create a recommended tools and resource page. It will help you in monetizing your blog.
Chapter 4: How To Promote Your Blog Content?
Writing and publishing the post on your blog is just the tip of the iceberg. The main action starts after publishing your content on your blog, It is the promotion of the content that you have published.
If you are not able to reach out to your intended audience.
The blog promotion can be of two types
- Free Promotion
- Paid Promotion
Let us discuss the blog promotion strategies:
Free Promotion Strategies
Google is the largest search engine, and most of the free traffic will come from Google.
Let us face this, free promotion methods take 3 to 6 months to kick in. A lot of patience is required if you want to go the organic way.
If you want quick results you can skip to paid promotion strategies.
The first thing that you should do is submit your site to the following
- Google Webmaster
- Bing webmaster
Blog Commenting
Do not randomly start commenting on the blogs. Find 5 -10 blogs in your category, and participate actively in the conversation. You should not spam them with unwanted links.
Submit blog posts to voting and bookmarking sites that have engaged users.
For e.g
- Delicious,
- StumbleUpon
- BizSugar
- Inbound
Guest Blogging
Guest blogging is when you post an article on another blogger’s blog. You can include a link back to your site. This link back is called back-links. It is one of the best methods to get backlinks.
The number of back-links to a blog better you rank on Google
Reach out to the bloggers in your domain and keep pitching for guest posts.
After about two weeks of posting an article on your site. You can post the same article by changing the headline on these sites.
Create a Feedburner Account
Feed-burner helps in subscribing to your blog using an RSS feed. So that the subscriber can receive your posts in their email or other RSS readers like Google Reader.
Build Your Mailing List
You must have heard that “Money is in the list”. Start building your list from the launch of your blog.
You must create a popup or a slide-in for each page on your blog. You have to sign up for an email delivery service like Mailchimp. There is a plugin for the seamless integration of Mailchimp into your WordPress blog.
Promote on Social Media.
- YouTube
- Google+
READ: 5 Surprisingly Easy Ways to Promote Your Blog For Free
Paid Promotion Strategies.
If you want quick results, then paid advertising is the best way to drive traffic to your blog.
Google and Facebook are two major players with the largest market share.
Facebook is more targeted and economical.
Start with a small budget and gradually scale the successful campaigns.
Chapter 5: How To Make Money Blogging?
Your focus should be on creating engaging content and not money. Money should be taken as a reward for your outstanding and engaging content.
When it comes to blog monetisation. You have the following options
- Ads
- Affiliate Programs
- Your Products and Services
- Selling Ads
Ads
You will show ads on your blog at some prominent places. Whenever a visitor clicks the ad you will be paid a certain amount
Google AdSense is good for beginners but not the best in the marketplace. You should move on to another network when you start getting a good amount of traffic.
Follow our step-by-step guide on how to add AdSense to a WordPress site.
Ads should not be cluttered with ads ideally use 3-5 ads per 1500 words blog post
Here is a list of some additional ad networks for your future reference:-
Ad Network Minimum Page-views Required for Approval
- Ezoic 10,000/month
- Mediavine 30,000/month
- AdThrive (Recommended) 100,000/month
Affiliate Programs
You have to join affiliate programs that you want to promote on your blog. You will get a commission if your blog visitor buys the affiliate product by clicking through your affiliate link.
So the first thing here is to build trust with visitors then only they will click through your affiliate links
The top three affiliate programs that you should enrol for are;
Amazon Associates
Shareasale
Your Products and Services
These types of products are most profitable as you keep all the profits. You can create your own products e.g
- Online course
- Ebooks
Selling ads
BuySellAds
BuySellAds is an online marketplace. The advertisers and publishers interact through this site. BuySellAds handles these transactions.
Chapter 6: How To Scale Your Blog?
To increase the revenues and traffic and conversion to a new level. You should start scaling your blog.
When your blog is at least 6 months old. You’ll start getting a fair amount of traffic and some earnings. You should reinvest the earnings into your blog.
Start outsourcing the work that you enjoy the least, or that consumes a lot of your time. Start investing that time in productive work e.g digital products like an ebook or paid course etc
You can find freelancers on Upwork and Freelancer. For article writing, you should check iWriter or Copyblogger job boards.
Your main focus should be on link-building and the promotion of your blog.
If you have followed along with all the steps till now. You can start a blog without any problem.
If you still have any issues. Leave a comment below and I will get back to you.
Chapter 7: Top Blogging Resources and Tools
In this section, I list down all the best blogging tools and websites that are useful for a blogger.
- Keyword Tools
- Email Marketing Tools
- Graphics
- Social Media Tools
Keyword Tools
- Google Keyword Planner
- Ahrefs
- Semrush
- LSIgraph
Email Marketing
- MailChimp
- Aweber
- Drip
Graphics
- Canva
Social Media Tools
- Buffer
Books
- The 4-hour workweek by Timothy Ferris
- Think and Grow Rich by Napoleon Hill
- How to win friends and influence people
Check out my Recommended Tools.
What are you waiting for? You now know how to start your blog. Start the blog as a side hustle and convert it into a lifestyle business.


![Read more about the article How to Create a Free Blog on Blogspot? [Ultimate Guide]](https://startblogpro.com/wp-content/uploads/2022/10/create-a-free-blog-on-blogspot-300x169.png)