Google AdSense is the first choice of beginner bloggers to monetize their blogs.
It’s one of the easiest ways to start earning money online from your site. Adsense allows you to sell your website’s ad space to eligible advertisers. Your website earns money in this process.
If you don’t have a blog, you can easily start a blog using our guide.
In this article, we will add Google AdSense to your WordPress blog. You can pick some best practices and tips that help you integrate your website.
Here are the topics that we will discuss:
Let’s start with an introduction to Google AdSense.
What is Google AdSense?

Google AdSense is an advertising network owned by Google. It enables website owners and bloggers to earn money. The website owners make money by presenting images, texts and videos. It includes various other types of advertisements on their site.
The ads are relevant to the site content and visitors. It offers cost-per-click (CPC) advertising. You earn money each time a visitor clicks on the ads showing on your site. The amount you receive per click depends on various factors.
You have to sign up with them and place the ads on your site. Google AdSense deals with the advertisers. They will collect the payments from the advertisers. And pay you the money after deducting the management fees.
How To Get Started with AdSense?
To get started with AdSense you need to follow 3 steps:
- Create a Google Account
- Updating Phone number and Postal Address
- Connect your site to AdSense
Let’s start with the first step. That is Google AdSense sign up
Create a Google Account
You should have a Google account. If you are using any of the Google services like Gmail or Google docs. You already have an account with Google.
Otherwise, you are can sign up for a Google account. It’s a mandatory requirement for creating a Google AdSense account.
After signing in, you have to submit an application. Google AdSense team will review your site. They will approve you within a few hours or at most 2 weeks.
After getting the approval, log in to your Google AdSense account. Now, you have to copy a piece of code from there and place it on your site. This code ensures that the ads start showing on your site.
Google AdSense announced auto ads recently. In this case, when you paste the code from your Google AdSense account onto your website. The Ads will start running automatically. Google decides how, when and where ads will appear on each of the pages.
Your Phone Number and Postal Address
Next, you need to update your phone number and mailing address. You Should also update your bank account. This will ensure that you receive your payments on time.
To update the payment information. From the left-hand menu, navigate to Payments > Payments Info. You are now ready to receive payments from Google.
Connecting Your Site to AdSense
Finally, you have to connect your site to AdSense. So, how to connect Google AdSense to WordPress sites? You can connect AdSense to WordPress in 2 ways.
The two methods for connecting your site to AdSense are:
- Manually add Google Adsense Ad Code to WordPress site.
- Use a Google AdSense WordPress Plugin
We will discuss both methods. For complete beginners, we recommend starting with a WordPress Plugin. As a beginner, you will find it difficult. As it requires placing ads on different areas of your blog. It’s tedious and time-consuming too.
So, let’s start with the easy way to connect AdSense to the WordPress site. That is using an AdSense WordPress Plugin.
We will integrate AdSense to WordPress using the official Google Site Kit plugin. The plugin also helps to integrate other Google services. You can integrate other Google services like Google Search Console, Google Analytics etc.
The Site Kit plugin lets you view data from all these services inside the WordPress admin area.
How To Add AdSense to WordPress with Plugins?

Let’s start by installing the site Kit by Google AdSense Plugin. You can follow our step by step process on how to install a WordPress plugin.
Step 1: Installing and Activating the Google Site Kit Plugin
From the WordPress dashboard left-hand-side menu. Click on Plugins. and then click on the Add New button. Then, type “site kit” in the search bar as shown in the figure below.
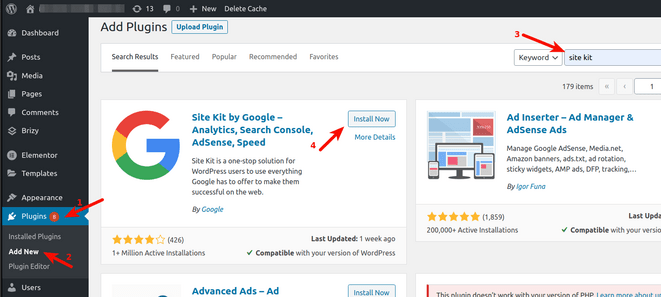
Spot the Site Kit by Google plugin and click on the Install Now button. After completion of the installation of the plugin, don’t forget to activate it.
After activation of the site kit plugin, it will prompt you for the setup process:
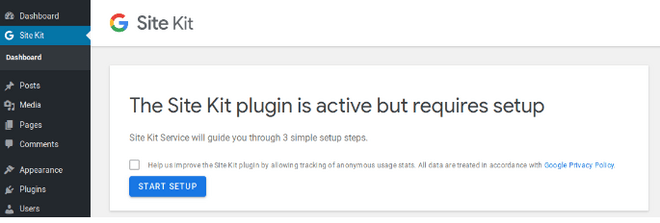
Next, click on the Start Setup button.
If you are not see the dialogue box. From the WordPress admin menu click on Site Kit > dashboard.
Step 2: Verification of ownership of the website and connect Google Search Console.
When you start the setup process, the Site kit will prompt you to sign in to your Google account. This helps in the verification of the ownership of the website.
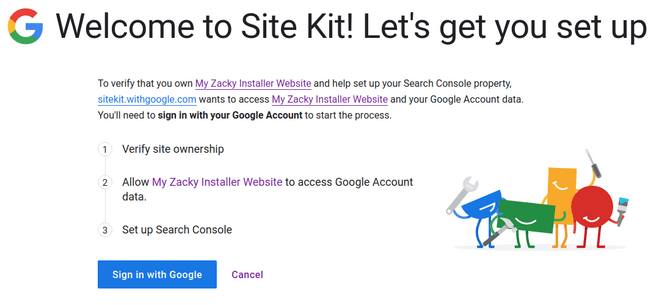
After you click on the Sign in with Google button. You have to allow Site Kit to access your Google search console account
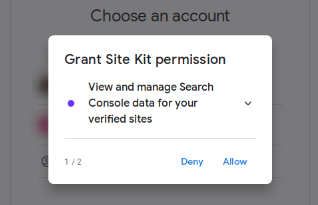
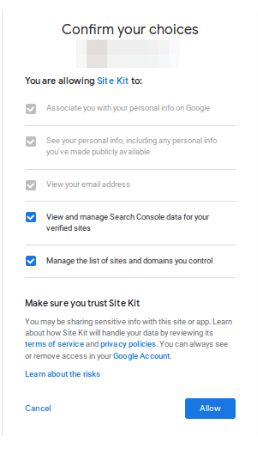
On the next page review the various permissions. Tick all the checkboxes and click the Allow button.
If you have added your WordPress site to Google Search Console. Google Site kit plugin will automatically integrate it.
Otherwise, it will prompt for integration as shown below:
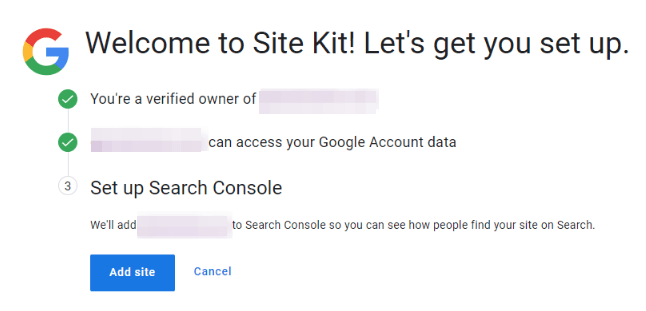
Google automatically integrates once you click on the Add Site button. The plugin is now ready for your use.
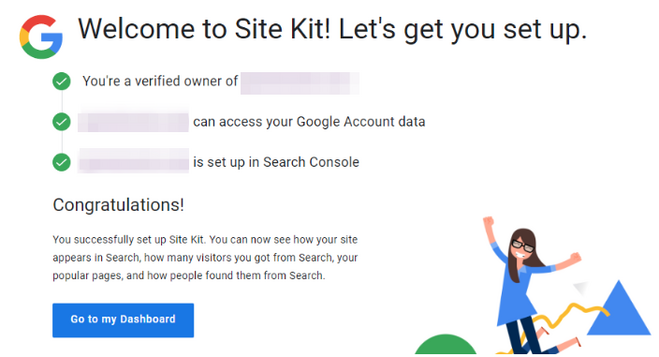
Remember that we have integrated the WordPress to Google Search Console. We have to follow a few more steps to integrate AdSense with the WordPress site.
Step 3: Integrate Google AdSense with WordPress
Google Site Kit requires the integration of Google Search Console with WordPress.
After this setup, you’ll see a list of additional Google services you can integrate. The plugin provides links to connect AdSense, Analytics and PageSpeed Insights.
Read: The Ultimate Guide To WordPress Speed Optimization.
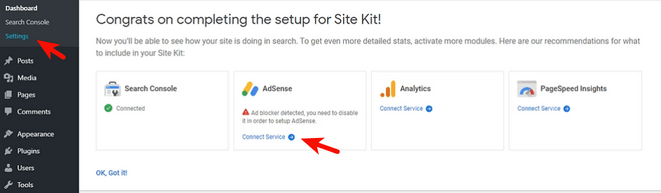
Click on the connect service under the AdSense Section. On the next page, you have to select the provide the account information.
Thereafter, you have to authorise and grant the site kit a set of permissions.
With a few clicks, you’ll connect WordPress to Google AdSense.
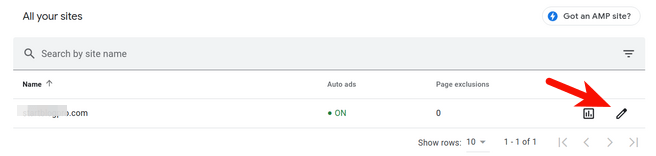
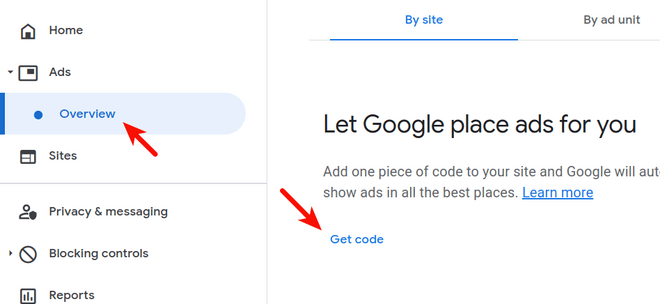
Login to your Google AdSense account for turning on the auto-ads. From the left-hand-side menu, click on Ads > Overview.

Click on the pencil icon next to the name of the website you are monetizing.
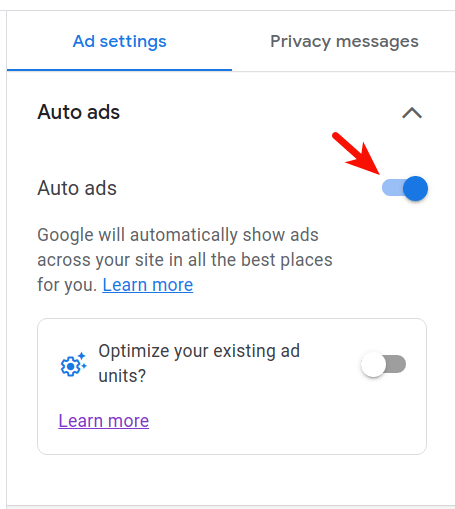
A page will load with the preview of your site. To the right side of the preview, there is an Ad settings tab. Under this tab click on the Auto Ads and enable the Auto ads.
Once your site gets approval from the Google AdSense team. Your site will start showing the ads. . You can experiment with other settings to optimise your site’s user experience.
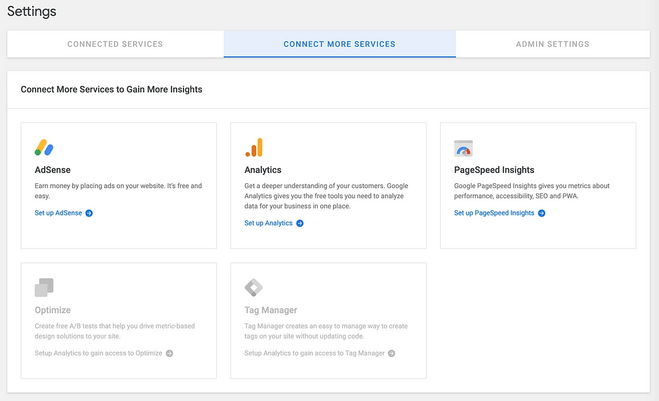
If you want to set up additional services later. You can do so by going to Site Kit > Settings > Connect More Services page.
Step 4: Site Kit dashboard and reports
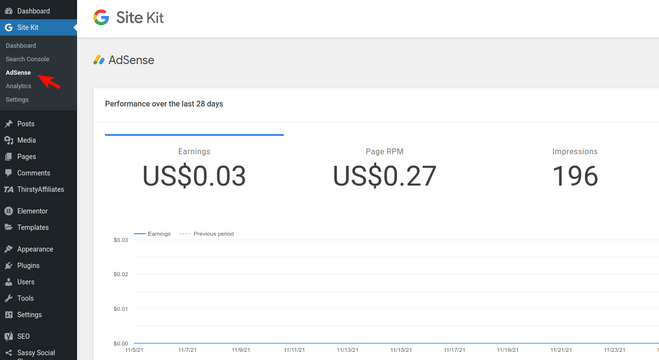
Google Site Kit displays AdSense data inside your WordPress dashboard. You can see the overview by accessing the Site Kit dashboard. To do so navigate to Site Kit >Dashboard.
You’ll be able to view the reports under the Site Kit > AdSense. This page contains more detailed reports as compared to the dashboard.
Additional AdSense WordPress Plugins

The Site Kit is the official Google WordPress plugin. There are many other plugins that can help you integrate WordPress with AdSense. A Few of the plugins are:
Read: 10 Must-Have WordPress Plugins For Bloggers.
How to Connect AdSense to WordPress Manually Without Plugins?
Steps to Connect AdSense to WordPress manually:
Step 1: Get the AdSense Code
On the completion of AdSense sign up, you will see the Connect your site to AdSense page. Copy the code by clicking on the COPY CODE link.
You can also get the code by navigating to Ads > Overview and clicking on Get code link.
Step 2: Insert the Code in WordPress Site
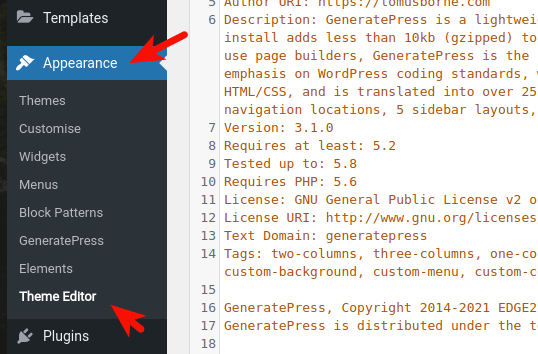
Log in to the WordPress admin area. Navigate to Appearance > Editor.
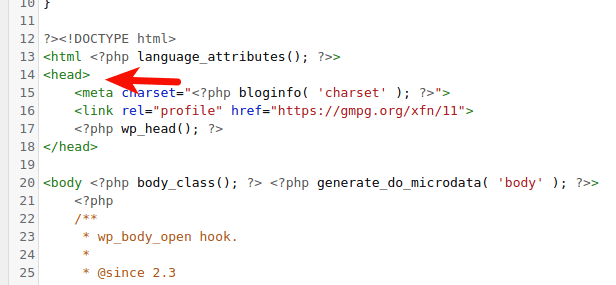
Select your current theme from Select theme to edit drop-down menu. Now click on the Theme Header (header.php) template from the list.
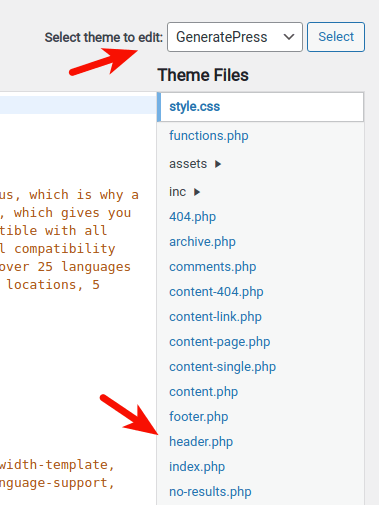
Finally, locate the <head> tag in the theme file. Paste the AdSense code after the <head> tag and Save the file.
Step 3: Submit your site for review
Ads will show up only after approval of your site by the Google AdSense team. It takes a few hours to a few weeks for approving the site. Once approved you will start viewing the ads on your site.
Conclusion
There are two different ways to integrate Google AdSense into the WordPress site.
- Using an AdSense WordPress Plugin
- Manually connect AdSense to WordPress Site.
If you are a beginner, you should use an AdSense WordPress plugin, For e.g Google Site Kit. Google Site Kit for WordPress is an easy way to connect AdSense to WordPress.
Install the Site Kit, integrate it with Google AdSense. Finally, enable Auto-ads from the Google AdSense dashboard. Google will automatically place ads on your site.
You can manually integrate AdSense with WordPress. Get the code from your AdSense account and place it inside the <head> tags of your site.
Besides Site Kit, there are a lot of AdSense WordPress plugins. But Site Kit is most useful and straightforward to install and connect with AdSense.
How are you planning to integrate AdSense with your WordPress Site?


Hey Bhagwant Singh,
Excellent and well-written post. It is my first time doing comments on your blog page and am glad to say that you have shared an awesome content providing great tips to include Google AdSense to a WordPress site. I appreciate the way you have explained and elaborated things that are true enough to understand. You have explained very nicely along with all the vital info and necessary steps that are really providing a good understanding. Your each listed steps are so clear and easy to follow, as considering your steps will be helpful and allows user to add AdSense to a WordPress site.
After reading this complete guide i gain ideas and am sure that this post will surely help many of people, readers and especially WordPress-users. Lastly i would like to say that you are definitely providing good understanding to your readers.
Very informative and keep sharing more similar post.
Thanks,
-Aadarsh
Thanks Aadarsh for your kind words. Keep coming back.