WordPress is used by more than 30% of the websites on the internet. It is one of the most popular website builders.
The main reason for WordPress’s popularity, it is very easy to install. Anyone can use it to create a beautiful website or blog.
WordPress is supported by the best web hosting companies.
All WordPress websites provide WordPress 1-click installation scripts like Fantastico, Softaculous and Quickinstall.
The main topic that we discuss here are:
Before You Begin Installing WordPress
There are some prerequisites to installing WordPress.
The very first thing you require is a domain name and a reputed web hosting service that supports WordPress installation
If you are just starting I recommend Bluehost. You will get a free domain along with WordPress hosting.
Bluehost is officially recommended by WordPress. It is one of the best WordPress hosting provider companies.
How To Install WordPress On Bluehost?
Bluehost is one of the most popular WordPress hosting providers. They are also one of the best when it comes to WordPress hosting business.
When you sign up for Bluehost Basic WordPress hosting plan. They automatically install WordPress on your domain name.
Once you log in to your Bluehost hosting account you can find your WordPress site under the My sites tab.
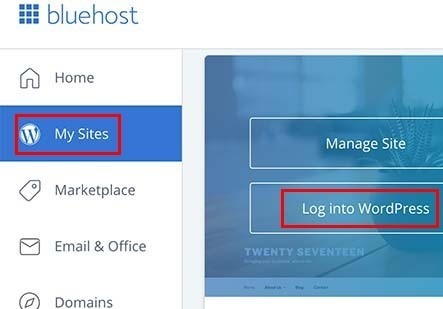
Click on the “Log into WordPress button and you’ll be logged into your WordPress administration area.
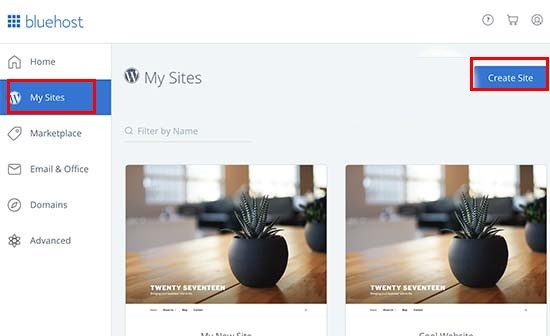
If you sign up for Plus or Choice Plus plans you’ll be able to host unlimited sites.
In that case under the, My sites tab click on the “Create Site” button to get started.
You will be guided by the Bluehost WordPress installation wizard to complete the installation process.
The First thing it will ask you is your Site Name and Site Tagline.
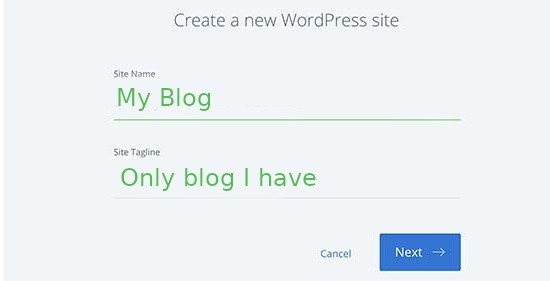
Now click on the “Next” button.
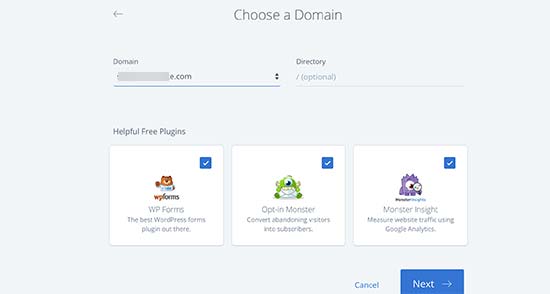
You will be prompted to select your domain name. Purchase a domain name before proceeding to create a new site.
A domain name that you have already bought will appear in the drop-down menu.
Select the domain name and leave the directory path blank. WordPress will automatically configure the path settings.
After a few seconds, you will see a WordPress installation success message.
On the installation details page bottom, you will see a Login to WordPress link

Now click on the link and it will load the WordPress admin area.
How To Install WordPress On SiteGround?
SiteGround offers reliable and faster WordPress hosting. They have industry-leading tech support and flexible payment options.
Let’s start the installation of WordPress on SiteGround.
On completion of your signup, you will get a welcome message. You will be prompted to set up your website
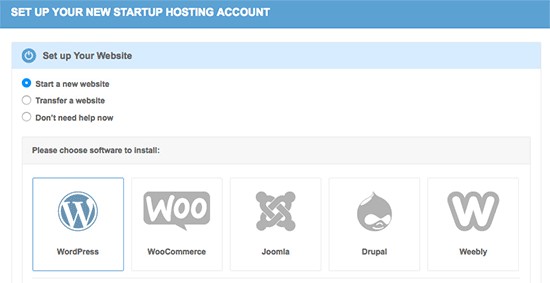
Select the “Start a new Website option and then click on the WordPress icon down below.
Now WordPress installation wizard will ask you for some details.
You will have to enter the following for your new site.
- Email Address
- Username
- Password
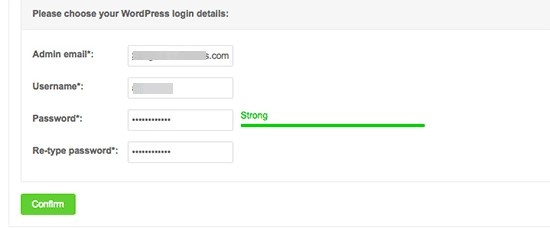
After entering the info click on the “Confirm” button.
A new screen with the details of your selection will load. Here you have the option to add additional enhancements to your account.
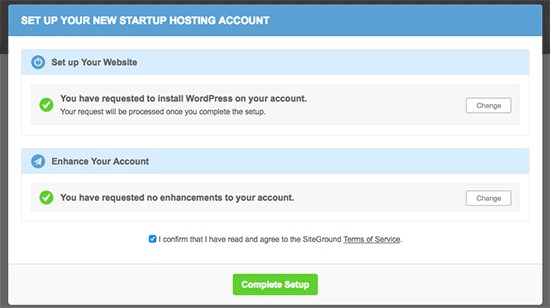
Click on the Complete setup button. Now the installer will start installing WordPress.
On the completion of the installation, you will be able to see a success message.
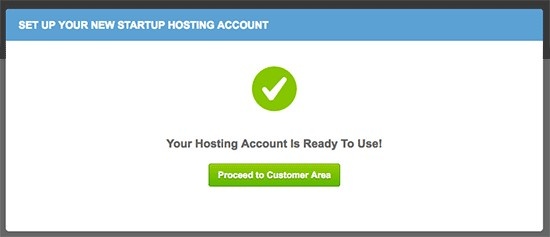
Click on the “Proceed to Customer Area” button. On the next page, you will see your website under the “My Accounts” tab.
Now click on the “Visit admin panel” to visit your WordPress admin area.
This completes the installation of WordPress on SiteGround
How To Install WordPress On Hostgator?
Hostgator is among the most popular hosting providers for beginners.
Shared hosting plans offered by Hostgator make it super easy to install WordPress
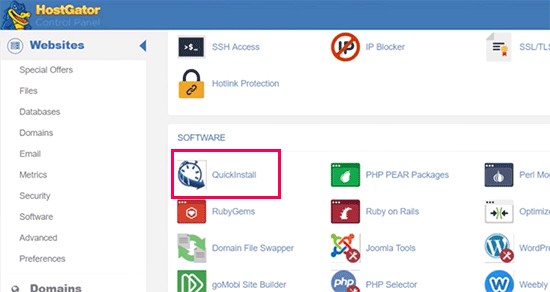
To install WordPress, log in to your Hostgator account.
On the Dashboard under the Software section, there is a “Quickinstall” option.
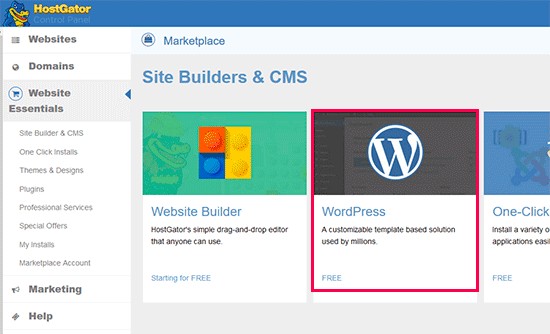
Locate the WordPress section on the new screen and click on it to launch the installer wizard.
Next, you need to enter the domain name for installing WordPress along with the directory path. You should leave the directory path blank.
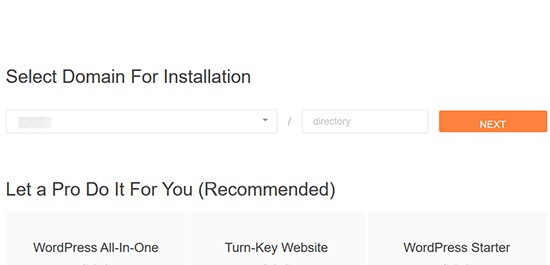
Click the Next button.
On the next screen, you will have to fill in your WordPress site details like Site Title, Username, First Name and Last Name and Admin Email address.
The email address will come in handy if you happen to forget the password.
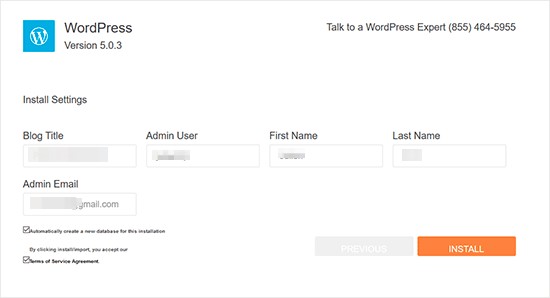
When you finish entering the information click on the “Install” button.
Now the WordPress installer will start installing WordPress. On finishing the installation, you receive a success message along with your username and password.
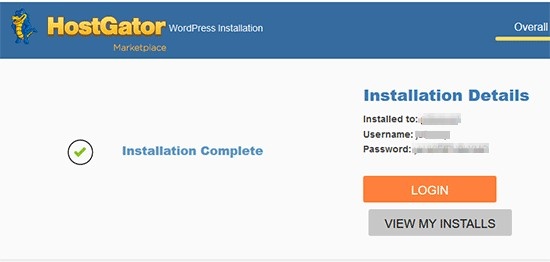
Click on the Login button to enter the WordPress admin area
How To Install WordPress Manually?
In this part, we learn how to install WordPress using FTP. We will be downloading WordPress to our computer and then manually installing WordPress to the hosting provider.
This manual installation of WordPress is also known as the famous 5-minute install.
You require an FTP client like Filezilla to transfer WordPress files.
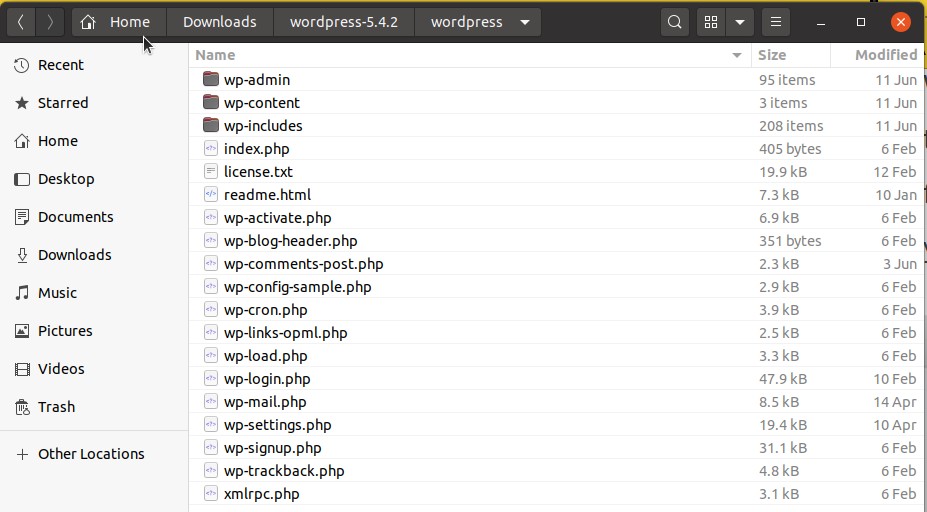
WordPress that you have downloaded from the wordpress.org site will be in zip format.
When you unzip the file you will get a WordPress folder containing all the installation files.
Transfer WordPress files using Filezilla
Now fire up your FTP client and connect it to your hosting provider. You will be prompted for the username and password of your hosting account.
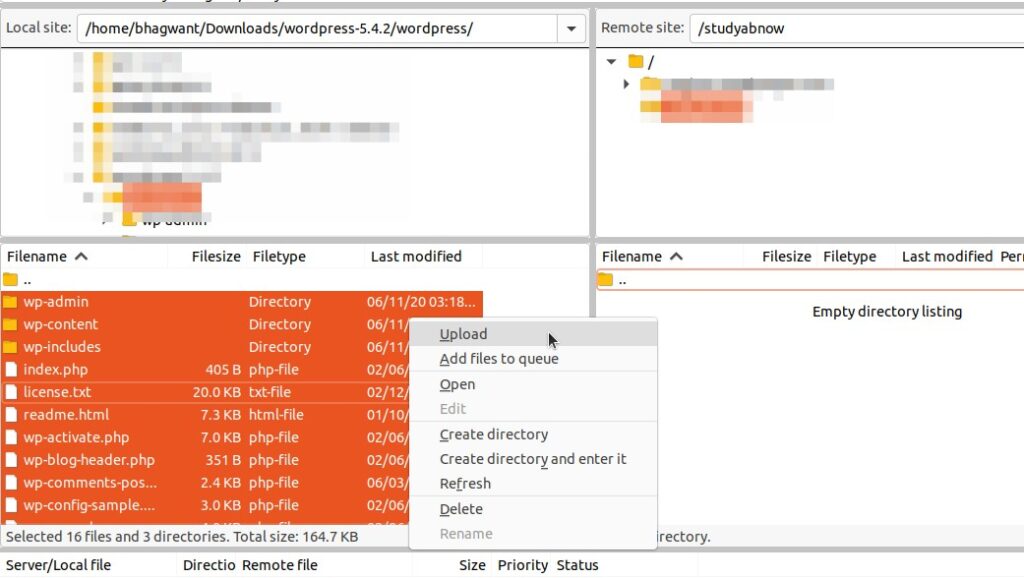
Select all the files in the WordPress folder from within the FTP client.
On the other side of the FTP client, you will have to select the folder on the hosting provider where you want to transfer the WordPress files.
Now right-click and select upload to start the upload to the root directory which is usually /public_html/ or any other custom path where you want to install WordPress
Create Database for WordPress
After transferring the files, log in to your hosting control panel and create a database for the WordPress installation.
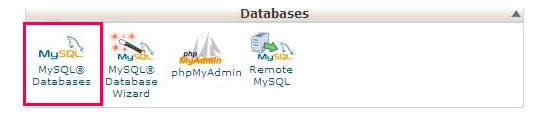
You have to look for MySQL databases options and click on the MySQL Databases icon
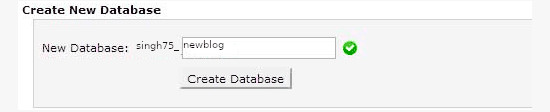
Next enter the name for your new database and click on the ‘Create Database’ button
This will create a database, you will have to create a username and password for the new database.
On the MySQL Databases page, if you scroll down a bit you will see a users section.
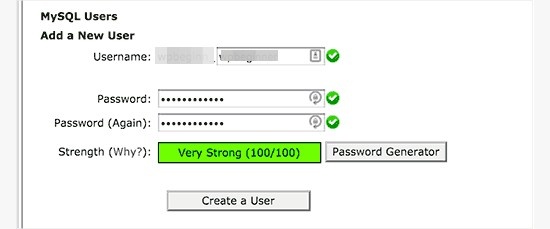
In this section, you can add your new username and password for the database. Click on the “Create a user” button.
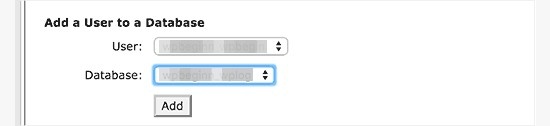
The new user will not have access to the database you have created. If you want to give them access to the database you have to add the user to the database and give the required permissions.
Further, scroll down the MySQL Database page, and you will see “Add a User to a Database page.
In the User and Database drop-down menu select the user and database and click on the “Add” button.
Next, you will be asked for the permissions you want to allow to the users. Select all the privileges and click on the Make changes button.
Note down the username and password for future reference.
Installing WordPress
In your browser type the URL where you have uploaded your WordPress files.
You will be greeted by WordPress with the languages page. Choose your language to complete the WordPress installation.
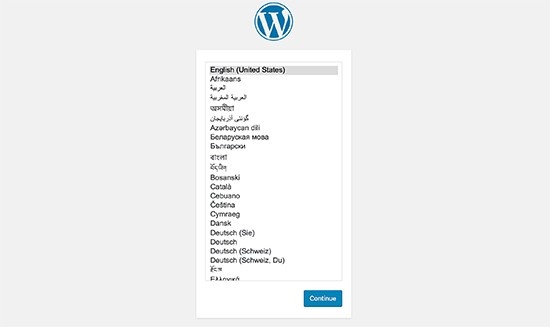
Then click on the continue button.
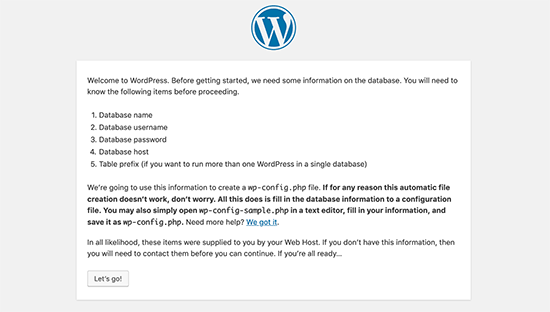
On the next page, you will get instructions for the things that are required for proceeding like database name, password and MySQL host information
Now click on the ‘Let’s go button.
A form will load prompting you to enter the database information that you have created earlier.
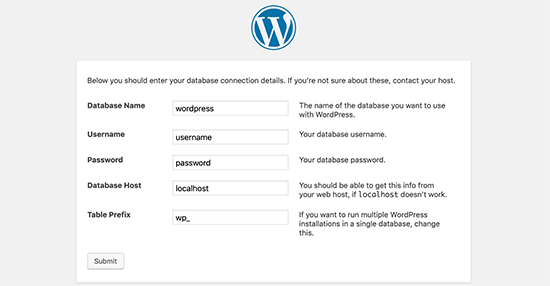
Fill up all the information and click on the ‘Submit” button. This will connect WordPress to the database and on completion of the same, you will get a success message.
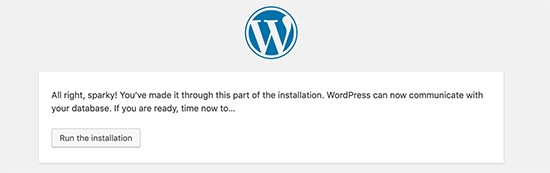
Next Click on the “Run the install” button.
On the next page, you have to provide the following information to WordPress for setting up your site
- Site Title
- Username
- Password
You should tick the checkbox showing Search Engine visibility as your site is still not ready for indexing by search engines.
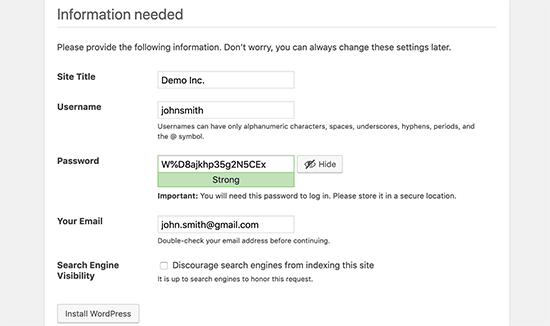
Click on the Install WordPress button.
After completion of the installation, you will see a success message.

You can click on the “Log in” button to log in to your WordPress admin area.
After Finishing WordPress Installation.
After you finish installing wordpress you will have to install plugins and themes.
Here is the link to my articles that will help you.
- 19 WordPress Settings After Installing WordPress
- How To Install WordPress Theme For Beginners?
- Install WordPress Plugins For Beginners?
- How To Backup WordPress For Beginners?
If you have enjoyed reading the post l would like to know your views.
![Read more about the article How to Install WordPress Plugins for Beginners? [2023]](https://startblogpro.com/wp-content/uploads/2022/09/install-wordpress-plugins-for-beginners-300x169.png)

Pingback: How To Choose The Best Blogging Platform? | StartBlogPro
Pingback: How to Transfer Your Domain to Another Registrar? | StartBlogPro