Are you struggling with how to add a Facebook pixel to a WordPress blog? Facebook pixel is a must for running Fb ads. It helps in optimising your ad campaigns.
Don’t worry you can easily install the Fb pixel. Even if you are a complete WordPress beginner.
In this article, we discuss the Fb Pixel and the two methods of installing the pixel to your WordPress blog.
These are the points that we cover:
What Is A Facebook Pixel?
Facebook Pixel is a tracking code generated within your Facebook account. We install this code in the header section of your blog or site.
This code monitors specific actions that visitor performs on your blog. This data is available to the advertiser in a useful format. The data helps in refining and optimising Facebook and Instagram advertising campaigns.
This data helps in segmenting the audience based on their actions. It also enables us to create custom audiences and lookalike audiences.
What Are The Benefits Of Facebook Pixel?
The benefits of the Fb pixel are manifold. You should install a Facebook pixel even if you have no plan to start Facebook paid advertising.
Install the pixel code. Turn on Automatic Events and it will start tracking the most important site actions. This data will help you in optimising your ads when you start Facebook Ads in future.
Some of the other benefits of installing a Fb Pixel are:
1. Create Custom Audiences
The pixel provides insights about the visitor actions on our blog or site. These insights help us in the creation of custom Facebook audiences.
You can use these insights for retargeting your blog audiences. The custom audiences may include:
- Visitors that sign-up on your blog.
- People that visited specific product pages.
- Visitors that added products to the cart.
2. Creating Lookalike Audiences
The custom audience data helps in the creation of the lookalike audiences. The lookalike audience shares all the characteristics with the source audience.
Facebook uses AI (Artificial Intelligence) to create an audience. This audience shares the characteristics of your target audience.
A lookalike audience helps in increasing your reach to your potential customers. You can target the lookalike audience and improve your conversions.
3. Tracking Conversions
The pixel code allows you to track your blog conversions. It also provides insights that help you in measuring key result areas. For e.g cost per conversions.
You can use this data and insights to track your conversions and measure the return on ad spend (ROAS).
4. Optimising conversions
The Fb Pixel helps you in targeting the audiences that are most likely to convert. The Facebook algorithm shows ads to your target audience. This helps in driving you the most conversions.
Thus, it helps in optimising your convention and driving most sales for you.
5. Maximises Your Return on Ad Spend (ROAS)
Facebook targets your most profitable customers. You can even create a lookalike audience of these type of customers.
It also retargets the visitors that abandon the cart or didn’t complete the sale. The dynamic products ads retarget the visitors with the ads. The ad shows the product that they have abandoned.
How Does The Facebook Pixel Work?
The Facebook Pixel working is the same as that of Google Analytics. The Fb pixel is an invisible 1 X 1 image. The javascript code helps us in embedding this image into our blog.
When a visitor visits your blog and takes a specific action. This image gets downloaded to the visitor’s device.
Facebook tracks who, when, where and how many times this 1 X 1 image is downloaded. It also identifies the browser, operating system, type of device and the IP address of the device.
Facebook associates an account to a specific Facebook ID. The Facebook ID is mapped to a specific downloaded image. It enables Facebook to collect data on visitors’ actions on your blog.
With this Facebook is able to show targeted ads and even retarget the blog visitors.
Different Methods To Add Facebook Pixel to WordPress Blog?
How to install Facebook Pixel to the WordPress site? You can add it using two methods.
- Manual Method
- Using WordPress Plugin
You can use either of the methods to add the Pixel to your blog. There are some basic steps you must ensure before adding the Fb Pixel.
First, you need to have a Facebook business account. Sign up at https://business.facebook.com and sign in to your account and create a Facebook page. A Facebook page is a must for running your ads.
Let’s start by creating and copying the pixel. You can create one per Facebook Ads account.
How To Create A Facebook Pixel
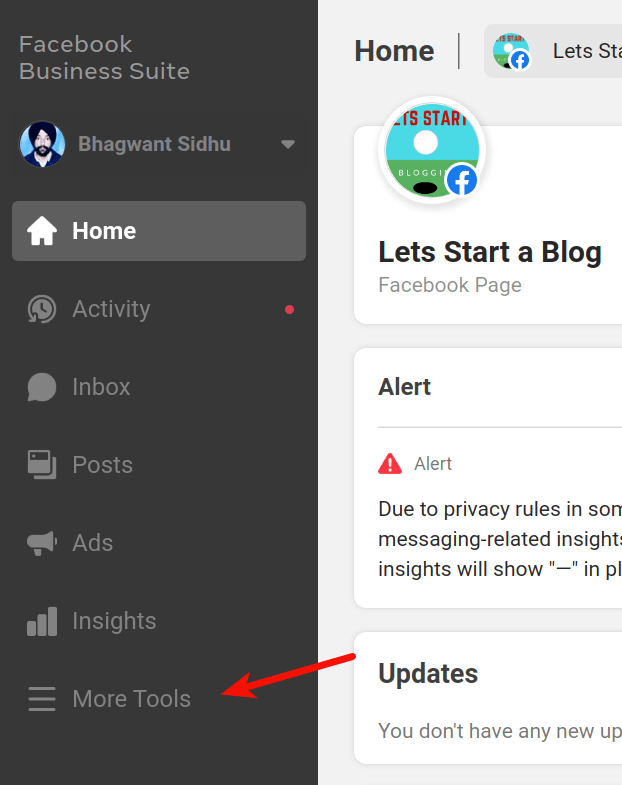
Log in to the Facebook Business Suite Dashboard
Click on More Tools on the left-hand sidebar.
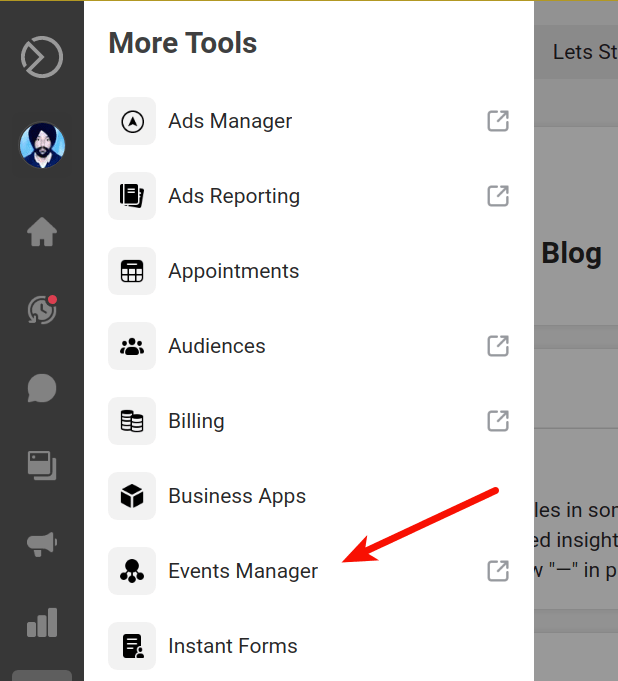
From the pop-up bar click on Events Manager.
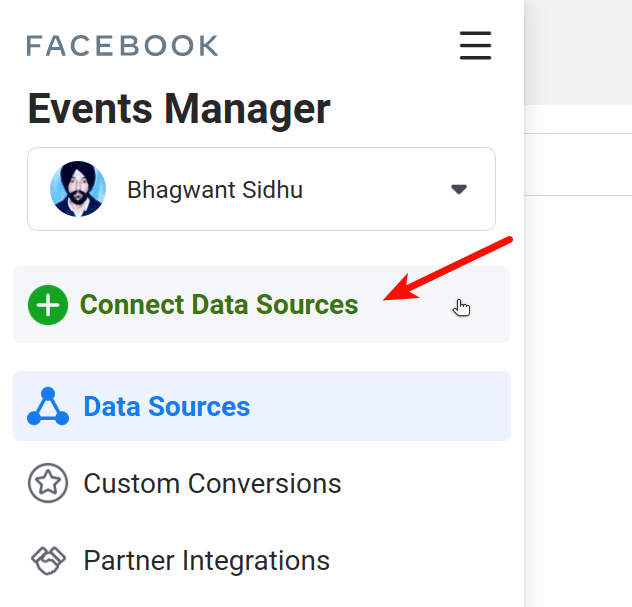
On the Facebook Events Manager Dashboard, click on the Connect to Data Sources.
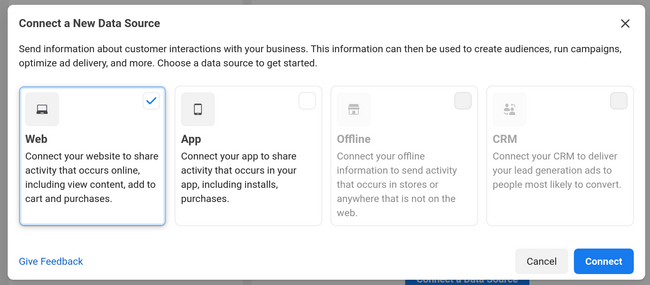
Select Web in the pop-up dialogue box and click on Get Started button.
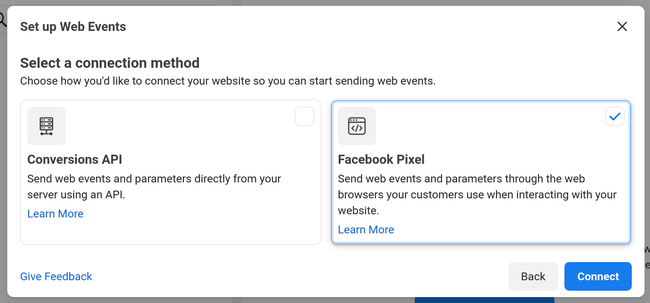
In the next window, select Facebook Pixel, and click on the Connect button.
Enter the name of your pixel and the URL of the site you want to add the pixel. When choosing the name remember you get one pixel per ad account.
The name should represent your blog or business and not a campaign. You can generate more than one pixel per ad account using Facebook Business Manager
Click on the Continue button.
To collect visitor data from your blog, we need to install Fb pixel code on your blog or website.
Here you can choose to add Facebook Pixel code manually or using a WordPress Plugin. We will cover both methods.
Let’s start with the manual method of connecting the Fb pixel code to WordPress.
How To Add Facebook Pixel to WordPress Manually?
To add a Fb pixel to WordPress without using a plugin. We need to continue from where we left in How To Create A Facebook Pixel. Click on the Install code manually button on the dialogue box.
Use a partner button is for WordPress and other types of web platform integrations
In the next window, click on the green Copy Code button.
You have to paste the pixel code into the header code of your website, above the </head> HTML tag. Click Continue on the copy code dialogue box.
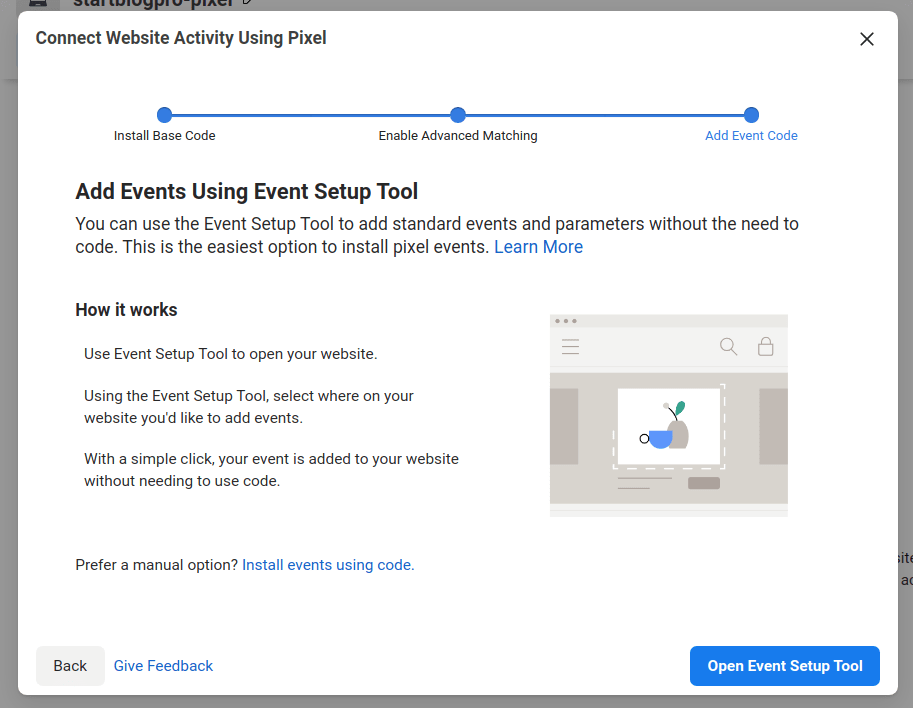
Turn on Automatic Advanced Matching in the next window. It will track visitors with greater accuracy and create better custom audiences.
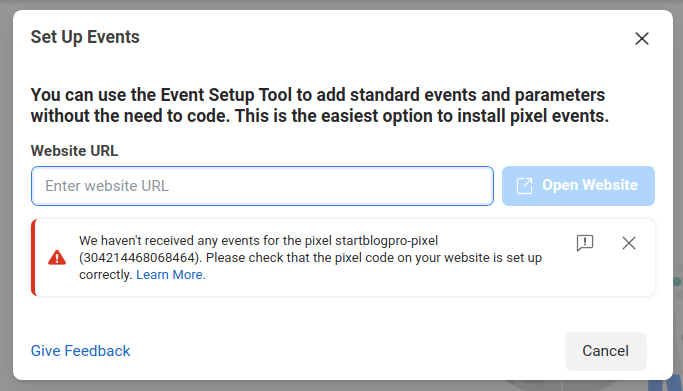
Click on Continue. On the next dialogue box Click on the Open Event Setup Tool button.
On the next screen enter your blog URL and click on Open website to add the events.
This completes the installation of Fb Pixel on your blog. If you are a beginner you can install the pixel code using a WordPress Plugin
How To Add Facebook Pixel to WordPress using Plugin?
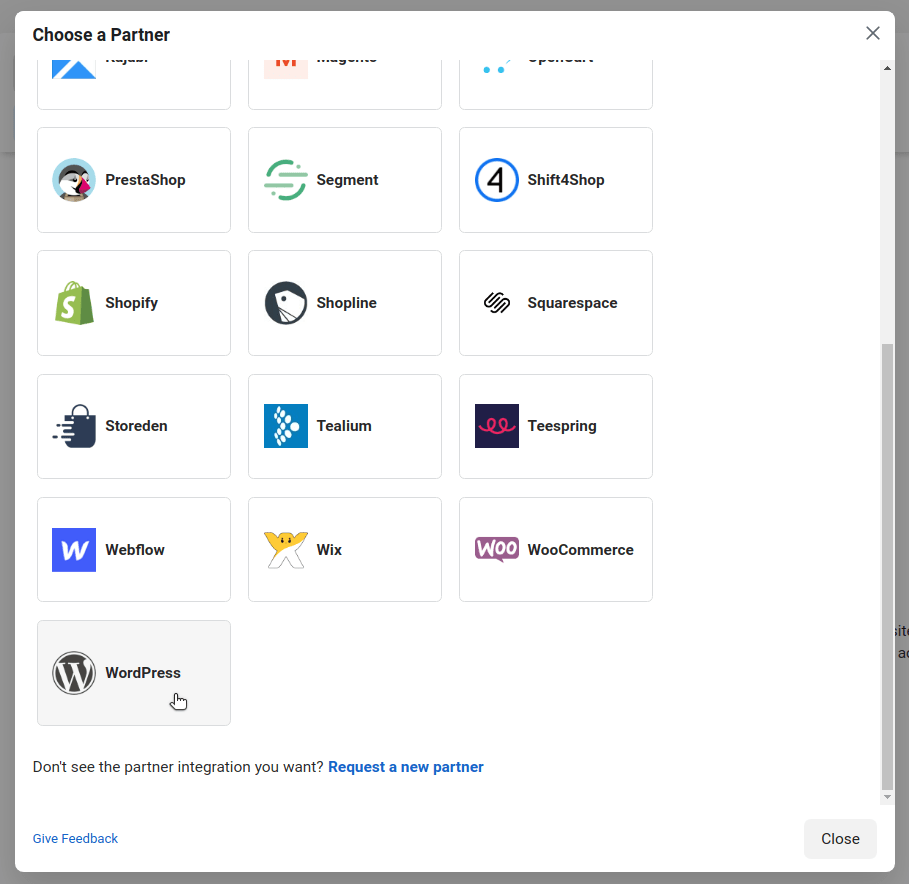
To add Fb Pixel to WordPress using a plugin. Click on the Use a partner button. If you directly landed on this section. Go back and follow the steps in How To Create A Facebook Pixel.
We now continue from the section of creating a Facebook Pixel.
Select WordPress on the next window.
Now, you need to install the Facebook for WordPress plugin. You will see the steps to install the plugin below.
Click on next and Continue with the steps in the image below for connecting Facebook and WordPress.
Next, verify your pixel is working by entering the URL of the WordPress site. The site should be the one you installed the plugin to. Click on Send Test Traffic.
The Send Test Traffic section will change into Active.
Congratulation you have installed Fb Pixel on your blog.
How To Check Facebook Pixel Is Working?
To check Fb Pixel is working. Install the Facebook Pixel Helper Google Chrome extension from the Chrome store.
Now, navigate to the page you need to test for Fb pixel installation. Click on the Facebook Pixel Helper extension icon on the Chrome toolbar.
If the pixel is present on the page, it will show you the pixel related information like the Facebook Pixel ID. Otherwise, it will give you a warning that the pixel is not available.
6 Best Facebook Pixel Plugins For WordPress.
One of the easiest ways to add Facebook Pixel to a WordPress site is using the WordPress Plugin.
If you don’t want to install the Facebook for WordPress plugin. Here are the other best Facebook Pixel Plugins alternatives for WordPress.
1. Insert Header and Footers
Insert Headers and Footers makes it a breeze to insert any type of scripts into the header or footer of your WordPress blog.
2. PixelYourSite
PixelYourSite enables one-click install of Fb pixel code on all the pages. It is useful in setting up custom or standard events.
3. WP Facebook Pixel
WP Facebook Pixel adds a meta box to each of the post or pages. This enables you to add events to specific pages.
4. Pixel Caffeine
Pixel Caffeine installs the pixel code to all your pages and posts. You can create custom audiences on the basis of many different parameters. For e.g, specific or referring URLs etc.
5. Facebook Conversion Pixel
Facebook Conversion Pixel is another useful plugins. You can insert Fb pixel code into specific posts and pages. There is an option to disable the code on pages/posts as per need.
6. Facebook Pixel and Meta Tag Manager for WordPress
Facebook Pixel and Meta Tag Manager for WordPress is a premium Fb pixel plugin. It has basic to advance pixel integrations. It also helps you manage the Facebook shared links metadata.
Conclusion
Facebook Pixel is a very useful tool. Even if you are not thinking of paid traffic you should install the pixel. It provides you with valuable data related to your target audience.
This data will come in handy when you start the paid Facebook advertising. It will also help you in creating custom audiences and lookalike audiences.
You can add the Facebook pixel to your WordPress site in two ways.
Manual Method includes copy and pasting code.
Using a WordPress Plugin.
If you are a beginner use WordPress plugins to install the Facebook pixel.
Finally, You need to test the Facebook pixel installation. You can use the Facebook pixel helper chrome extension.

![Read more about the article How To Install a WordPress Theme For Beginners [2023]](https://startblogpro.com/wp-content/uploads/2022/09/How-to-install-wordpress-theme-300x169.png)