Do you know how to set up Cloudflare for WordPress?
Most bloggers think setting up Cloudflare is hard. But let me assure you that it is quite straightforward. Stay with me to the end and follow the steps. I’ll make it a breeze for you.
In this step-by-step article, we discuss how to set up Cloudflare for WordPress. We also cover installing the Cloudflare WordPress plugin.
It is one of the best WordPress CDNs and firewalls for WordPress. For installing WordPress check how to install WordPress for beginners?
What is Cloudflare CDN?: Working Explained
WordPress is one of the best blogging platforms. A Content Delivery Network enhances WordPress for speed and performance.
A Content Delivery Network or CDN is a network of globally distributed proxy servers. It helps in serving web pages to the user from a server that is closer to his geographical location.
The web hosts serve the web pages to the users from a single location. The visitors farther from the server location will observe delays in website loading.
A CDN has many edge servers spread across the world. These servers fetch and store the static content of your website. Moreover, static content like website images, videos, JavaScript, and CSS files seldom change.
When a user requests a web page, the CDN server closer to the user’s location will serve it. This results in faster website loading speed irrespective of the geographical location.
Check out the ultimate guide to WordPress Speed Optimization.
Cloudflare free CDN also offers many extra features and functions.
What are the Benefits of Cloudflare for WordPress?
The benefits of Cloudflare for WordPress are:
Free SSL Certificate
Are you looking for a free SSL certificate? You can easily get a free SSL certificate for the WordPress site. SSL for WordPress secures your site data transfer between your site and the site users. Users and search engines trust sites with SSL certificates.
Maximises Website Uptime
Although most web hosting services have 99.99% uptime. Using a CDN like Cloudflare takes care of the 0.01% downtime. During this time it will serve the cached version of your site from the CDN servers.
Faster Page Load Speeds
Cloudflare boosts web page loading speed by more than 60%. It uses a technique called Argo Smart Routing to find the shortest path to the nearest CDN server. Speed improvements result in a better user experience. Which results in higher clicks and sales.
Inbuilt Firewall
Cloudflare has an inbuilt firewall. The web application firewall (WAF) blocks unauthorised web applications. It also blocks malicious traffic from the black-listed IP addresses. The inbuilt rulesets protect against WordPress vulnerabilities and threats.
Protection From Denial-of-service (DDOS) Attacks
Denial of Service (DDoS) attacks flood the server with more requests than it can handle. This makes the server unresponsive and users are unable to access it. Cloudflare safeguards your site from DDoS attacks.
Optimization of Images
It minimises the size of the image using lossless and lossy compression. Polish reduces the image size by removing unnecessary data. For e.g camera manufacturer and other image details. It also enables users to save images in WebP format. This format uses less storage space than JPEG and PNG formats.
Improves Search Engine Optimization (SEO)
Optimization of images and static files results in faster loading of your site. Resulting in more incoming traffic. Search engines like Google love fast-loading sites. It ranks them higher in search engine result pages or SERPs.
Automatic Platform Optimization
The Automatic Platform Optimization (APO) caches the dynamic content. It updates the content whenever there is a change in the content. It improves the Time to First Byte (TTFB) by 72% and the Largest Contentful Paint (LCP) by at least 23%. APO ensures serving your entire WordPress data through its edge network.
Automatic Cache Purge With Website Updates
Cloudflare’s WordPress plugin purges the cache whenever you make changes to your site. Your visitor always gets fresh content.
Apart from the benefits above, Cloudflare has the fastest domain name server. It also offers load balancing to optimize performance and availability. It helps in the streaming of high-quality videos.
Fixes Mixed Content Using Automatic HTTPS Rewrites
Mixed content occurs when a site serves pages over a secure HTTPS connection. Then it loads other resources using an insecure HTTPS connection. Other resources are images, videos, stylesheets and scripts. It forces automatic HTTPS rewrites. It serves all resources using a secure connection.
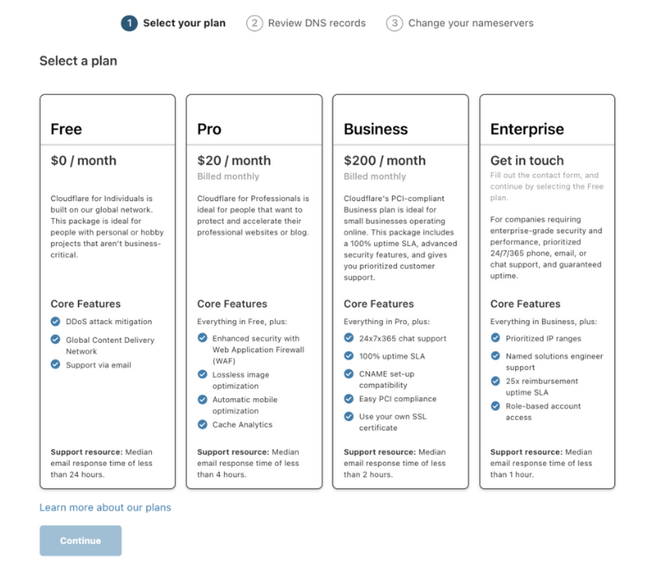
What are Cloudflare Pricing and Plans?
Cloudflare pricing has four plans Free, Pro, Business and Enterprise.
The free version comes with basic features. These features are enough for a personal blog or website.
Business and Enterprise plans are for businesses. These plans have a wide range of features. You can select the plan based on your website requirements.
Free Plan
- Basic plan
- Unmetered DDoS Attacks Protection
- Access to Global CDN, and Shared SSL certifications.
- 3-page rules to configure specific pages.
- No limit on bandwidth / Number of users
Pro Plan
- $20/month per website
- An extra feature to the free plan
- Application Firewall (WAF)
- Access to image optimization tool – Polish.
- Mobile Acceleration tool – Mirage
- 20-page rules to configure specific pages.
- “I’m Under Attack” Mode – Dedicated DDoS protection.
Business Plan
- $200/month per website
- Access to all the features and functionalities.
- Railgun for accelerated delivery of dynamic content.
- 50-page rules for specific pages.
- Dedicated option to bypass Cache on Cookies.
Enterprise Plan
- No Limitation access to all the Cloudflare features.
- Customised pack for maximising performance.
- No preset price you need to ask for a quote.
How to Setup Cloudflare for WordPress Blog?
To set up Cloudflare for a WordPress blog. You can use one of the two methods.
- Single-Click Cloudflare setup
- Manual Setup Of Cloudflare CDN
The single-click method is the easiest way to set up Cloudflare CDN on your WordPress blog.
A few leading WordPress hosting companies tied up with Cloudflare. They offer an easy way to set up Cloudflare from within their hosting control panel. For example Bluehost, Siteground and Hostinger.
If your WordPress host is not offering a single-click setup. You can install it using the manual method. Let’s set up single-click Cloudflare integration with Hostinger.
One-click Setup of CloudFlare in Hostinger
Login to the hPanel of your Hostinger account.
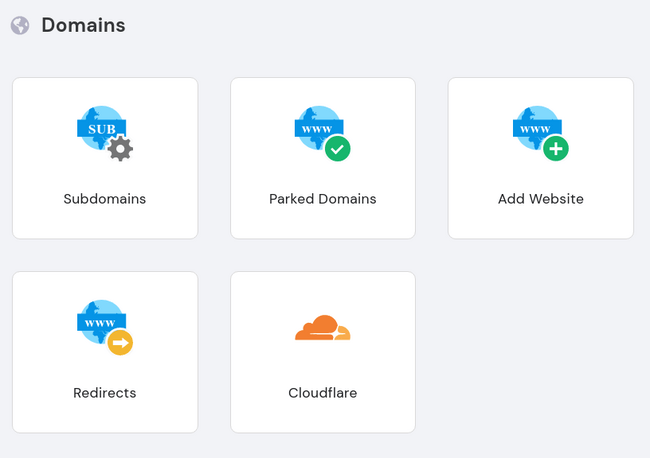
Navigate to the Domains sections and click on the Cloudflare option.
The Cloudflare for WordPress page will load.
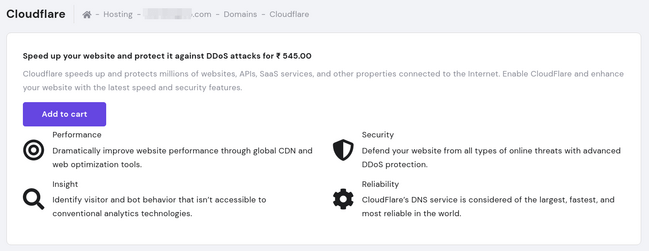
After completing the purchase, click Set up
Under the Cloudflare Control section, Change the Service status to Green tick. Then select Full from the drop-down menu for SSL / Encrypt communication. Now your site has end-to-end data protection.
You can also encrypt the subdomains if applicable.
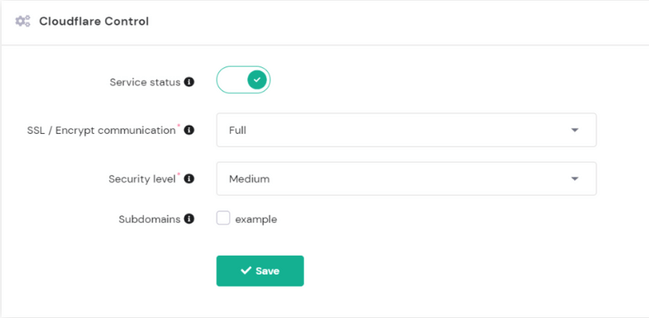
Click to Save the information.
Now, you can manage your Cloudflare settings through hPanel.
Manual Setup of Cloudflare for WordPress
You can manually set up Cloudflare on WordPress. Here is the process we follow step by step.
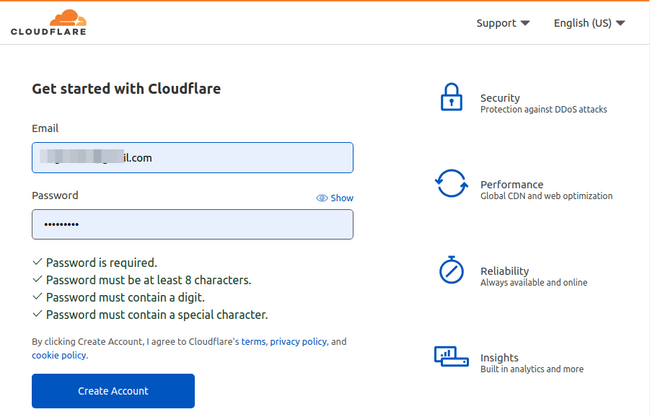
Create an Account with Cloudflare.
Create your Cloudflare Account by clicking Sign up on the homepage.
Enter your email address and password and click the Create Account button.
How to Add Your WordPress Site Domain Name to Cloudflare?
From your Cloudflare Dashboard. Click on the Add Site button.

Enter your WordPress site URL. You can add unlimited sites here even with the free plan.
Choose A Plan
On the next screen, you have to select the plan. You can go with a free plan for a blog or personal website. It has all the basic features for site protection including faster loading speed.
Check and Update your DNS Records
Next, you will see the DNS details of your domain name. Here you can disable or enable Cloudflare for specific domains or subdomains.

Toggle the orange cloud icon to activate or deactivate the domain.
You should enable Cloudflare for both WWW and non-WWW versions. Click on Continue to proceed to the next step.
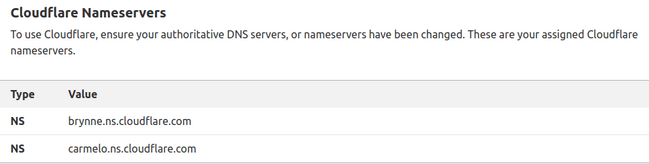
How to Point Your Domain Name to Cloudflare Nameservers?
On the next page, you will see Cloudflare nameservers. You have to replace old nameservers with Cloudflare nameservers.
- You can also access the nameservers from the Cloudflare dashboard by clicking on the DNS tab.
- From the DNS management section, copy the Cloudflare nameserver values.
- Now, open a new tab and log in to your domain name registrar’s site.
- Hostinger users can find the nameserver details in the domains tab.
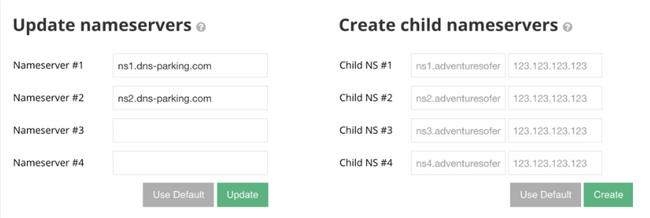
- Below Update nameservers section. Select and replace both values with the Cloudflare nameserver values. Press Save.
- Navigate to the Cloudflare page and click on the Done button.
- To check whether the nameserver update was successful. Check the DNS tab on the Cloudflare dashboard.
- Once the nameserver update is complete. You will get an email confirmation from Cloudflare. It may take up to 72 hours for DNS records to propagate worldwide.
The HTTPS Settings Configuration
Hypertext Transfer Protocol Secure (HTTPS) configuration protects your WordPress Site. You get protection from potential data leakage and data breaches. It secures all your website data using an SSL certificate.
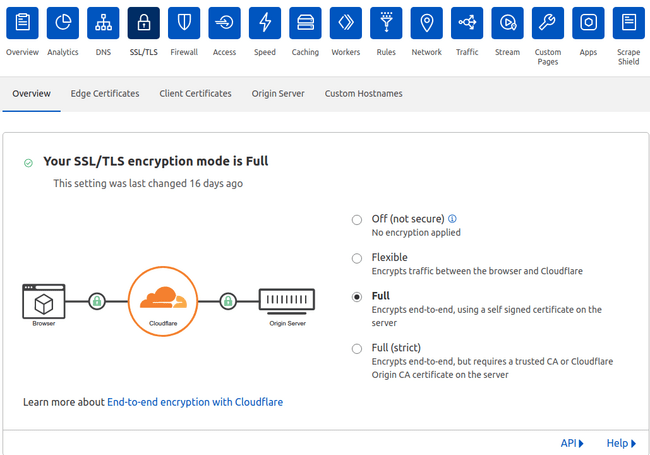
Steps for Setting up HTTPS:
From Cloudflare Dashboard visit the SSL tab. Select Full SSL for an existing SSL and Flexible SSL if you don’t have an SSL certificate.
- Full SSL gives end-to-end protection from the visitor’s server to your site.
- Flexible SSL protects data between Cloudflare and the WordPress site only.
Turn on Always Use HTTPS from the Edge Certificates section. The changes may take time to be visible. You will receive a confirmation message after the changes take effect.
A padlock icon near the website URL will confirm that HTTPS is active.
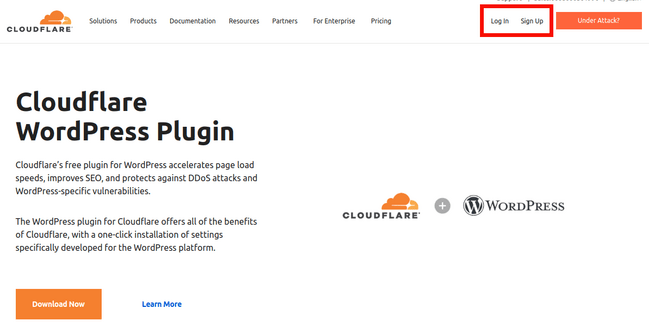
How to Install and Configure Cloudflare WordPress Plugin?
The Cloudflare WordPress plugin has a simple one-click install. You can install the plugin from within the WordPress admin area.
You can refer to the article on how to install WordPress plugins?
The plugins improve your SEO, accelerate page loading and prevent DDoS attacks.
To use the Cloudflare WordPress plugin you need to have a Cloudflare account. If you don’t have an account.
- Register your account at Cloudflare.
- Login to your WordPress Admin Area.
- Click on the Plugins >> Add new.
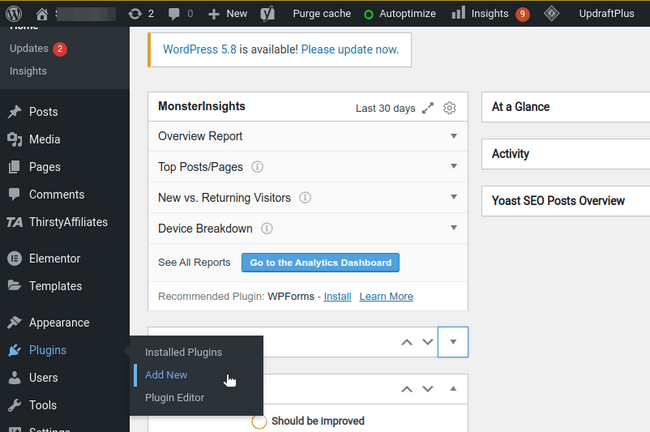
On the add new page. Using the search bar, search for Cloudflare.
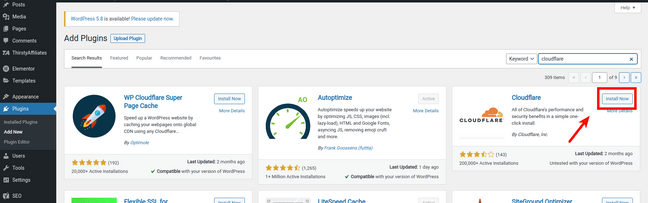
Click on the install and then the activate plugin button.
Check out the 10 must-have WordPress Plugins for bloggers.
How To Configure the Cloudflare WordPress Plugin?
After we finish installing the Cloudflare WordPress plugin. We have to configure the plugin settings.
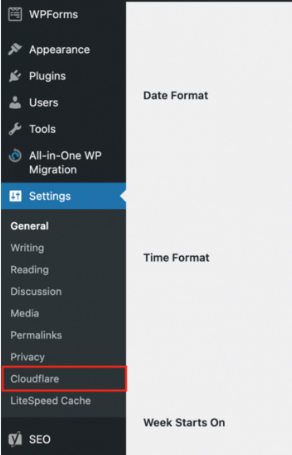
- Login to your WordPress Admin Area.
- From the left-hand menu. Click on Settings and then the Cloudflare plugin.
Cloudflare login page will load. You can register a new account if you haven’t at this stage.
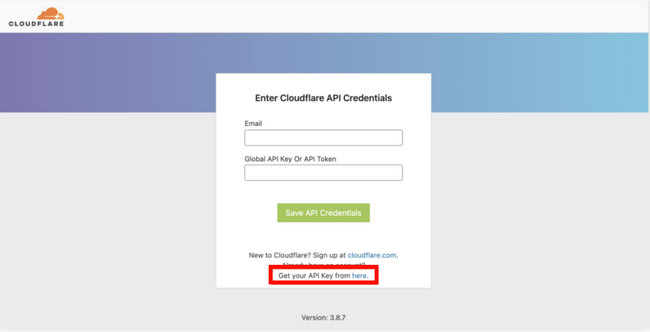
- Now enter your Cloudflare login credentials, including your email and Cloudflare API Key.
- Click the Save API Credentials.
How To Get Your Cloudflare API Key?
To get your Cloudflare API key, you need to log in to your Cloudflare account.
After logging in, click on your account icon in the top-right of your account page.

- From the drop-down menu, click on My Profile.
- On the My Profile page, click on the API tokens tab.

Under API keys sections, Click on View next to the Global API Key. It will ask you to enter your password again.
Copy these API key values and paste them into the plugin’s settings in the WordPress admin area.
How To Optimize Cloudflare Settings in WordPress?
We can optimize Cloudflare for WordPress using the Cloudflare WordPress plugin.
On the plugin home page in your WordPress Admin Area. Click on the ‘Apply’ button next to ‘Optimize Cloudflare for WordPress’
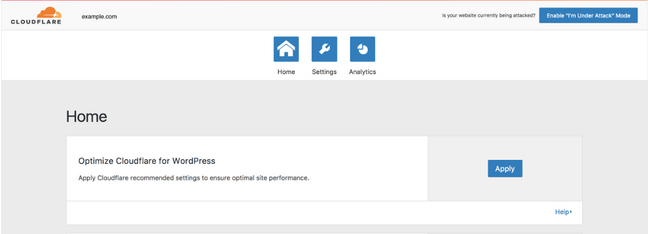
That’s all you have to do to optimize your WordPress.
Conclusion
Cloudflare is one of the best Content Delivery Networks (CDN). It boosts site speed along with other advanced security and performance features.
You can start with Cloudflare for WordPress for free. The easiest way to set up is using the Cloudflare for WordPress plugin. You can secure WordPress with Cloudflare CDN in a few clicks.
What are you waiting for? If you are clear on how to set up Cloudflare for the WordPress blog. Do it immediately and let me know of your experience.
I would love to hear from you. If you are stuck let me know. I will be happy to help you.
![Read more about the article How to Create a WordPress Sitemap for Beginners [2023]](https://startblogpro.com/wp-content/uploads/2022/09/how-to-create-a-wordpress-sitemap-300x169.png)