Want to build a website with no coding knowledge? I have good news. You don’t have to be a developer or have a background in web design, to build a WordPress website,
In this article, you’ll learn to create a beautiful and professional-looking WordPress website in an hour. WordPress allows you to create any type of website. E.g, blog, portfolio site, or e-commerce store.
You’ll also find tips and tricks to improve your website’s user experience and boost conversions.
What is WordPress?
WordPress is a free, and open-source content management system (CMS). It allows you to build various types of websites with no coding experience.
It is a flexible and user-friendly platform. You can publish content without worrying about the technical aspects of web design.
There are a ton of WordPress themes for enhancing website design. A huge directory of WordPress plugins to extend the functionality of the website.
Before we create a WordPress website, let’s go through WordPress benefits
Why Choose WordPress to Create a Website?
Often beginners make a mistake while choosing a website platform. They pick an expensive website platform and burn their pockets. Some of these platforms have a steep learning curve with a lot of technical jargon.
Thus, we recommend a self-hosted WordPress.org site. Here are some benefits of choosing the WordPress platform.
- Open-source platform.
- Free Platform.
- Lots of Themes and Plugins.
- SEO optimized.
- Flexible and Adaptability.
- User-friendly.
- Allows the creation of various types of websites.
WordPress is one of the best CMS. Aren’t there two types of WordPress platforms?
WordPress.org and WordPress.com.
Let’s find the differences between these two platforms. Which one should we choose for building our website?
WordPress.org vs WordPress.com – Which is best?
The major difference between WordPress.com and WordPress.org is hosting.
WordPress.com hosts your website on its servers. You don’t have to buy hosting, manage a server or download website software. WordPress.com provides a sub-domain to host your site. The website URL is
www.yoursitename.wordpress.com
But you can buy a domain and point your website to this custom domain. So your website URL is like
www.yourwebsite.com
WordPress.org hosts WordPress website software. You must buy a domain name and web hosting from a third-party hosting provider. Then, download the WordPress software from WordPress.org and install WordPress on the web host.
So, which one should you use for your site WordPress.org or WordPress.com?
WordPress.org
WordPress.org provides full control of a website. You can download the WordPress software for free. But you pay for the domain name and web hosting.
With more power comes more responsibility. You have to upload and install themes and plugins. Manage your web space and website security.
WordPress.com
WordPress.com provides you domain name and hosting. You don’t have to worry about server maintenance and security. The level of website customization depends upon the plan you choose.
It has free and paid plans. You can start with a free plan. The free plan comes with a sub-domain. Your site URL will look like www.yourwebsitename.WordPress.com. The free plan doesn’t allow you to upload and install custom themes and plugins.
Upgrade the plan for more features and functionalities.
Requirements to Build a WordPress Website
The requirements to build a WordPress Website are:
For a Self-hosted WordPress Website (WordPress.org).
- A domain name – The domain name is the address of your WordPress website on the internet. For example, www.startblogpro.com.
- Web hosting – Hosting means server space. It holds WordPress CMS along with your website content like text, images, and videos.
- An hour of free time – You need to install WordPress on your web host and set up WordPress themes and plugins.
For a WordPress-hosted website (WordPress.com)
- Create an account – Sign up for a WordPress.com account.
- Select a plan – A free plan starts with the WordPress sub-domain. You need to upgrade for more control and customisations.
How Much Does it Cost to Build a WordPress Website?
The cost of creating a WordPress website varies on the type of website you want to build. The cost of a basic WordPress website can start from $25 to $100. You should start with a low-cost WordPress website and upgrade as your business grows.
This way you can minimise losses and prevent overspending on your website. Let’s go through the basic WordPress plans for both WordPress.org and WordPress.com.
For a Self-hosted WordPress Website (WordPress.org).
- Domain name – $12 per year.
- Web Hosting – From $2.95 to $15 monthly.
- WordPress Themes – $0 to $200 one time
- WordPress Plugins – $0 to $1000 one-time or recurring.
For a WordPress-hosted Website (WordPress.com).
- Free Plan – $0
- Personal Plan – $4 per month, billed annually.
- Premium Plan – $8 per month, billed annually.
- Business Plan – $25 per month, billed annually
- eCommerce Plan – $45 per month, billed annually
Besides the above, you buy premium WordPress themes and plugins.
How to Build a WordPress Website?
Let’s create a WordPress website.
Follow the steps in the tutorial to build a WordPress website. By the end of this tutorial, you’ll have a fully functional WordPress website.
If you feel stuck or need help while following this step-by-step tutorial. You can contact us and we will help you set up your WordPress website for free.
The steps differ for a WordPress.com website vs a WordPress.org website.
Create a WordPress Website with WordPress.com
For a WordPress.com website, start by signing up for a WordPress account.
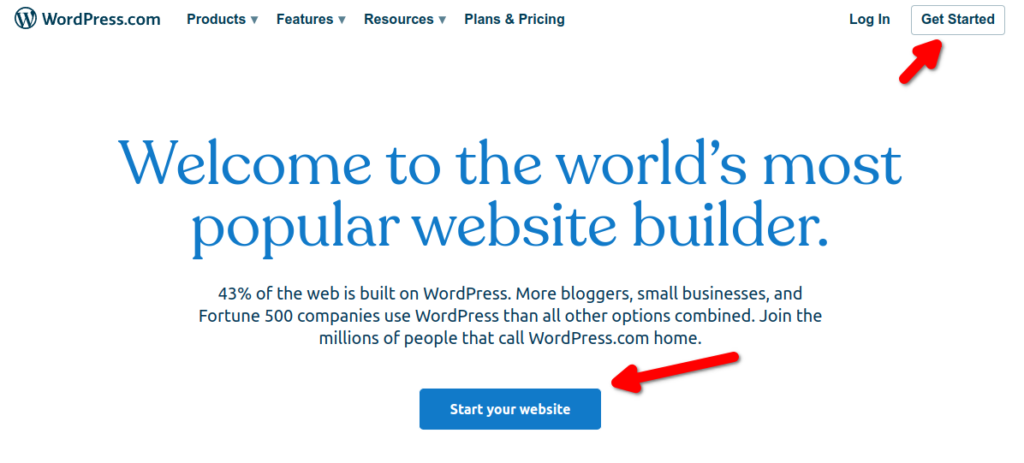
Next, choose a WordPress plan. Start with a free plan and upgrade the plan for more control and customization.
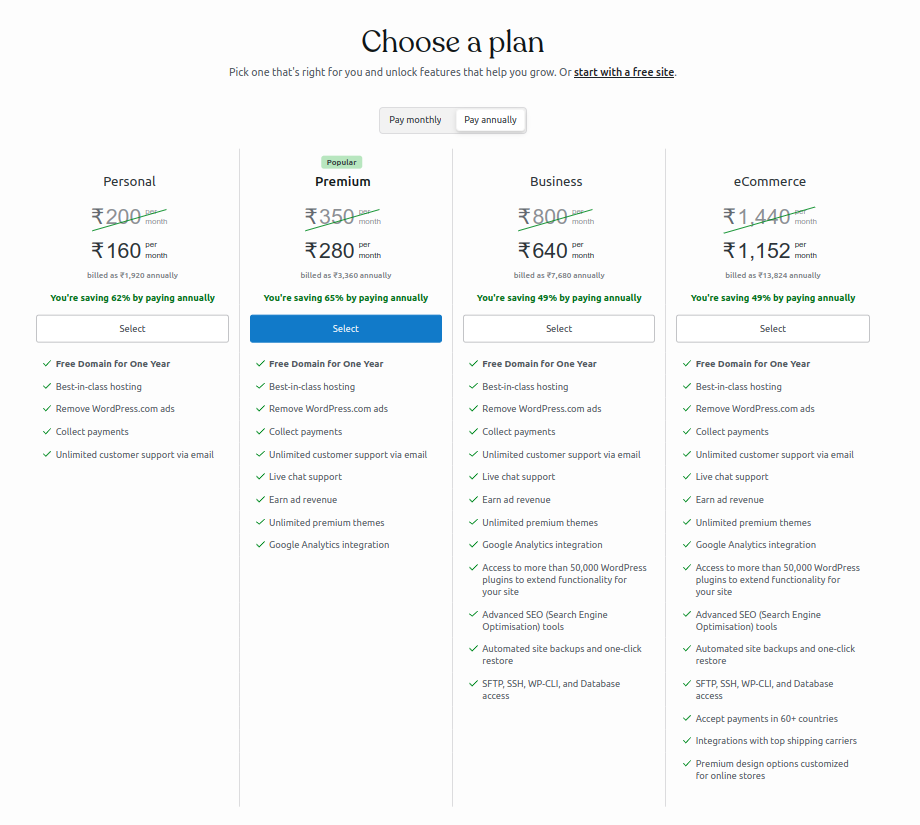
WordPress.com offers four paid plans with varying monthly fees and functionalities.
Create a WordPress Website with WordPress.org
Although the WordPress software for a self-hosted website is free. To build a WordPress.org website, you need to buy a domain name and WordPress hosting service.
Choose a Domain Name
The domain name is the address of a website on the internet. Visitors enter this address in the address bar of a browser to access a website.
How to Choose a Domain Name?
- Choose a short name that is easy to memorise.
- Avoid a name that is difficult to spell or pronounce
- Always prefer the .com name
- Avoid numbers and symbols
- Include niche keywords.
You can use domain name generators like Domain Wheel. Enter a seed keyword and click on the Search Domain button. It will suggest to you a lot of potential domain name candidates.
Read out article on how to choose the best domain registrars.
Select WordPress Web Hosting
Web hosting service hosts your website file. It gives you storage space for hosting WordPress files, videos, images, and text files.
- Shared Hosting – A shared web hosting one web server is shared by multiple websites. It offers the cheapest web hosting and is ideal for starting new sites.
- VPS Hosting – With virtual private server (VPS) hosting you get dedicated server space and resources.
- Dedicated Hosting – With dedicated hosting, you get full rights to use the entire server for hosting.
A domain name will cost around $12 per year and hosting starts at $ 8 per month. You get a free domain and free SSL when you buy web hosting from Bluehost.
You can read the detailed blog post on how to choose the best WordPress hosting.
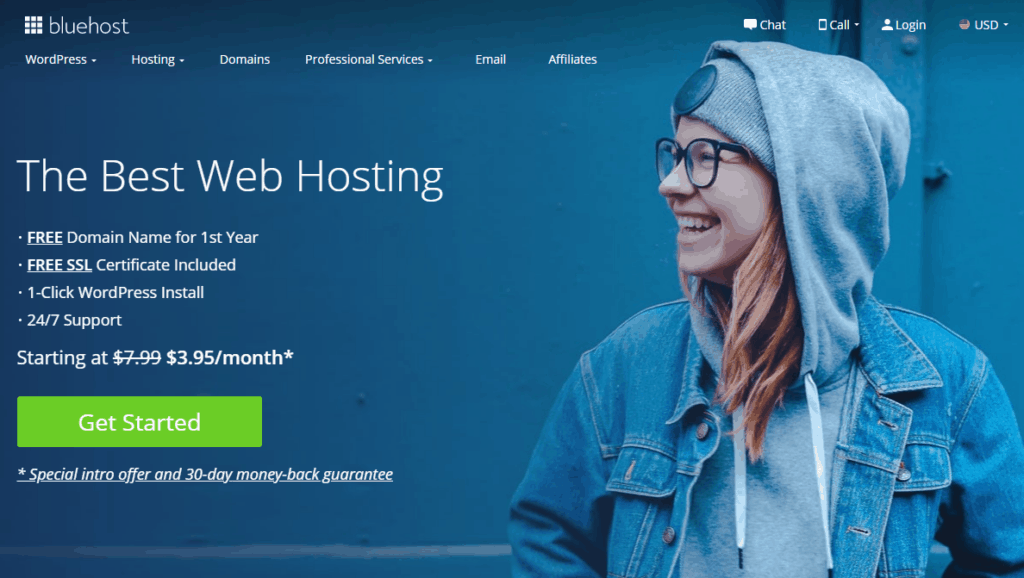
Why Choose Bluehost?
- It starts at $2.75 / month.
- Get a free domain name.
- WordPress.org recommended web hosting.
- Free SSL certificate
- Beginner-friendly and easy to use
- Best customer support.
Steps to Buying Bluehost Web Hosting
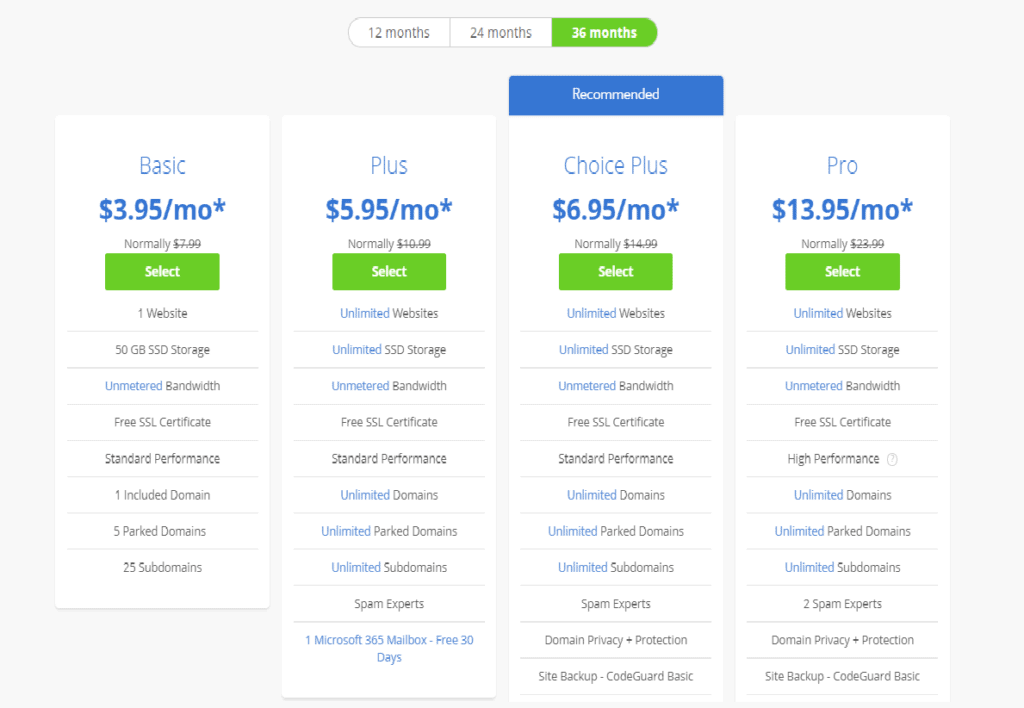
Visit Bluehost’s website and click on the Get Started button.
Select a hosting plan from Bluehost’s pricing page. You can go ahead with a basic or plus plan and continue to the next step.
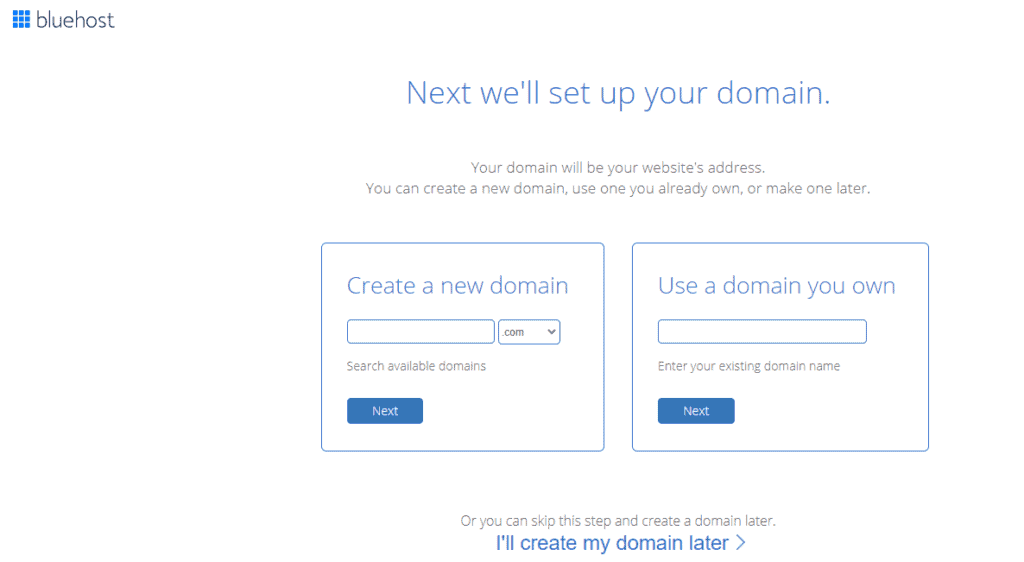
On the next page, sign up for a domain name. You can use a domain you already have or get a new one from here. After choosing the domain name, click on Next.
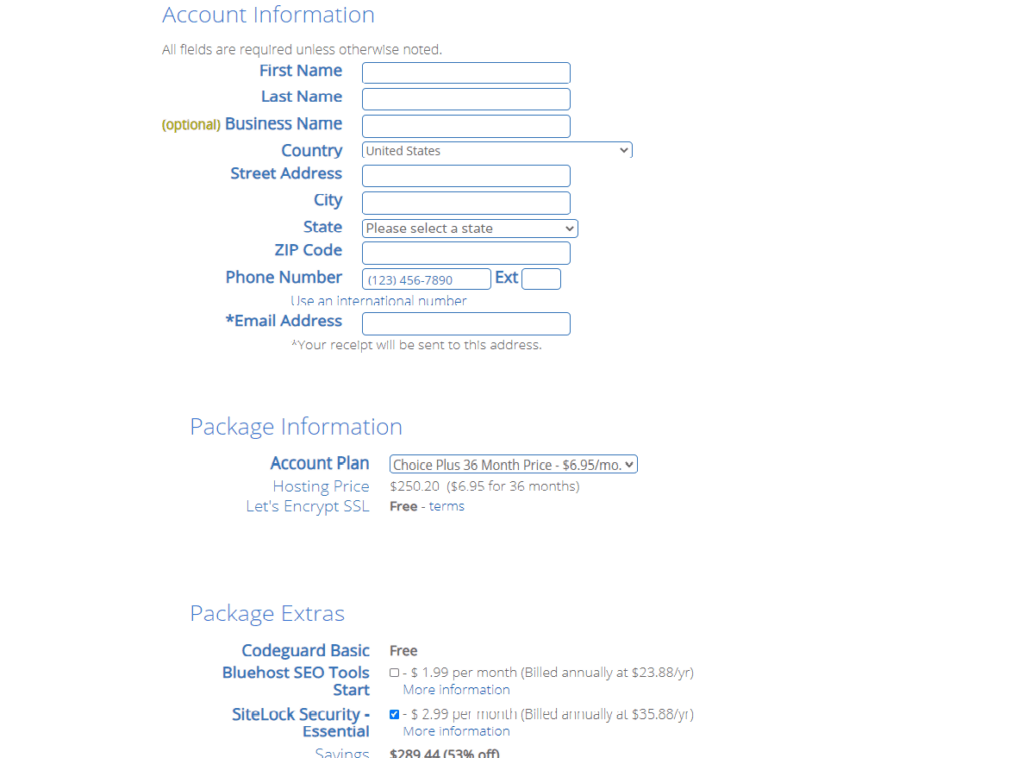
Now, Create an account by providing billing information to complete the purchase. Skip the optional extra offers at the bottom of the page.
Once you complete the purchase, you can access Bluehost’s hosting dashboard. If you cannot set up your site, contact us for free setup.
Install WordPress on Bluehost
Once you signup for Bluehost using our link. You get an automatic installation of WordPress done for you. One-click WordPress installer makes it a breeze to build a WordPress website. Even non-tech users can create a WordPress website easily.
To access your WordPress admin area. Log in to your Bluehost account or enter “yoursite.com/wp-admin” in your browser address bar.
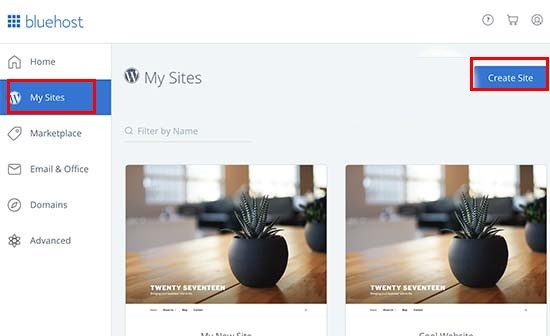
To Create Multiple WordPress Websites.
Login to your Bluehost account.
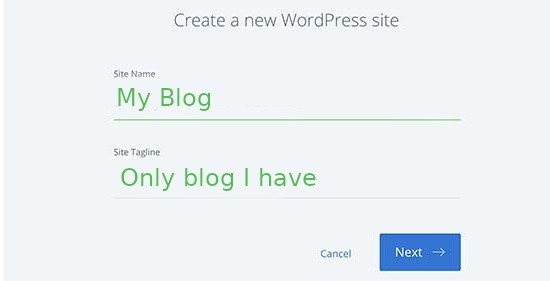
From the dashboard menu, click My Sites and then Create Site button.
Next, enter the Site Name and the Site Tagline. You can change this information.
On the next page, select the domain name using the Domain drop-down. You can also install Bluehost-recommended plugins.
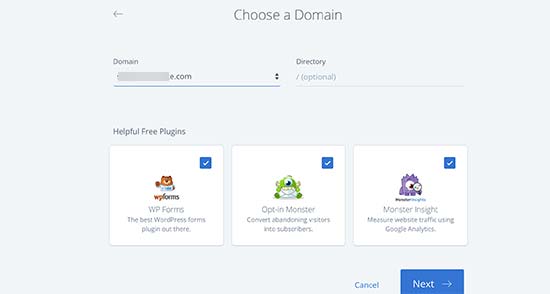
The one-click WordPress installer will install an additional website for you.

Click the Login to WordPress link, to open your new WordPress site.
After setting up WordPress, the next step is to enhance the visual appearance of our website. So, you need to choose and customize a WordPress theme for your site.
Let’s start by choosing a WordPress theme
Choose a WordPress Theme
A WordPress theme handles the visual appearance of your website. There are a ton of free and paid WordPress themes. You should choose a WordPress theme as per your website niche.
By default, WordPress installs a simple theme. You can change or customize this WordPress theme as per your taste.
To Install a Free WordPress Theme.
Login to your WordPress admin area
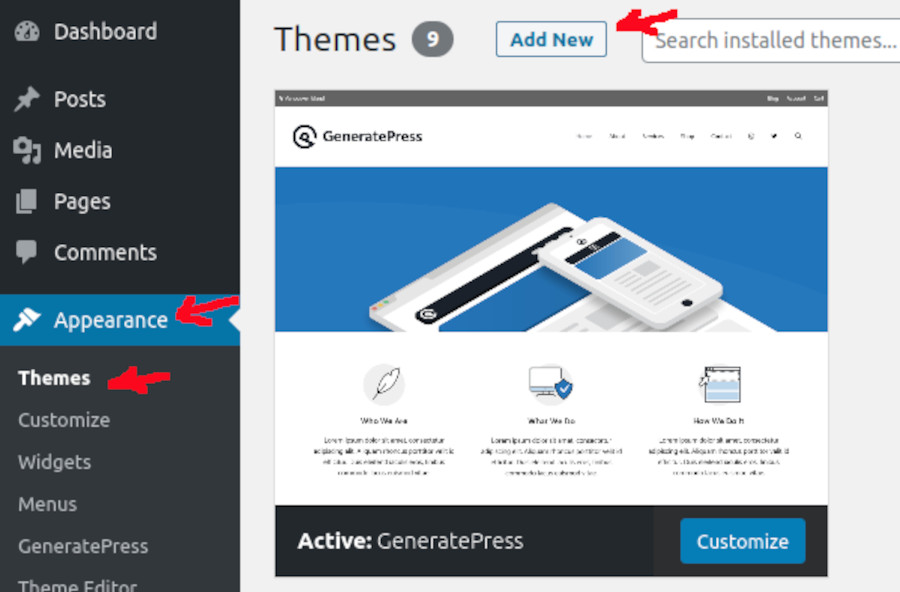
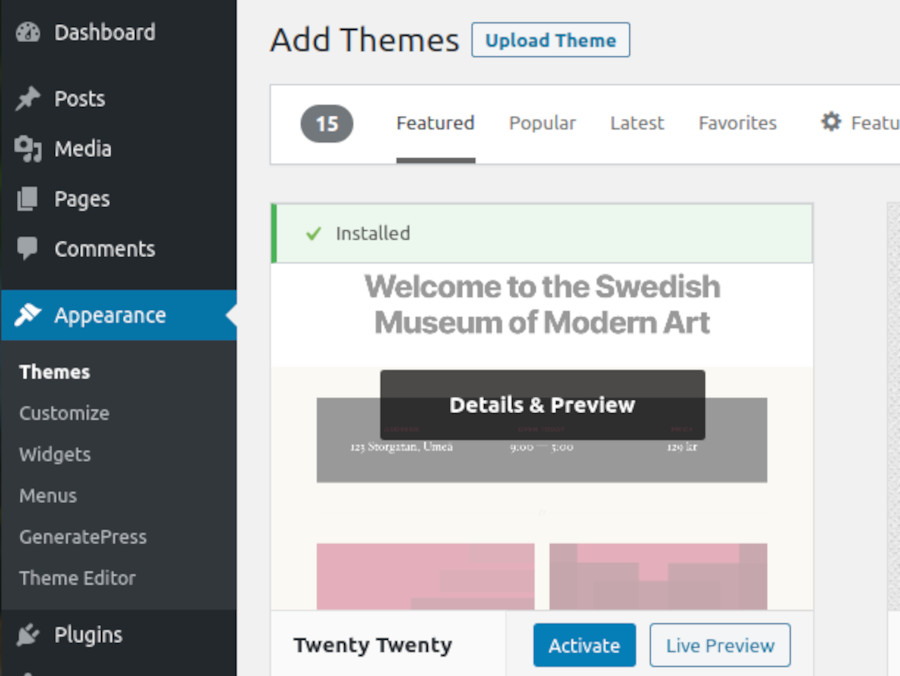
From the WordPress menu, click Appearance > Themes.
Browse or search for a WordPress theme using various filters or the search bar.
The WordPress theme filters include.
- Featured – Themes featured on WordPress
- Popular – The popular themes
- Latest – New WordPress themes
- Favorites – Themes you added to favourites
- Feature Filter – Filter a WordPress theme using a criteria
- Search themes bar – Search WordPress theme using a keyword
Install the WordPress theme and activate it. You can customize the theme further using the theme customizer.
Apart from the free WordPress themes. There are customized premium WordPress themes from third-party vendors. We recommend Generatepress, Astra or Divi WordPress themes.
To Install a Premium WordPress Theme.
Login to the WordPress admin area
From the WordPress menu, click Appearance > Themes.
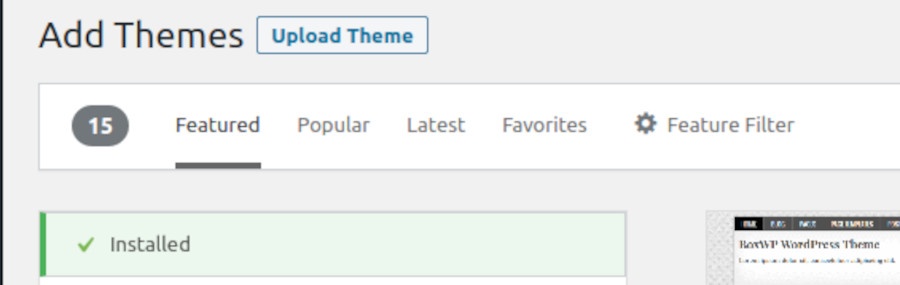
Click on Add New at the top of the page.
Next, click on the Upload Theme button
Choose the Zip file of the WordPress premium theme.
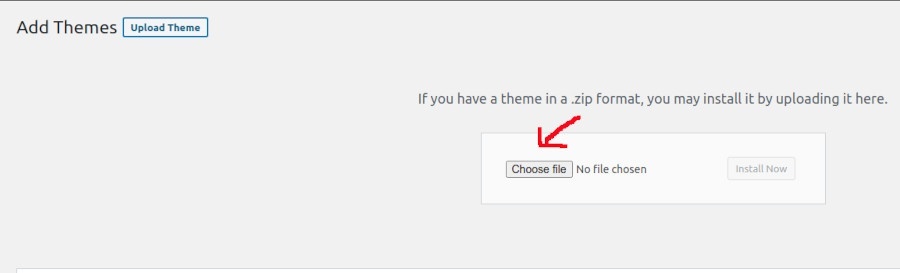
After uploading the Zip file completes, click on Install Now.
After installing a WordPress theme, you can customize the WordPress theme.
To Customize a WordPress Theme.
From the WordPress dashboard, click Appearance > Customise.
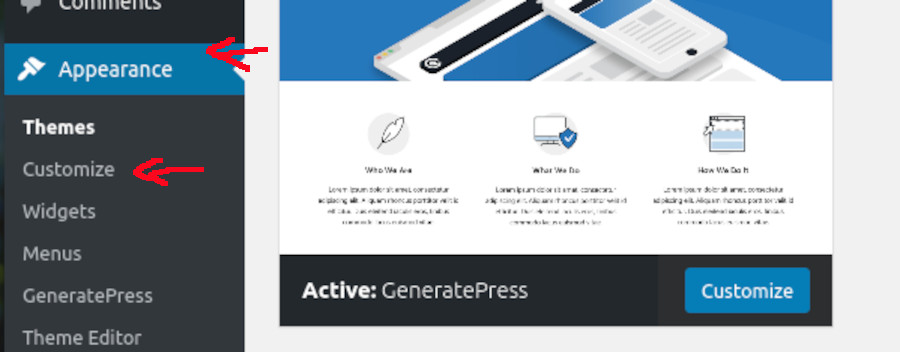
Use the WordPress theme customizer to change and tweak various theme settings.
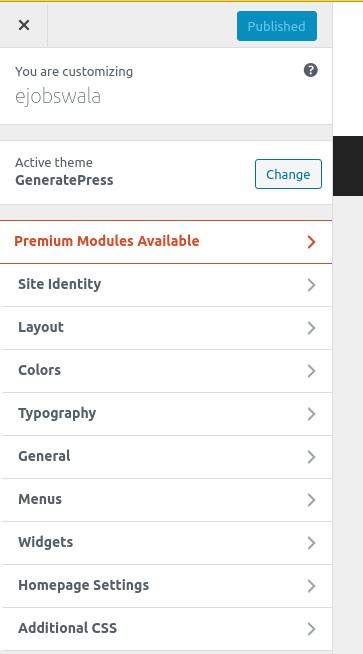
View the changes live with the live preview feature.
Another way to improve the website design is by using page builder plugins. E.g Elementor. The page builder plugins offer advanced options and better control over website design.
Install WordPress Plugins.
WordPress plugins add more features and functionalities to your website. There are tons of free and paid WordPress plugins.
You can buy premium WordPress plugins from developers and third-party vendors.
To Install WordPress Plugins.
Login to the WordPress admin area
From the WordPress menu, click Plugins and then Add New.
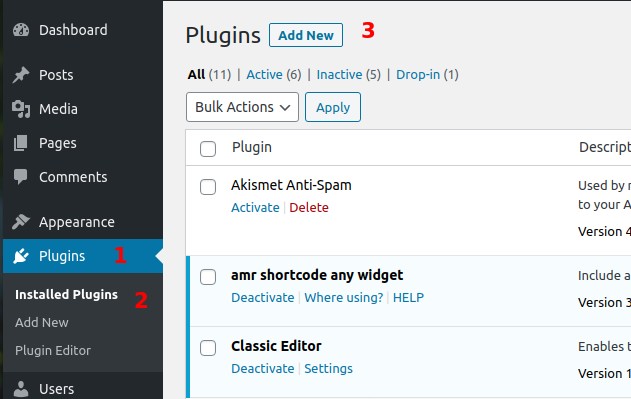
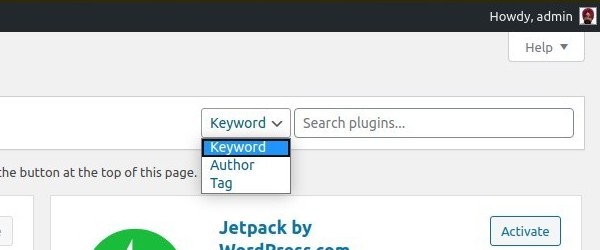
Search for the WordPress plugin using the search bar.
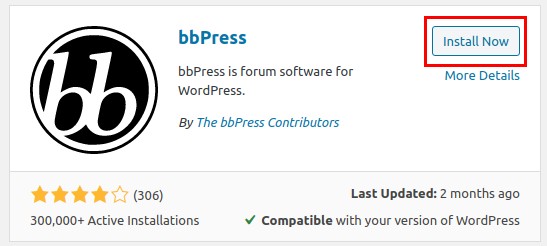
After you find the plugin, click on the Install Now button.
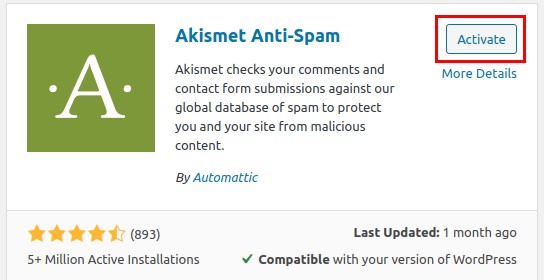
Activate the WordPress plugin.
Read our detailed article on how to install WordPress Plugins for beginners.
To Install Premium WordPress Plugins.
Login to the WordPress admin area.
From the WordPress menu, click Plugins > Add New.
Click on the Upload Plugin button at the top of the page.

Upload the plugin from your PC in .zip format using Choose file button.
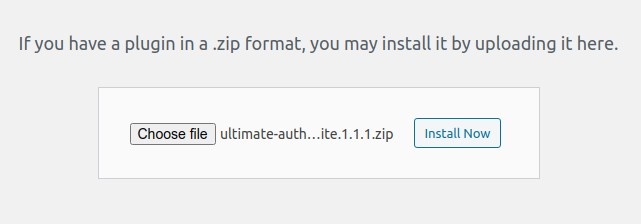
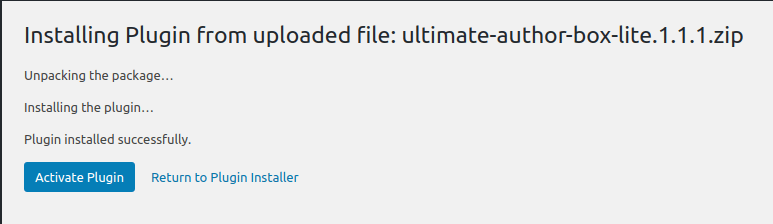
On completion of the plugin upload, click on the Install Now button.
Activate the WordPress plugin.
Here is a list of must-have WordPress plugins for your website:
- Yoast SEO – Optimizes your website for search engines
- Google Analytics – Connects WordPress website with Google Analytics.
- Akismet – Anti-spam WordPress plugin.
- Elementor – For improving website design.
- W3 Total Cache – To enhance the website loading speed
- Updraftplus – For automatic scheduled backup of your site.
Check out the 10 must-have WordPress plugins for bloggers.
Add Widgets to Your WordPress Site?
A widget is a small block of content for displaying in different places on a website. They are visible on the sidebar or footer of a website.
To Add a Widget to Your Website.
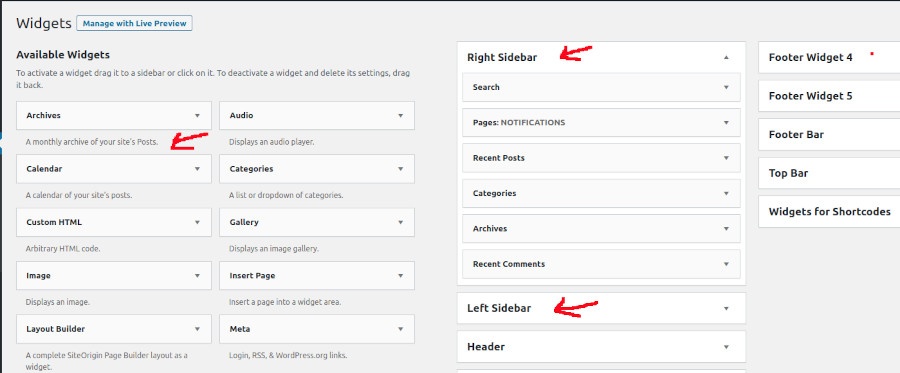
Login to the WordPress dashboard, and click Appearance > Widgets.
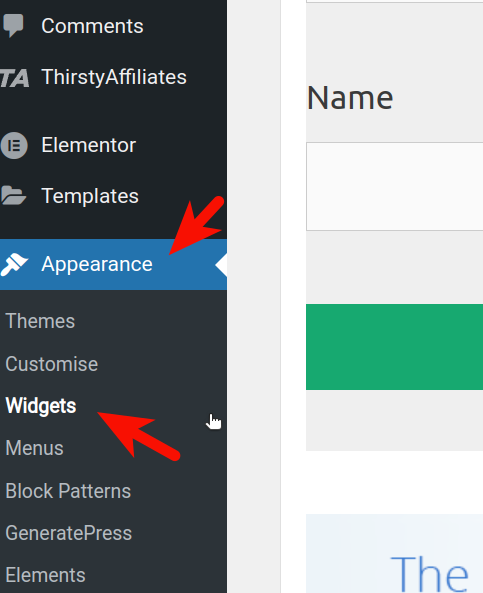
From the widgets section. Drag a widget to the desired area on the right side.
Set Up the WordPress Website Menu.
The site menu helps visitors to navigate through your site. The site menu improves the user experience and user engagement.
The menu option depends on the WordPress theme. Some themes have over one menu option. For example, one menu at the top and another one for the footer.
To Configure the WordPress Site Menu
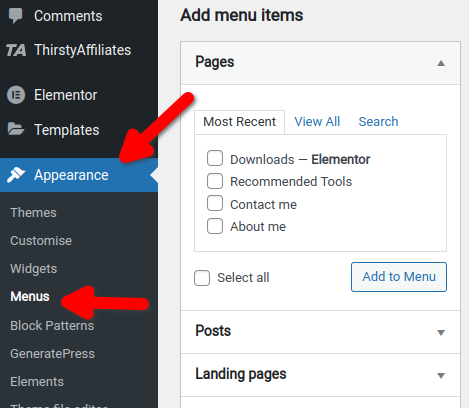
From the WordPress admin area, click on Appearance > Menus.
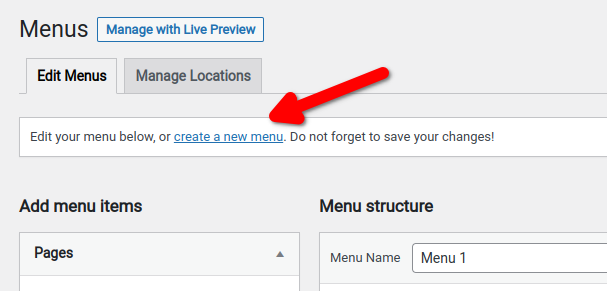
Enter a name for your new navigation menu and click on the Create Menu button.
From the Add menu items section. Select a Page, Post, or Category for creating menus and Click on the Add to Menu button.

The added posts or pages will appear under the Menu Structure section.
Click and hold pages for re-ordering the menu. You can nest the items under other pages to create sub-menus.
At the bottom of the page, locate the Menu Settings section. Click on the box next to Primary Menu. This will show the menu on your site header.
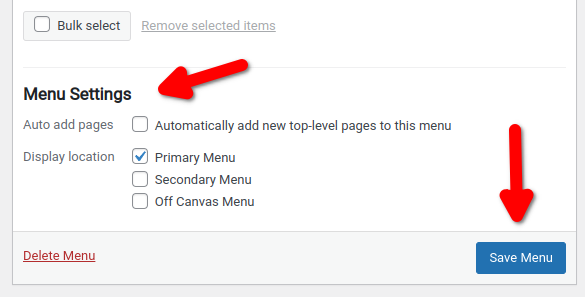
Click the Save Menu button at the bottom of the page.
Optimize Website for Page Loading Speed
Fast website loading speed improves the user experience. A slow website frustrates the users and they navigate away to your competitors’ sites. Resulting in a loss of traffic and conversions for your website.
You can improve the site loading speed by enabling browser caching. In this process, the browser temporarily stores your website’s data locally. This allows the browser to access the data faster. As compared to fetching from a remote server location.
To enable website caching, you can install WordPress caching plugins. For example, the WP Rocket caching plugin. The WP Rocket plugin allows for removing the unused CSS and delays JS Execution. Thus improving the website loading speed.
Configure WordPress Settings
After setting up your website, configure WordPress settings to customize your website. Some of the important WordPress settings are:
Set the Time Zone
Setting up your time zone correctly allows you to publish your post as expected. Set the time to your time zone or as per your target audience.
From your WordPress dashboard, Click Settings > General.
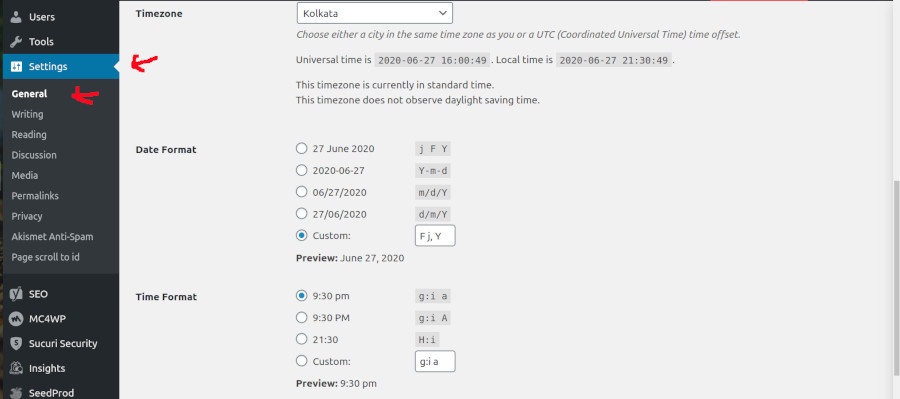
Under the Time Zone section, set up your desired location. You can also set the date and time format down below.
Save by clicking on the Save Changes button.
To Add a Logo to a WordPress Site
A logo helps customers recognise your website, build trust, and branding.
Login to your WordPress dashboard. Click on Appearance > Customize.
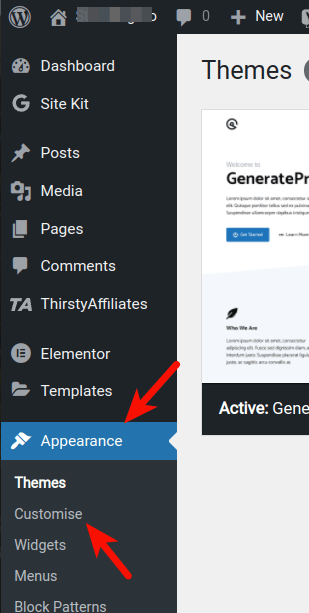
From the left-hand menu, Click Site Identity > Select Logo.
Click Upload Files and follow the prompts to upload the new logo. Before adding the logo, you can crop the logo image. Select Skip Cropping or Crop.
Click Publish in the Customizer window to save the changes.
You can create a logo using these 7 best logo makers and logo generators.
To Set up the Permalink for a WordPress site
Permalinks define the structure of your site web pages. The URL structure is important for search engine optimization.
Login to your WordPress dashboard.
From the dashboard menu, click on Settings > Permalinks.
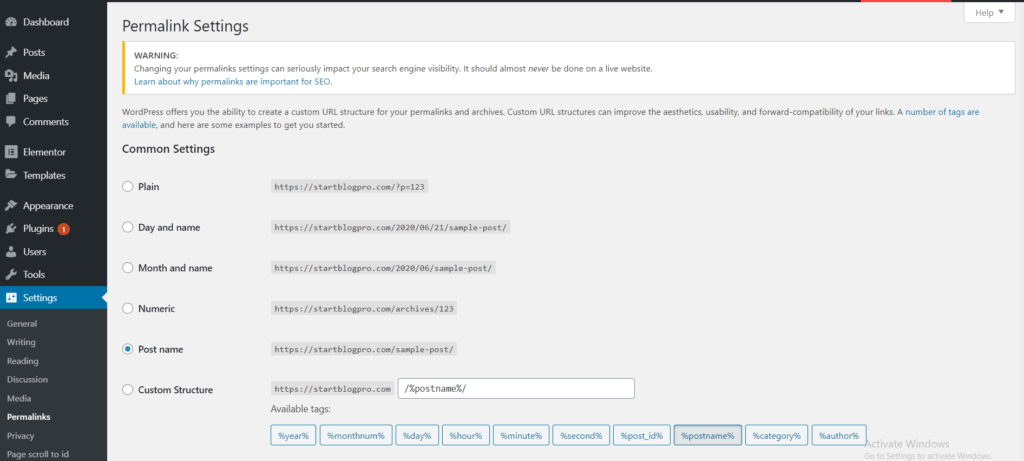
Click on the radio button in front of the Post name.
To Customize the General Settings
General settings allow you to add your website title and tagline.
Login to the WordPress admin area. Click Settings > General.
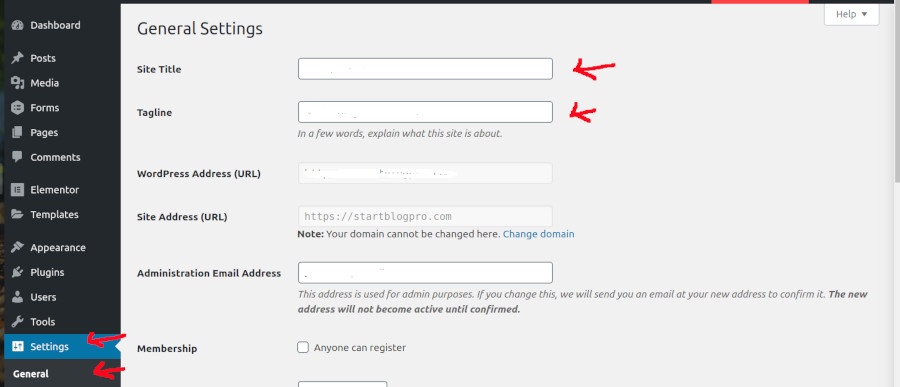
Add the Site Title and Tagline in the text boxes provided against them.
To Customize the Reading Settings
Reading Settings sets your homepage display to the latest post or a static page.
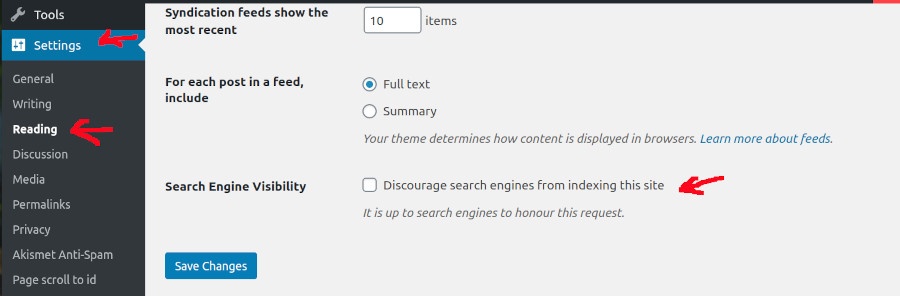
Login to the WordPress admin area, and click Settings > Reading.
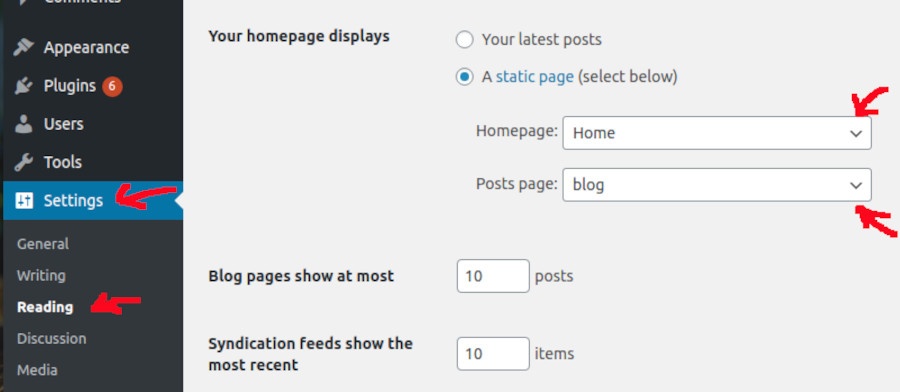
Set your homepage to a static page or your latest blog post. For a business website, choose a static page. If you are a blogger, you can set the latest posts.
Search Engine Visibility – The search engine can find and index your site if it is visible to them. Uncheck the checkbox labelled “Discourage search engines from indexing this site”.
Comments Settings – You need to moderate the comments on your website. This helps in preventing spam comments.
To Set Up WordPress Comment Settings
Comments Settings help in moderating the comments on your website. This helps in preventing spam comments.
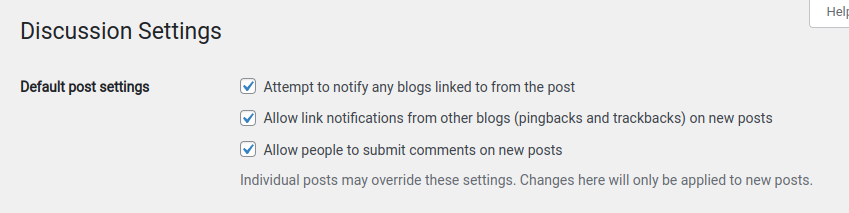
Login to your WordPress dashboard and click Settings > Discussions.
Under the section Default post settings. Check “Allow people to post comments on new articles“
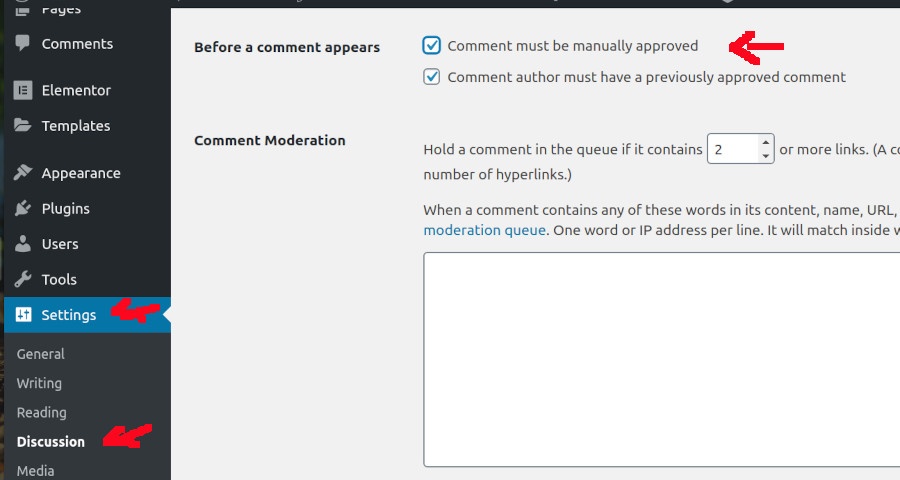
Locate the section “Before a comment appears”. Check the option “Comment must be manually approved”
Click the Save Changes button to apply the settings.
Create Mandatory Pages
A WordPress website has posts and pages as default content types. Posts are the content types for a blog. They appear in reverse-chronological order, new items are on the top and older ones at the bottom.
A WordPress page contains static content. We create all the mandatory pages using WordPress pages.
To Create Pages in WordPress.
From your WordPress admin area, click Pages > Add New for creating a new page.
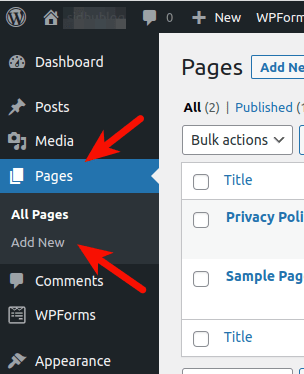
To customize an existing page, click on All Pages. Locate the page and click on the edit option for editing the page.
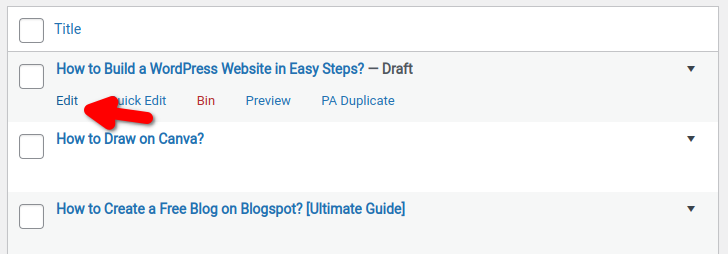
If you have a page builder plugin installed, you’ll get an option to edit using the page builder.
Enter the title of the page. Add content and customize using the text editor, and finally, click Publish.
Repeat the above steps to create more pages.
These are the mandatory pages for a website.
- Contact Page – Displays your contact information and a contact form. So that visitors can contact you.
- About Page – Use the About page to introduce yourself and your website. You can tell your story to the visitors and why they should visit your site.
- Privacy Page– With introducing the new General Data Protection Regulation (GDPR). A privacy policy is a requirement for websites.
- Disclaimer Page – A disclaimer page protects a business from legal claims arising out of users and third-party risks.
WordPress shows blog posts on the front page of your website. If you want to show a static page, change the settings.
To change the settings login to your WordPress admin area. Click Settings > Readings and select a static page you created on your site.
Add and Publish a Blog Post
Log in to your WordPress admin area.
From the left-hand menu, click Posts > Add New.
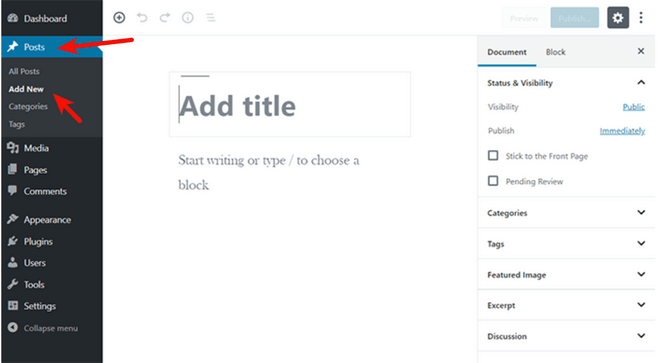
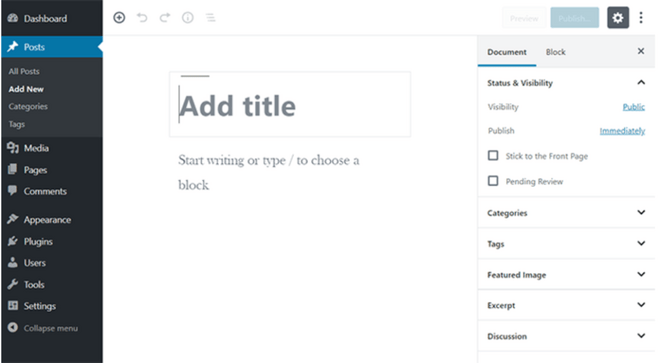
On the next page, enter a post title. Create and format content using the Gutenberg text editor.
From the sidebar, choose the categories, tags, and other settings.
Click on the Save draft for further editing.
After completion of the blog post. Click on Publish to make the blog post live on your website.
Various Types of WordPress Websites
WordPress allows you to create various types of websites. Some websites types you can create using WordPress are:
- A Job Board website.
- Question and answer website.
- A web directory.
- Membership website.
- A Review website.
- Start a Podcast.
- Social Network site.
- An eCommerce store.
- Multilingual websites.
- An auction website.
- Start a blog
Conclusion
WordPress is one of the most popular content management systems (CMS). It allows you to build a WordPress website in an hour.
We recommend building a self-hosted WordPress website. The steps involved in creating a WordPress are
- Choose a domain name.
- Get WordPress hosting.
- Install WordPress.
- Design your website using WordPress themes and plugins
I hope the article helps you build a WordPress website. Let me know if you face any issues. I will try my level best to help you out.

Pingback: How to Start a Business Online with No Money? | StartBlogPro
Pingback: How to Start a Fashion Blog and Make Money? | StartBlogPro
Pingback: How to Install Jetpack on Your WordPress Website? | StartBlogPro
Pingback: How to Start Freelancing With Zero Experience? | StartBlogPro
Pingback: How to Become a Successful Content Writer: A Step-by-Step Guide | StartBlogPro
Pingback: How To Set Up Cloudflare For WordPress? Step by Step Guide | StartBlogPro
Wow, It was really very informative and quite helpful