![You are currently viewing How to Create a Free Blog on Blogspot? [Ultimate Guide]](https://startblogpro.com/wp-content/uploads/2022/10/create-a-free-blog-on-blogspot.png)
Want to start a blog with no money? There are a lot of free blogging platforms on the internet. For example, you can create a free blog on Blogspot. Other platforms are WordPress.com, Medium, Tumblr, LinkedIn, etc.
We recommend buying your own domain name and hosting for creating a blog. WordPress allows you to create a blog within an hour. If you can’t afford the initial investment, go for the free blogging platforms.
In this article, we will help you create a free blog on Blogspot. You’ll learn how to earn money online by creating a free blog on Google.
Read: What does a blogger do?
What is a Blog?
A blog is a short form of weblog. It is an online diary written in reverse chronological order. The newer entries appear at the top and older ones at the bottom of the website. We call these entries blog posts.
Apart from blog posts, you can create blog pages. The blog pages are static and rarely updated as compared to the blog posts. Examples of blog pages are, the About Us and Contact Us pages.
Why Start Blogging?
People blog because of various reasons. Some of these are:
- Make Money Online
- Start a Business
- Share Story
- Business Growth
- Gain Knowledge
- Earn Fame and Popularity
- Charity or Helping others
- Learn Writing
- Create Community
- Learn Digital Marketing
- Professional Networking
- Extra Income / Side Hustle
Difference Between Blogger and Blogspot
Most of the newbies are confused about the terms BlogSpot and Blogger. Let’s clear up the confusion first.
Blogger is a free blog publishing platform and BlogSpot is a free blog domain service. Google owns both Blogger and BlogSpot.
If you type blogspot.com you’ll end up at blogger.com
You sign up for a blogging account on blogger.com. But you create a free blog on the BlogSpot domain name. E.g. sidhulive.blogspot.com
In a nutshell, the Blogger platform hosts your blog with a BlogSpot domain name.
Advantages and Disadvantages of Blogspot
Before we create a free blog on BlogSpot, let us discuss its advantages and disadvantages.
Advantages of Blogger
- Easy to get started
- Free SSL certificate
- Free blogging platform
- Hosted by Google, thus faster indexing
- Easy integration with Google products
- Don’t have to update software
- Easy to monetize with AdSense
- Add your own custom domain
Disadvantages of Blogger
- Limited Blog themes
- Provides a sub-domain with an ugly URL structure.
- No plugins to extend the functionality
- It is not optimized for search engines.
- You don’t own the site. Google can cancel the blogger service or suspend your blog.
How to Create A Free Blog on Blogspot?
1. Enter Blogger.com in your browser address bar and press enter.
2. From the Blogger homepage. Click the “Create Your Blog” orange button.
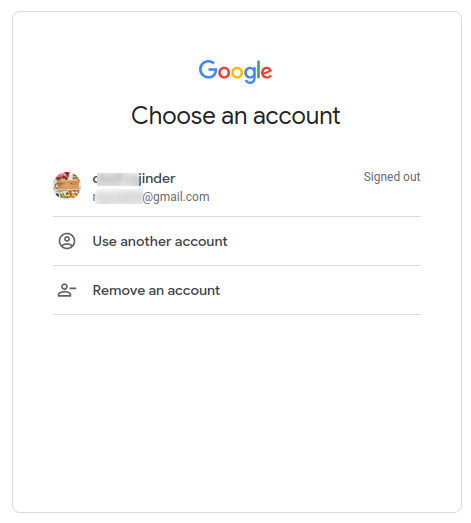
3. Use your Google account for signing into the Blogspot blog.
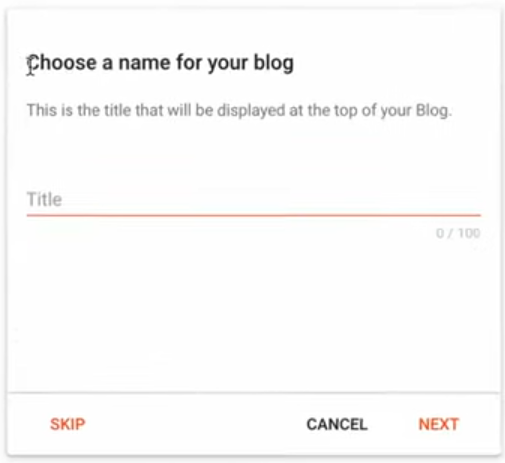
4. Choose a blog title for your new blog and click NEXT. You will see the blog name at the top of your blog.
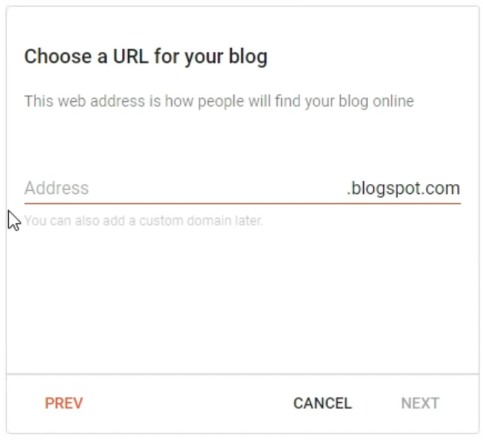
5. On the next page, choose a URL for your blog and click NEXT. Visitors will use this URL to reach your blog. If URL you choose is taken, the window will raise an error. In such a case, choose another URL.
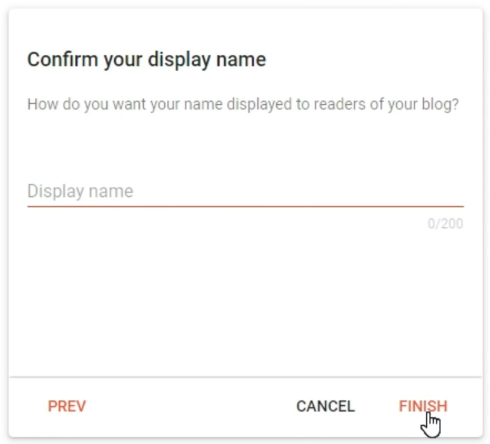
6. Confirm the name you want to display on your blog. Click FINISH.
After clicking the finish button. You’ll see your Blogger dashboard. This is the backend of your BlogSpot blog.

To write and publish your first blog post. Click on the + NEW POST button. For further tweaking, either your blog theme or the layout keep on reading the article.
If you own a domain name. You can use it in place of the default BlogSpot domain name.
How to Add a Custom Domain Name to a Blogspot Blog?
Google Blogger allows a custom domain name. You can use your own domain name instead of the default BlogSpot domain name. It also provides an option to buy a domain name from Google Domains.
To Add a Custom Domain Name to a BlogSpot Blog:
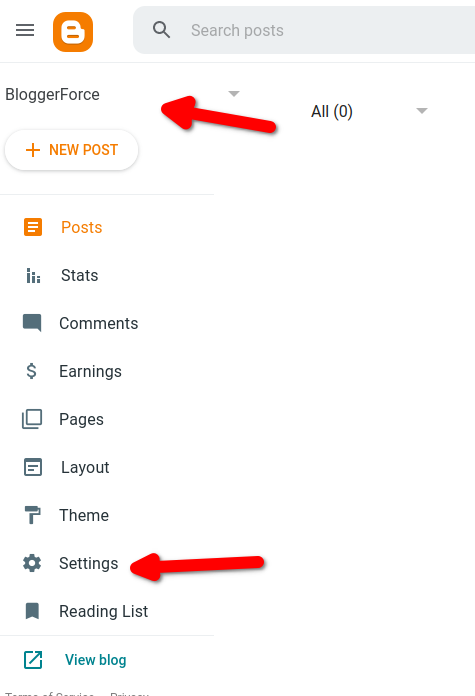
1. From the blogger dashboard menu. Click Settings.
2. Under the section “Publishing”, click on Custom domain.

3. Enter your domain and click on Save.
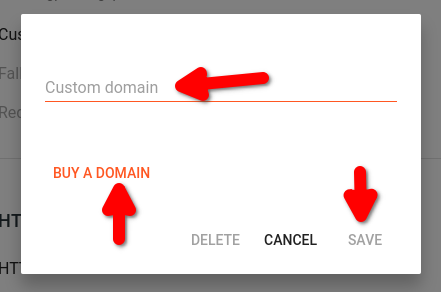
If you don’t own a domain name. You can buy one by clicking on the Buy a Domain option.
How to Backup and Restore Blogger Templates?
Before you customize or install a new Blogger template. You should create a backup of the current template. BlogSpot allows you to restore the blog if anything goes wrong.
To Backup a Blogger Template:
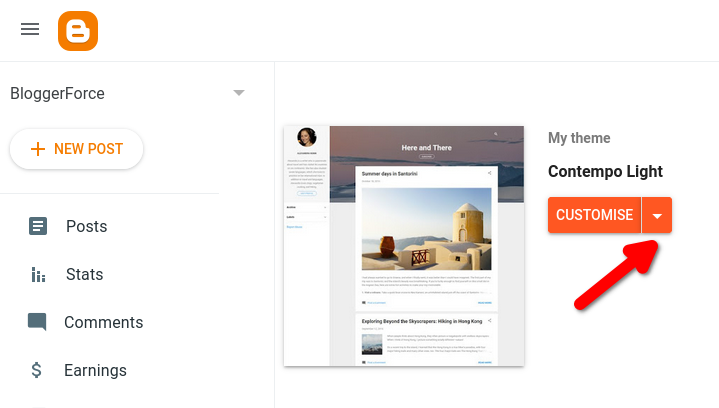
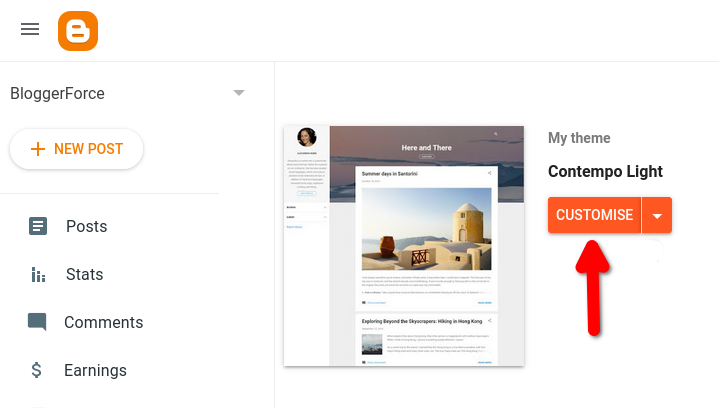
1. Log in to your blogger dashboard. From the left-hand menu, click on Theme.

2. Click the Customise orange arrow button.
3. On the pop-up page, click Backup.

4. Click Download
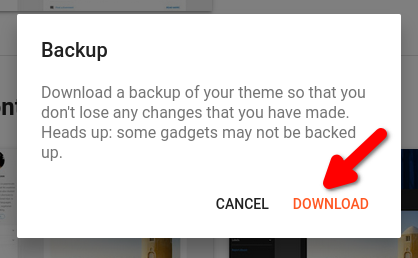
Save and rename the template file with a descriptive name and a .xml extension.
To Restore a Blogger Template:
1. From the blogger dashboard menu, click on Theme.
2. Click the customise orange arrow button.
3. Click on Restore on the pop-up page.
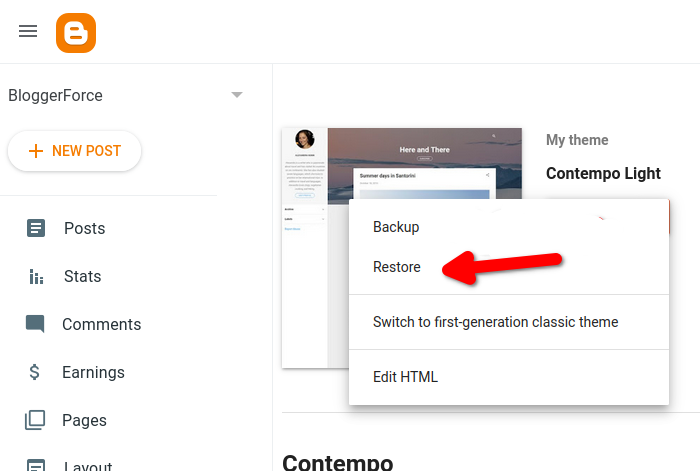
4. Upload the backup .xml file from your PC.
How to Change a Theme on Blogspot?
BlogSpot allows you to change a theme in 3 different ways:
- Using default themes.
- Uploading the Template file (XML file).
- Edit HTML of Blogger Theme.
Using the Default Themes
1. From the blogger dashboard menu, Choose your blog and click Theme.
2. Select a theme from the list of default themes.
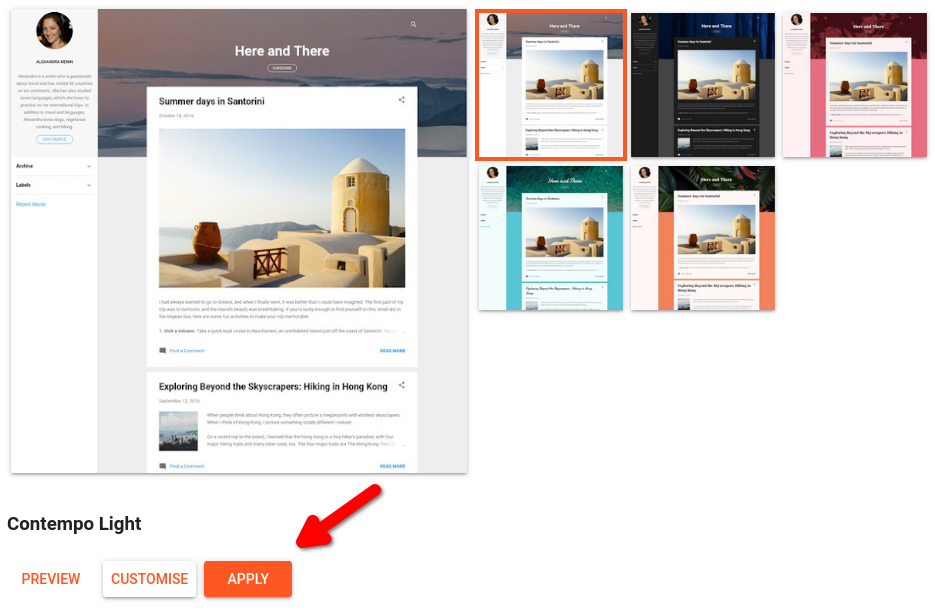
3. Click on Apply Button.
Upload the Template file (XML document)
1. Log in to Blogger Dashboard and select your blog.
2. From the dashboard menu, click Theme.
3. Click on the orange Customize arrow button.
4. On the pop-up, click on Restore.
5. Upload the XML template file from PC.
Edit the HTML of the Blogger Theme
1. From the dashboard menu, Select your blog and click Theme.
2. Click the orange Customize arrow button.
3. On the pop-up, click on Edit HTML

4. Click inside the editor. Press Ctrl+A to select and delete the entire template code.

5. Copy the XML code of the template you want to install.
6. Paste the code in the Blogger HTML editor by using Ctrl+V.
7. Save the theme using the Save icon.
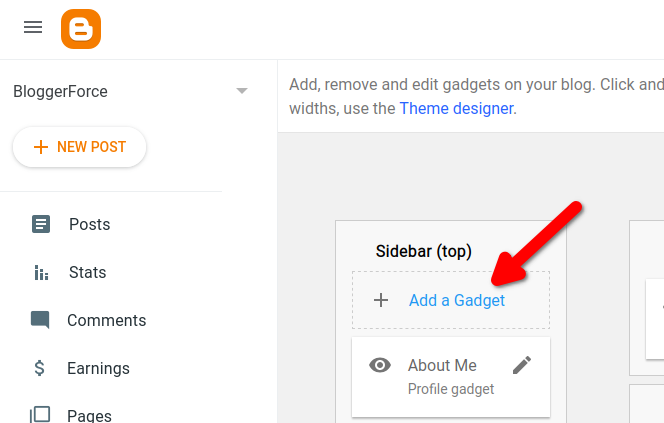
How to Add A Gadget on Blogspot?
Blogger Gadgets are widgets to enhance your blog. Some of the common gadgets are:
- Instagram Feed
- Email Subscribe Form
- RSS Feed
- Testimonial Sliders
To Add a Gadget to BlogSpot Blog:
1. Log in to Blogger and choose your blog.
2. On the dashboard menu, click Layout.

3. Click + Add a Gadget.

4. Choose the gadget from the pop-up page by double-clicking on it.
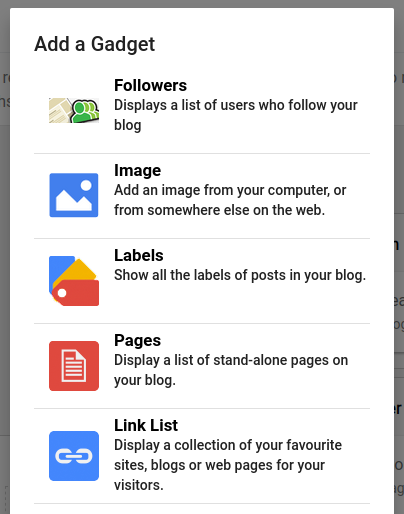
5. Click the Save icon at the bottom of the page.
How to Upload Favicon to a Blogspot Blog?
A favicon is a small image or shortcut icon. It represents your site in a web browser.
To Upload a Favicon to a BlogSpot Blog:
1. From the Blogger Dashboard, Click Settings.
2. Click Favicon, under the Basic section.
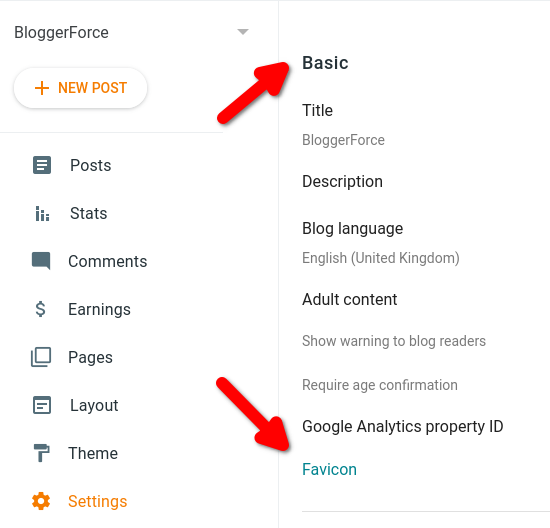
3. Use the Browse option to upload a favicon file.
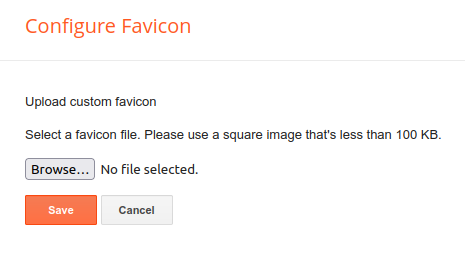
4. Save the changes by clicking on the Save button.
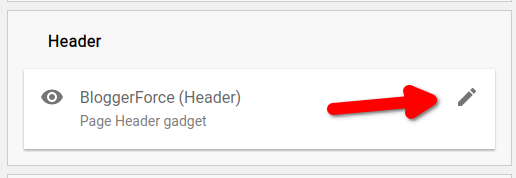
How to Add the BlogSpot Header Image?
The header is an image at the top of your blog. It can be a logo, banner, or your blog’s name.
To Upload the Header Image:
1. On the blogger dashboard menu, click Layout.
2. Click the edit option of the Header gadget.
3. On the pop-up page, select the image for uploading. Choose the placement of the image.
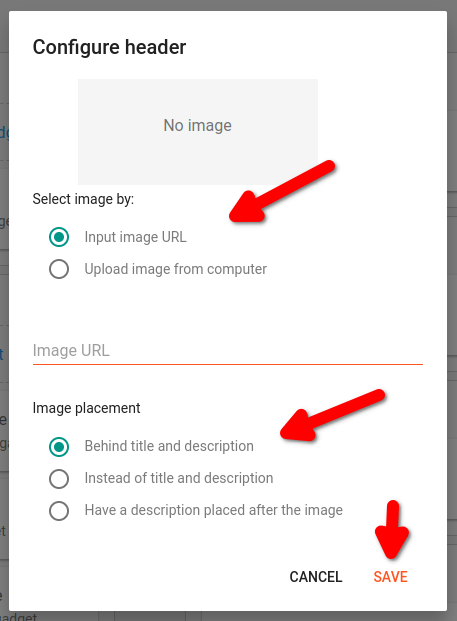
4. Save the header image.
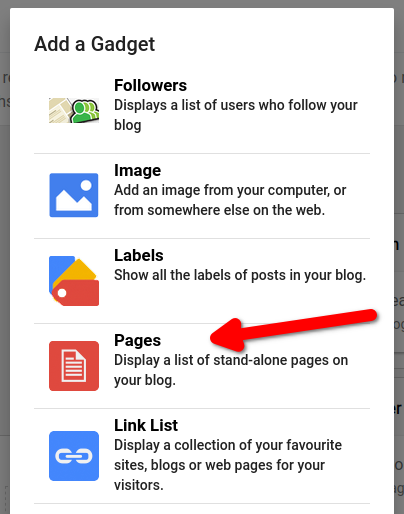
How to Add and Edit Menus?
1. From the dashboard menu, click Layout.
2. Click + Add a Gadget element.
3. Select the Pages gadget from the list.
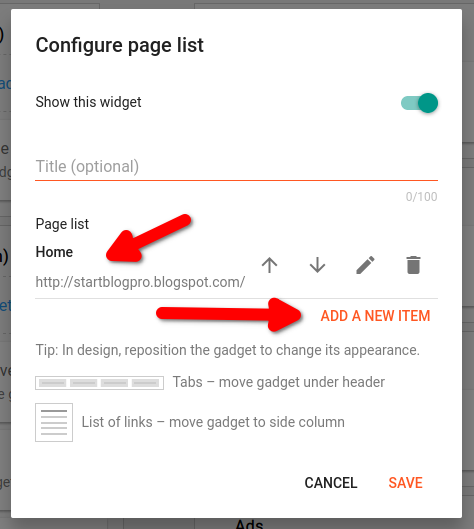
4. By default, the Configure Page List page contains your Home page under the Page list.
Adding Blogger Blog Pages to Pages Gadget:
1. Click the ADD A NEW ITEM.
2. Click the Page name bar. It will show you all the pages of your blog.
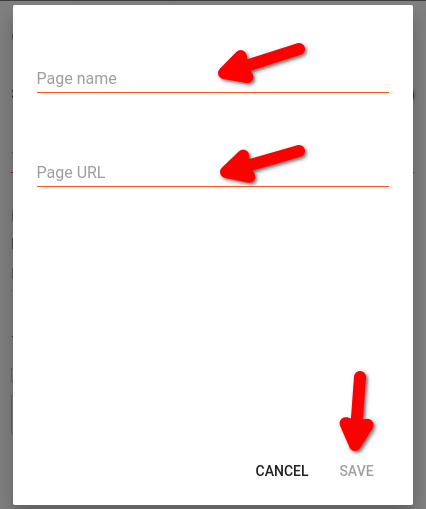
3. Click on the page name, and it will auto-populate the Page URL below.
4. Save the page.
Finally, click the Save icon on the Layout page.
Preview the page and check the placement of the menu items
You can edit, delete or change the sequence of menu items from the Configure Page List in step 4 above.
How to Make BlogSpot Blog Visible to Search Engines?
A blog receives free traffic from search engines only if visible to the search engines.
To make BlogSpot Blog Visible to Search Engines:
1. On the blogger dashboard menu, click Settings.
2. Under the Privacy section. Click the toggle button in front of the Allow search engines to find your blog.
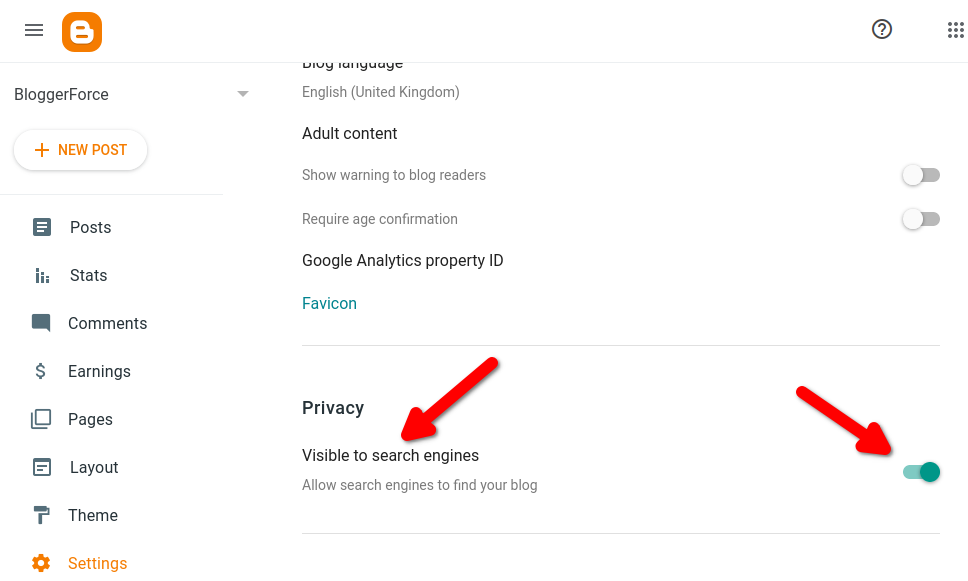
Now, your blog is visible to search engines online.
Difference Between a Blog Post and Blog Pages
When you write a blog, you use blog posts for writing content. Blog posts are content entries like the dated pages in a diary.
We don’t update the blog pages often. They contain static content, like the index and non-dated pages in a diary.
The static blog page examples:
- Home
- About Us
- Contact Us
How to Add Pages to Blogspot Blog?
To Add a Page to Blogger Blog:
1. From the blogger dashboard menu, click Pages.
2. Click on the + NEW PAGE button at the top of the dashboard menu.
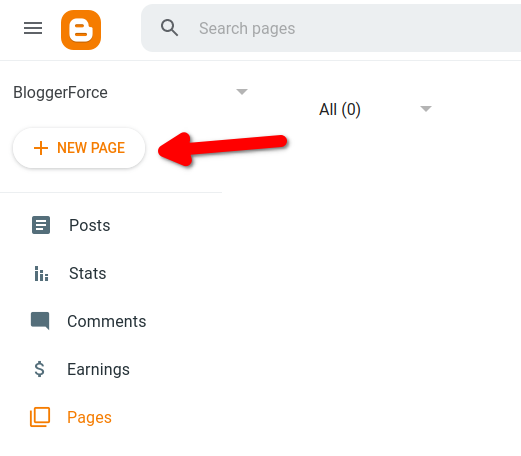
3. On the new page, enter the page title and body content.

4. Press Publish on the top right side of the page.
The blogger page editor has various options for customizing the page. It allows you to bold, italicize, and underline the text. Add images, videos, and hyperlinks to your text.
How to Change the Blog Content Width?
To Change the Blogger Blog Content Width:
1. From the Blogger dashboard menu, click Theme.
2. Click the orange Customize button.
3. Click on the Adjust widths drop-down menu.
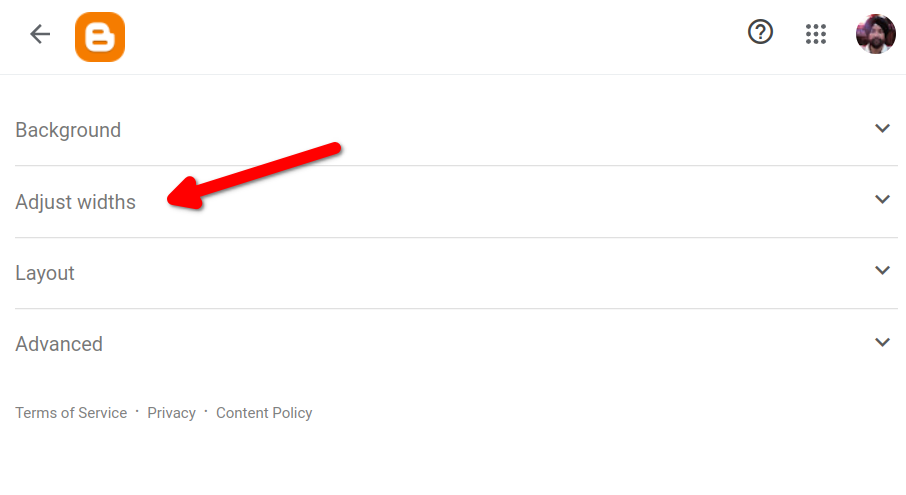
4. Adjust the width of the entire blog or a sidebar using the sliders.
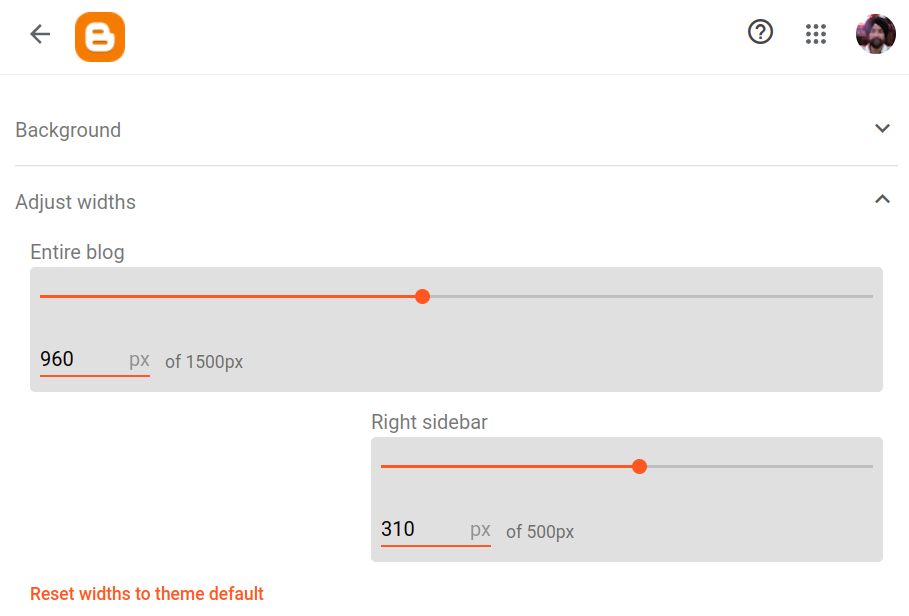
5. Save the setting by clicking on the save icon below.
How to Publish A Blog Post on Blogspot?
Publishing a blog post involves many tasks. Let’s start by adding a blog post blog.
To Add a BlogSpot Blog Post:
1. On the Blogger dashboard menu, click Posts.
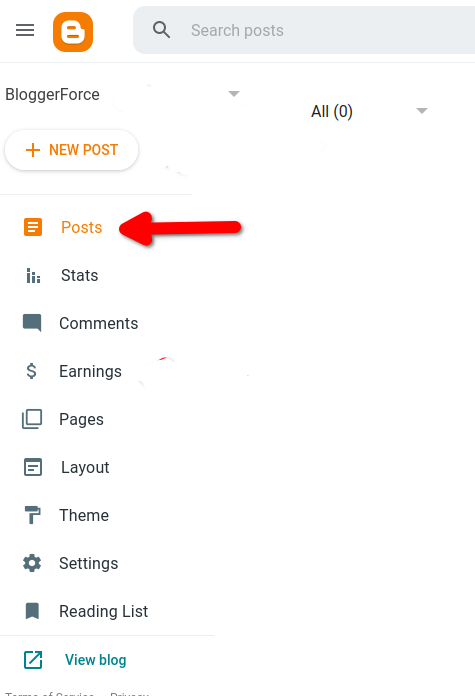
2. Click on the + NEW POST button

3. Enter the title of your new blog post. Use the page body to write and edit content.
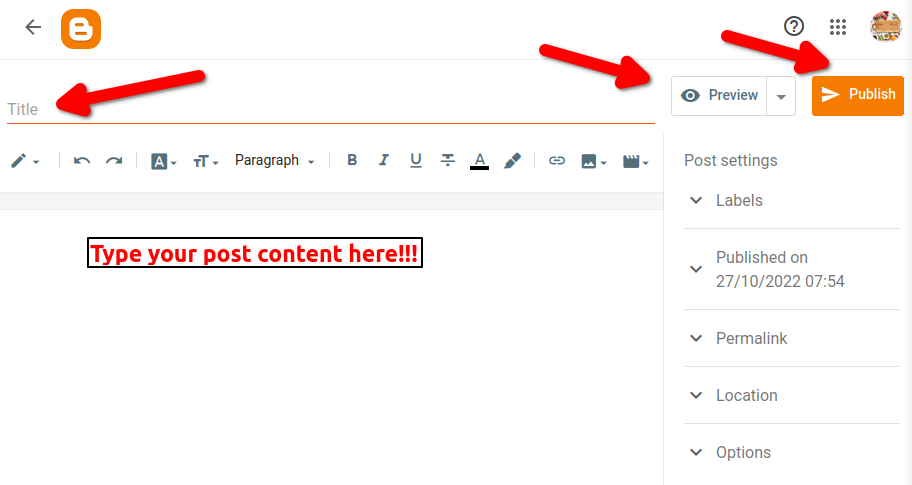
The blog post editor menu provides text editing and formatting options. You can Preview the page before pressing the Publish button.
Checkout the articles on how to write better blog posts:
To Delete a BlogSpot Blog Post:
1. Click the Posts option on the Blogger dashboard menu.
2. It will load the list of your published blog posts.

3. Hover your mouse on the post you want to delete.
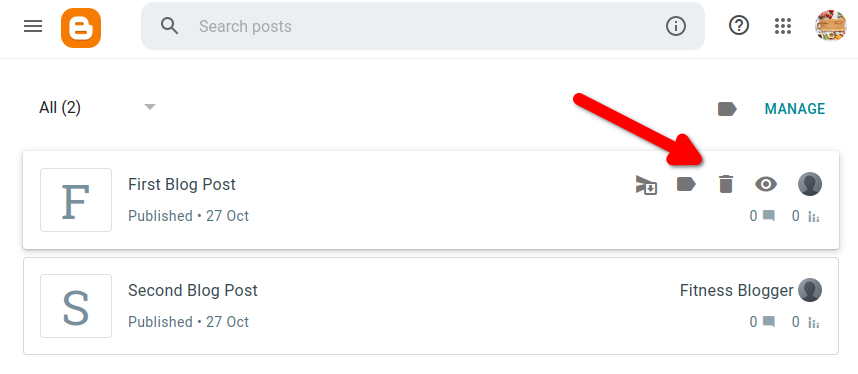
4. Click on the dustbin icon to delete the post.
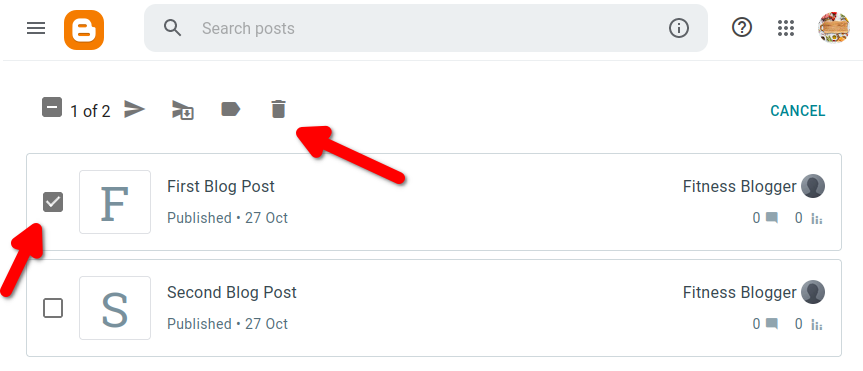
To Bulk Delete the Blog Posts:
1. Click the MANAGE on the top right side of the blog post list.
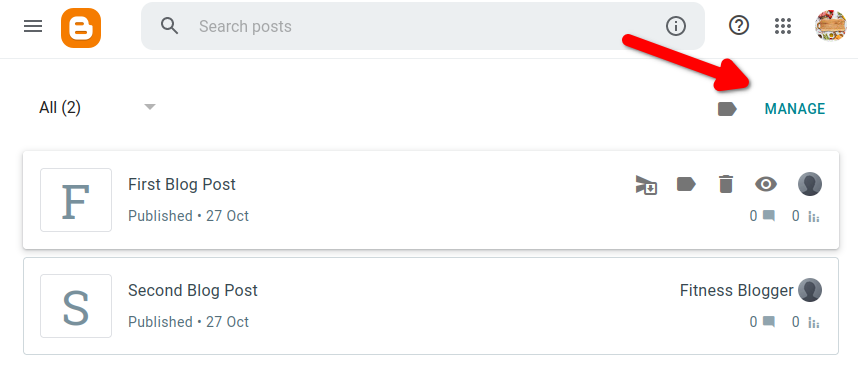
2. A checkbox will appear in front of all the blog posts.
3. Tick the blog posts you want to delete. Delete by clicking the dustbin icon at the top of the blog post list.
The Blog Post Editor and Toolbar
A blog post editor and toolbar offer various options for editing content. The first one with a pencil icon is the post-editor view. It provides an HTML view and Compose view.
The various options in the blog post editor and toolbar are:
- Choose HTML view or Compose view
- Undo and Redo option
- Change font size, font type, subheading, heading, and paragraph.
- Increase indent, Decrease indent, and Text alignment.
- Bold, underline, italics, strike-through, text background, and text colour.
- Insert images, videos, special characters, and links.
- Text layout and input tools.
- Quote text, jump links and clear formatting.
To Add Content to a Blogger Blog Post:
1. Enter the blog post title in the title bar.
2. Use the body of the blog post to compose a new post. Format the text using the editor menu. Add images and videos using the top menu.
To Add an Image to a Blogger Post:
1. Bring the cursor to the spot you want to add an image.
2. Click the Image icon on the editor toolbar.
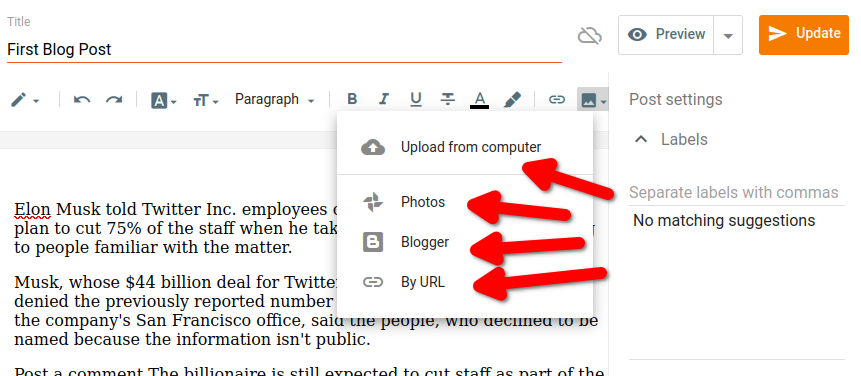
3. Use any of the four options to add an image.
- Upload from the computer.
- Photos – import from Google photos.
- Blogger – Images you already uploaded to Blogger.
- By URL – Provide the URL of the image uploaded elsewhere.
To Insert a Link in a Blogger Blog Post:
1. Select the text for creating a link.
2. Click on the link icon on the toolbar
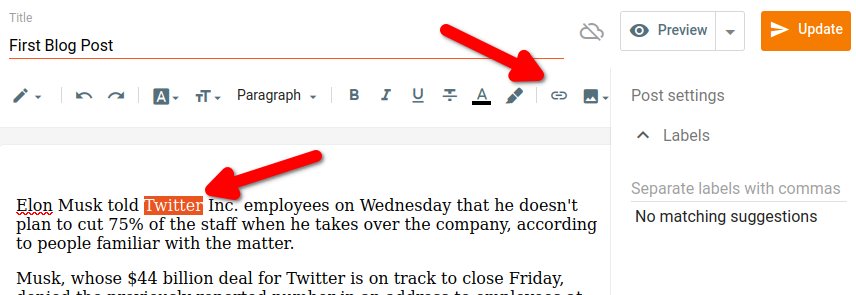
3. On the pop-up page, add the linking page by pasting or searching for the link.
4. Tick the checkbox for opening the link in a new window.
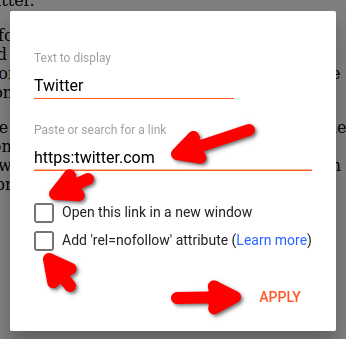
5. Add a nofollow attribute to the link.
6. Click Apply.
Embed YouTube Videos in a BlogSpot Blog Post
To Embed YouTube Videos in a BlogSpot Post:
1. Bring the cursor to the spot you want to add a video. Click the Insert video icon on the editor toolbar.
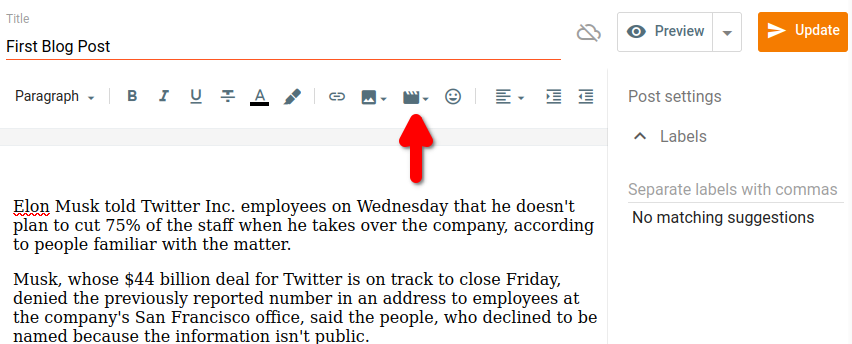
2. The drop-down menu will show two options. Click on YouTube.
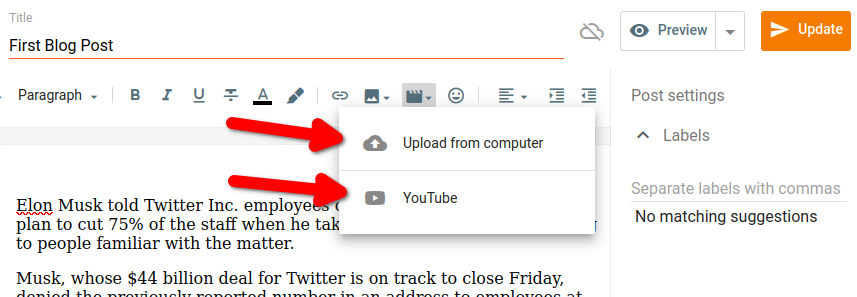
3. The pop page has two tabs, Uploads and Search. Upload the video from the video list or navigate to the search tab to search YouTube.
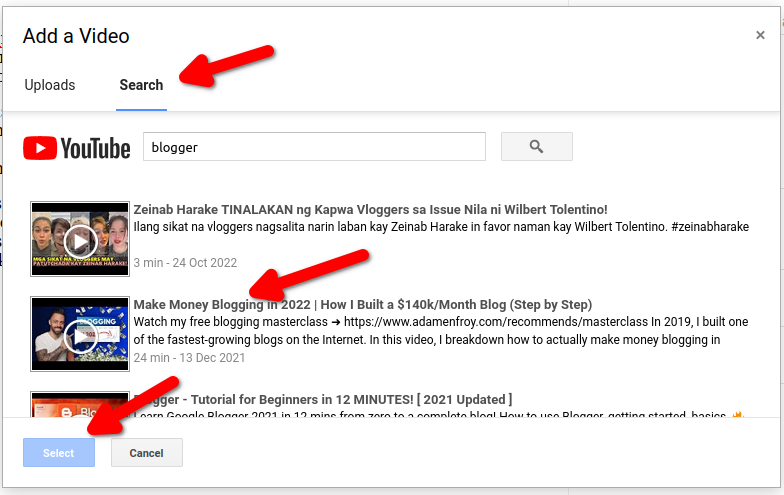
4. Click on the video and then the Select button below. It will add the video to your blog post.
Add Labels to a BlogSpot Blog Post
A label is a tag for grouping blog posts. It helps in categorizing blog posts into various categories.
If a reader uses the blogger search function for a specific query. The blog search engine groups and lists the related posts under a common label.
To Add Labels to a BlogSpot Post:
1. Look for the Post settings on the left sidebar of the blog post editor.

2. Click on Labels, and it will open a text box for adding labels.
3. Enter the labels that relate to your post
Edit the Permalink of a BlogSpot Blog Post
The permalink is the full URL of a blog post or blog page. A good permalink structure should be SEO-friendly. The best practice is to include your primary keywords in the URL and keep the URL short.
To Edit the Permalink of a BlogSpot Post:
1. On the left sidebar of the blog editor, under the Post settings.
2. Locate and click on the Permalink option. It will have two options, automatic permalink and custom permalink.
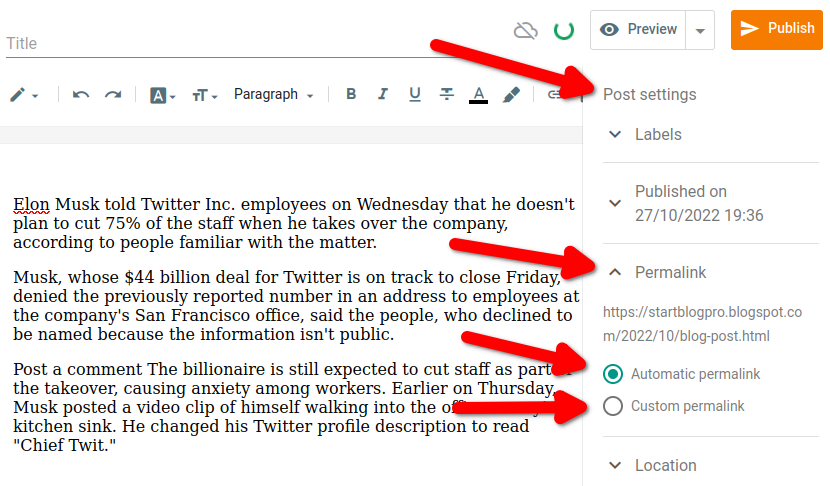
3. Use the custom permalink to create a short and SEO-friendly URL.
4. After you finish composing your blog post. Preview the blog post using the Preview option. The option is on the top right side of the editor menu.
5. If satisfied with the look of the post, click on the Publish button next to the Preview button. The post is now live on your blog for your readers.
How to Add and Customize Blogspot Sidebar?
The sidebar is the most important part of your blog. Visitors use the sidebar to learn about you. Follow you on social media, subscribe to your list, or buy your products or services.
Some widgets or elements you can add to the sidebar are
- A search bar for searching your site.
- A profile or a bio widget.
- An opt-in form for joining your email list.
- Social media links
- A call to action for buying your product or service.
To Add a Sidebar to the BlogSpot Blog:
1. From the blogger dashboard menu, click Theme.
2. Click on the Customize orange button.
3. Now click on the Layout drop-down element.
4. Under the Body layout, click on the desired sidebar column.
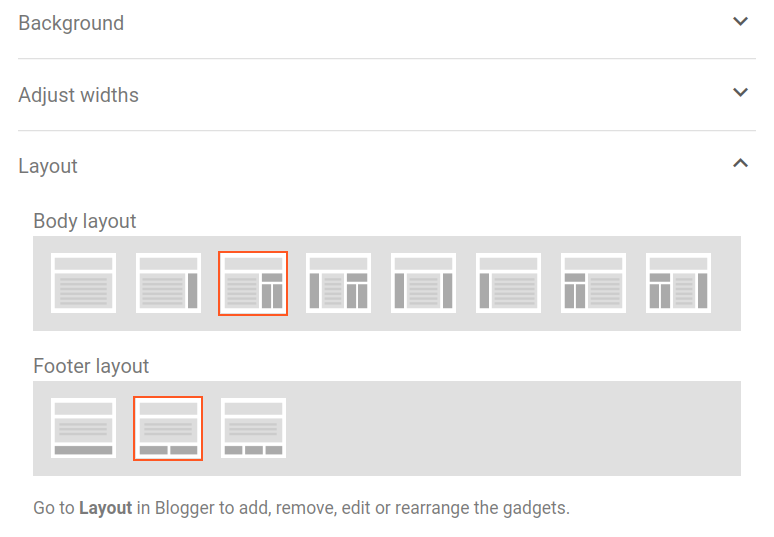
6. Preview and Save the settings using the icons at the bottom of the page.
Customizing the Sidebar and Adding Gadgets:
To set the sidebar width. Blogger Dashboard menu > Customize (orange button) > Adjust widths.
To add Blogger gadgets to the blogger sidebar. Navigate to the Blogger Dashboard menu > Layout. Click + Add a Gadget on the sidebar column.
How to Connect Blogger to Google Search Console?
To Connect the Blogger Blog to GSC:
1. From the Blogger Dashboard menu. Click Settings.
2. Under the Crawlers and Indexing section.
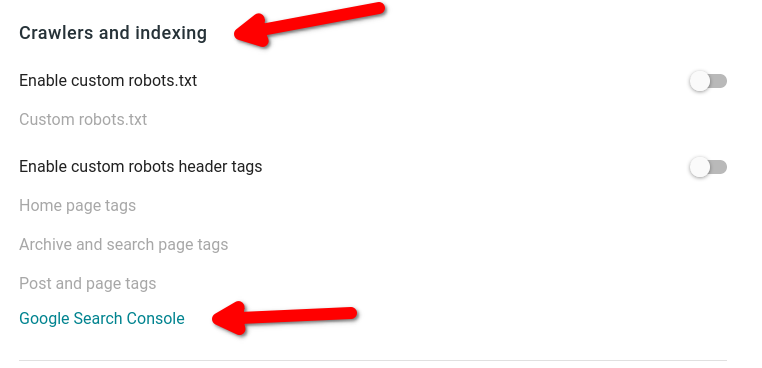
3. Click Google Search Console. It will redirect you to GSC.
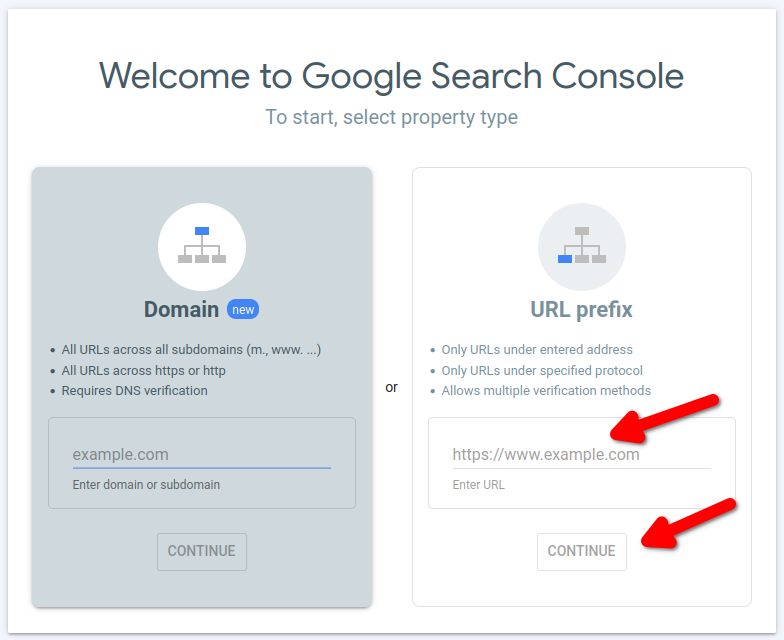
4. In the URL prefix section. Enter or paste your BlogSpot blog URL. Click CONTINUE.
5. GSC will verify the blog ownership. Access your GSC account by clicking on GO TO PROPERTY.

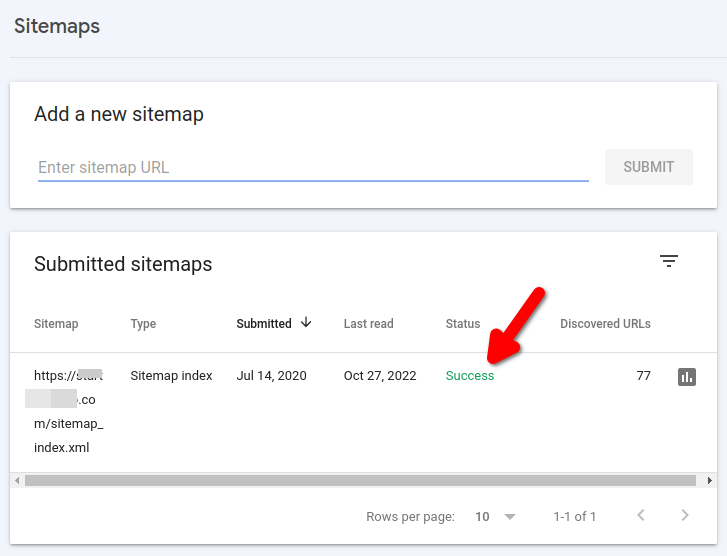
How To Submit Blogger Sitemap to Google Search Console?
A sitemap is an XML file containing a list of URLs of your blog. This file provides the search engine with the post or page URLs for crawling.
To Submit the Blogger Sitemap to GSC:
1. Log in to Google Search Console.
2. From the GSC dashboard menu. Click on Sitemaps.

3. Under the Add a new sitemap, Enter your blog URL followed by ‘/’ and sitemap.xml.
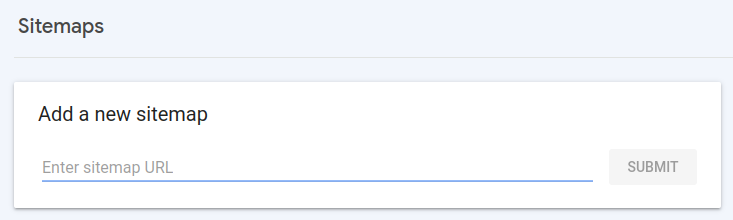
4. On successful submission. A success message will appear under the Status subheadings.
How to Add Analytics Tracking to a Blogger Blog?
To track your blog performance, sign up for a Google Analytics account. Login to your GA account to get your Tracking ID. it is under PROPERTY > Tracking Info > Tracking Code.
To Add the GA Tracking ID to Blogger Blog:
1. From the Blogger Dashboard menu, click Settings.
2. Under the Basic section. Click Google Analytics Property ID.
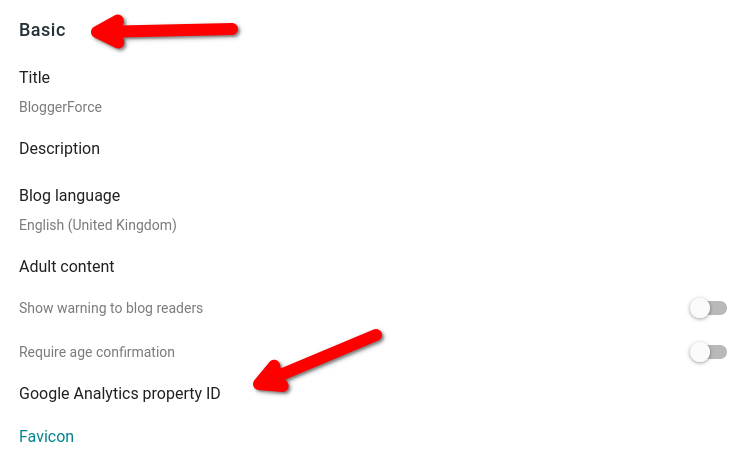
3. Enter the Google Analytics tracking ID in the format: UA-XXXXX-XX.

4. Click the Save button.
How to Google AdSense Approval Quickly?
Google AdSense allows you to make money by showing ads on your blog. But your blog should be eligible for displaying ads. For this, your blog has to qualify for AdSense.
To get faster Google AdSense approval, ensure the following.
- Your domain is at least one month old. So, don’t apply immediately after creating a blog. Take the time to create content and mandatory pages.
- Publish at least 20 to 30 articles.
- Create the following mandatory blog pages.
- About us
- Contact us
- Privacy policy
- Submit your site to Google Search Console. So, Google crawls and indexes your blog content.
How to Add Google AdSense?
Before adding Google Ads to your blog, sign up for Google AdSense.
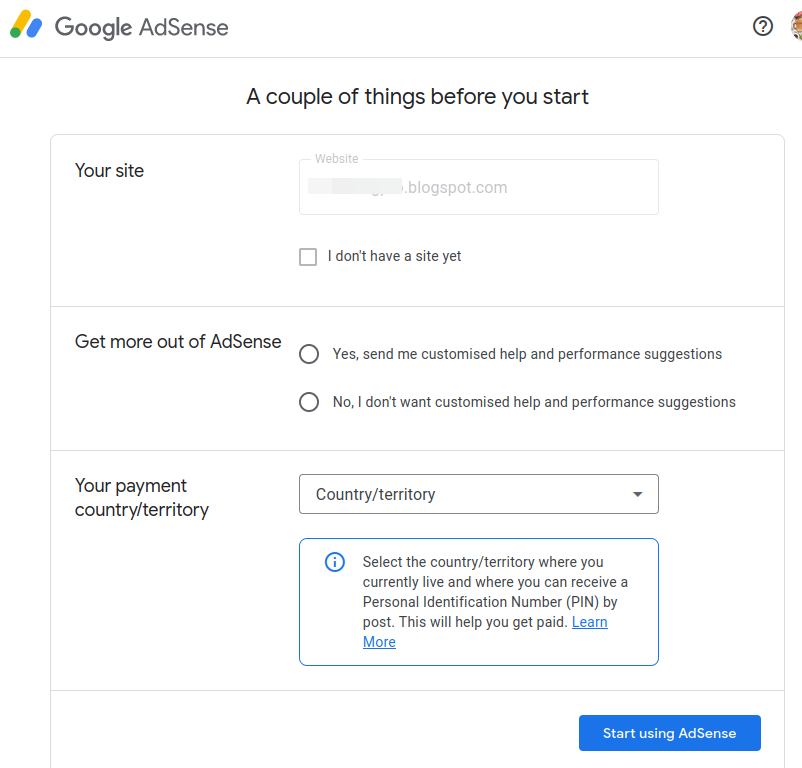
To Sign up for Google AdSense:
1. Log in to Blogger. Click Earnings on the Blogger dashboard menu.
2. On the next page, click on CREATE ADSENSE ACCOUNT.
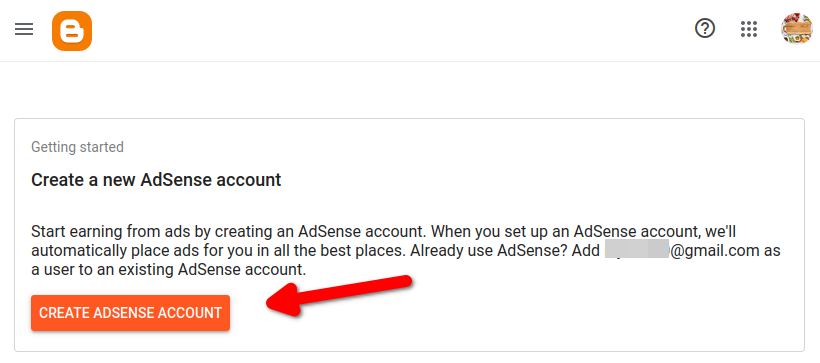
3. Fill out the AdSense form. Then, click Start using AdSense.
4. Click the Let’s go button in the SITES section to connect your site to AdSense.

5. Click on the Request review button.
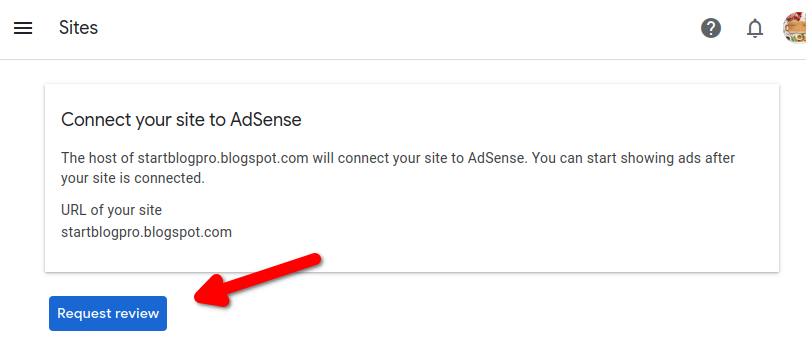
Google Adsense team will review your blog. After their approval, your blog will start showing ads.
To Show Ads on Blog Posts:
1. From the Blogger dashboard. Click Layout.
Depending upon your blog template:
2. Click edit on the Blog Posts element under the Main section.
3. Click edit on the Blog Posts element under the Page Body section.

4. Toggle the button next to Show Ads Between Posts. Select the ad colour, format and frequency.
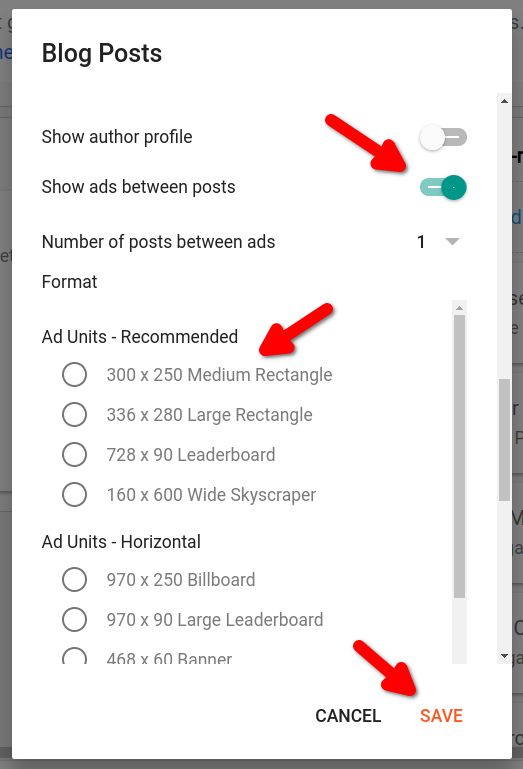
5. Click the Save button.
6. Finally, click the Save icon at the bottom of the page.
You can show ads on the blogger sidebar by adding an AdSense gadget. For showing ads from other ad services, add an HTML/JavaScript gadget and paste the ad code into it.
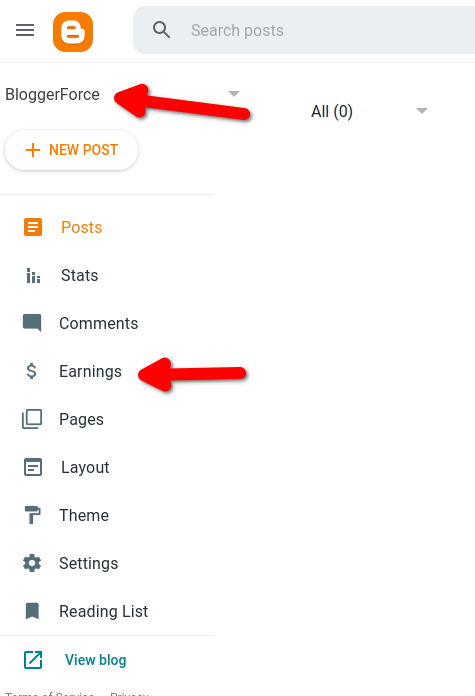
How to Check AdSense Earnings?
When you connect Google AdSense to your BlogSpot blog. Your blog starts showing your blog AdSense earnings.
To Check BlogSpot Blog AdSense Earnings:
1. Log in to the Blogger dashboard
2. From the dashboard menu, click Earnings > View earnings.
Conclusion
There are a lot of free blogging platforms like WordPress.com, Medium, Tumblr, and LinkedIn. The BlogSpot platform is beginner-friendly and easy.
If you have a Google account. You can sign up for a free BlogSpot blog and start earning with Google AdSense.
Keep in mind, Blogspot is a free blogging platform. You don’t have control over it, Google can suspend or block your blog anytime. So, we recommend buying your own domain name and hosting for creating a blog.
In case of money constraints, you can start with a free blogging platform. But, move to the self-hosted platform after you earn.
I hope you can now create a free blog on Blogspot. I would love to hear from you in the comments.


Pingback: 54 Free Blogging Tools For Frugal Bloggers | StartBlogPro