Want to learn how to use the WordPress block editor (Gutenberg editor)?.
With the release of WordPress 5.0 in 2019, WordPress replaced the classic editor with a block editor. The new block editor is known as the Gutenberg editor.
In this article, you will learn how to use the WordPress block editor. I’ll show you various blocks, layouts, and how to use them.
If you don’t have a blog yet, check out the post on how to start a blog.
Let’s start without further ado.
What is WordPress Block Editor?
WordPress Block Editor or Gutenberg Editor is a block-based writing and publishing tool. It’s a new age editor that uses blocks to write, edit and format content. You can create a rich and flexible layout for websites.
Each type of writing element has its block. E.g, Headings, Paragraphs, Lists, images and videos. It provides a drag and drop interface to move, edit and customize these elements.
You can have a live preview of the changes before you publish an article.
Difference Between a Block Editor and a Classic Editor
The WordPress block editor is different in functionality compared to the classic editor.
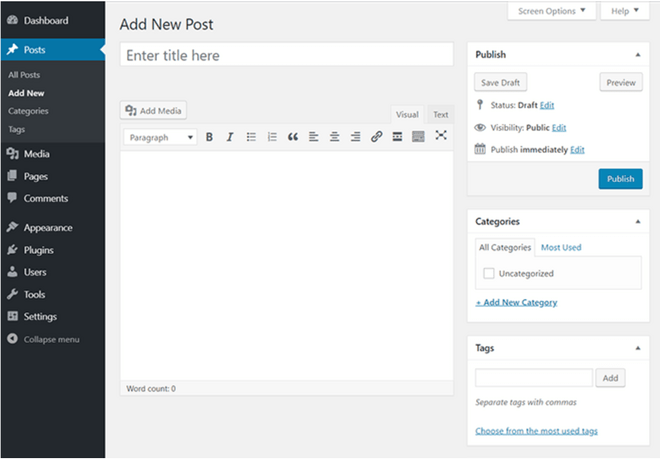
This is what the WordPress classic editor interface looks like:
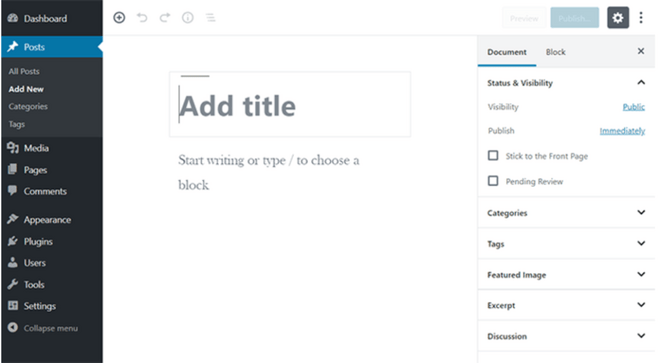
Here is the interface of the WordPress block editor
Both the WordPress editors are completely different from each other. Each provides a different way of creating and editing content.
The old classic editor interface is like that of a word processing application. E.g Ms-Word.
But the new block editor uses ‘Blocks’. Each content element has its own block.
You need to add the blocks and create content layouts. The block content is easy to edit and format using the toolbar options available for the block.
The block editor allows you to add blocks for various content elements. Some of the elements are headlines, paragraphs, lists, images, audio, video and many more. There are elements for every known content element. You can add more blocks using the WordPress plugins.
Is WordPress Block Editor Better than Classic Editor?
The WordPress block editor is easy to learn and use compared to the classic editor. You need to add a specific type of block to your post or page depending on the content.
The block editor helps you replace a few of your WordPress plugins. Two of the most common ones it can replace are the table of the content plugin and the table plugins.
For example, the table of content of this blog post uses a table of the content block. You can add a table block and then choose the number of rows and columns.
It is very easy to edit and customize each element. Moreover, you can drag the elements and create media-rich content layouts.
The modern block editor is intuitive and flexible to use. It is a powerful editor that can do all the things and much more than the old classic editor.
Create a New Post or Page with the Block Editor
To create a new post on the WordPress block editor. Click the Posts menu on the WordPress dashboard. Then click on the Add New button.
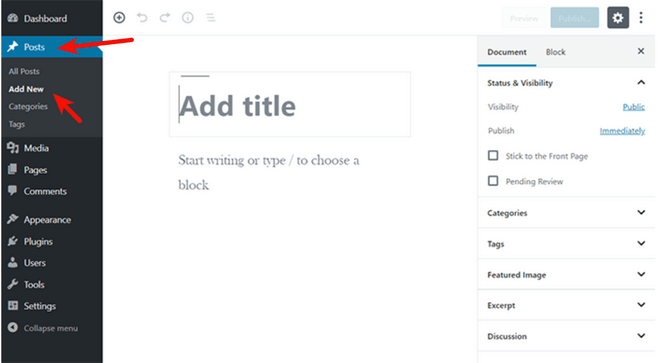
For a new page click on the Pages >> Add New menu.
Now it will load the block editor for your new post or page.
How Does The WordPress Block Editor Work?
Each document is a collection of various elements. The WordPress Block Editor uses a specific block for each content element. These elements are headings, paragraphs, images and various other types.
A WordPress block has various editing, customizing and styling options. You can move them around without affecting the content.
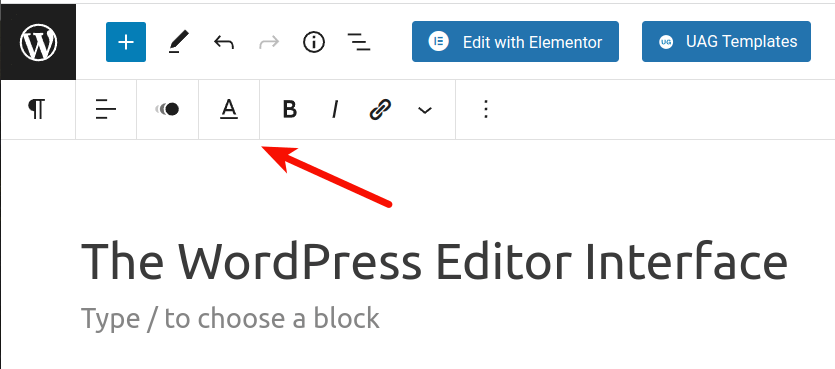
The WordPress Block Editor Interface
- Top Menu
- Content Area
- The Sidebar Menu
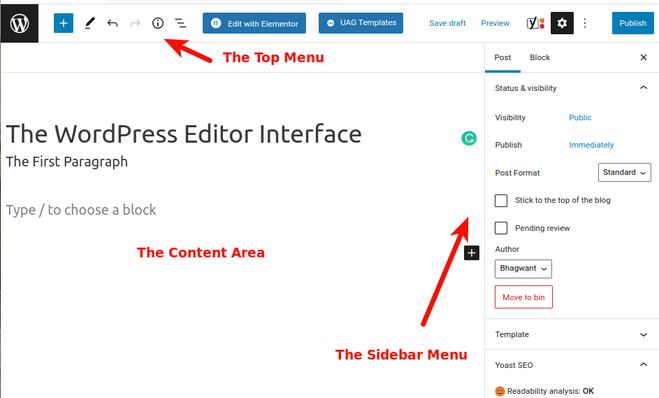
The Top Menu
The options on the block editor top menu are:
- Exit the Editor – Click on this icon to exit the editor
- Block Inserter – For inserting a new block to your page or post.
- Tools – Toggle between editing or selecting a block
- Undo /Redo – For
- Details – Shows the number of characters, words, blocks, headings and paragraphs in your document.
- List View – This shows the list of all the blocks on the document. Used for navigating to a specific block.
The Content Area
The content area forms the major section of the WordPress editor. This section holds the blocks that you add to your post or pages. It is useful for displaying, adding and editing the website content.
The Sidebar Menu
The cog icon on the top menu opens up a sidebar menu. It has settings related to the entire document and the selected WordPress block. You can switch between Post Settings and Block Settings.
The various Page/Post Settings in the sidebar menu are:
- Status & visibility
- Template
- Permalink
- Categories (only posts)
- Tags (Posts only)
- Featured Image
- Excerpt
- Discussion options
- Page Attributes (For Pages)
Extra Options
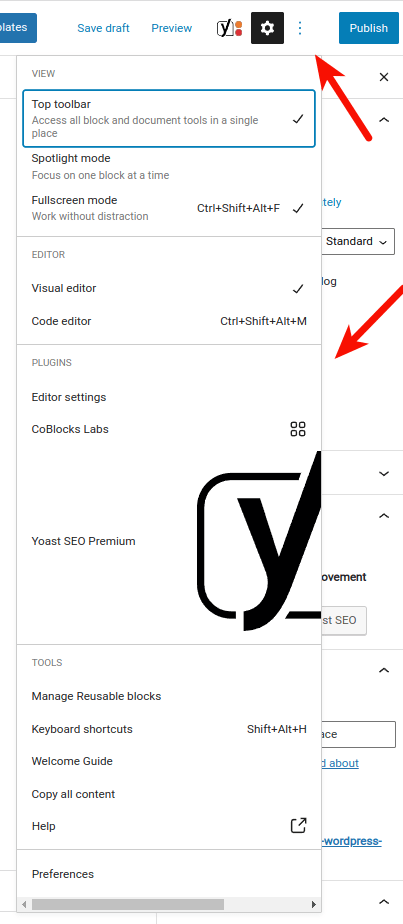
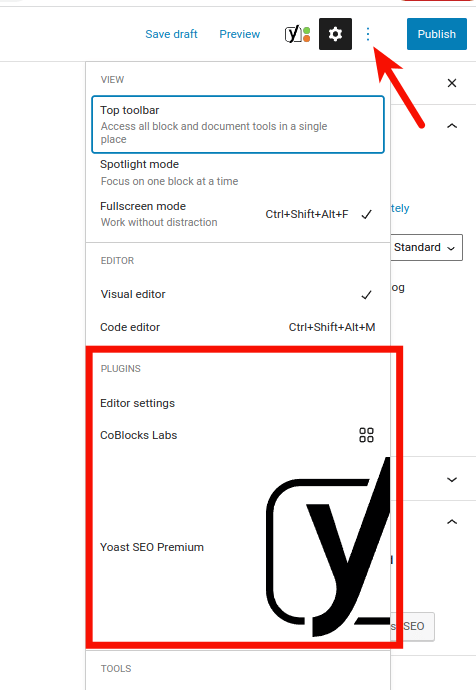
You can access more options by clicking on the three vertical dots on the right of the Settings icons (cogwheel icon). Each option has various sections.
View
The View options allow you to display or hide the top toolbar in the block editor.
- Top toolbar – You can pin the block toolbar on the top of the screen instead of on top of a block
- Spotlight mode – This option allows you to focus on the block you are working with by greying out all other blocks.
Editor
- Visual editor – Enables visual mode of editing text. The editor opens in the visual editor mode by default.
- Code editor – This option allows you to view and edit the entire page in HTML.
Plugins
This section displays the WordPress plugins and their settings
Tools
Use this section to read the block editor welcome guide or learn keyboard shortcuts. It has an option for copying all the page/post content. You can also view additional help resources using this option.
Preferences
The Preferences menu has extra settings for a better editing experience. You can set the blocks that you want to use in the editor. It allows to show or hide the panels from the post/page settings
Working With Blocks in a New Block Editor
The new WordPress editor has a block for each type of content element. The WordPress blocks are easy to add, edit and customize elements.
Blocks consist of 3 main sections:
- The Block Toolbar
- Block Content Area
- Block Settings Sidebar Area
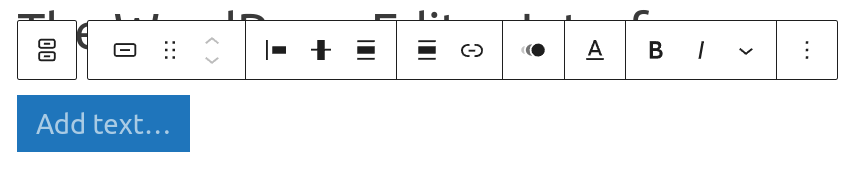
The Block toolbar has various options for customizing the block content. The buttons on the toolbar change depending upon the type of block you choose.
For example, the paragraph block has text formatting options. Like alignment, bold, italic and link inserting. You can find more settings by clicking on the three dots on the toolbar
Configuring a WordPress Block
You can configure the block using the block toolbar settings. To see the toolbar, click and select the block you want to configure.
The block toolbar will appear on the top of the selected block. You can use these settings to change the block type or for formatting the block content.
On the sidebar, there are additional settings for the block. You can switch between the block settings and the whole document settings.
The Document settings are options that apply to the whole page/post. They allow you to add a featured image, tags, categories, and other options.
Click on the cog icon on the top right side of the column to hide the sidebar settings. Move a block up and down by clicking on the up and down arrows. You can drag the block by clicking and holding on the arrow/dots button.
Add a Block in Gutenberg Editor
By default, the title is the first block on a new post or page. You can add blocks using different ways.
Here are 4 ways to add a new WordPress block:

- Click on the title block and then press the TAB key on the keyboard. It will create a new paragraph block moving the cursor to the new block.
- Use a keyboard shortcut, type ” / ” to search and add a block.
- To add a specific block. Click on the add new block button (+) on the top left side of the editor.
- Click on the add new block button (+) on the right-hand side of the block.
The last two options will bring up an add block menu with a search bar. It will also show the most commonly used blocks below the search bar.
The blocks are organized by category and recent usage. You can search the block using the search bar or browse using the block categories.
Change One Block Type Into Another Type
To change one WordPress block type into another block type. Click on the first icon on the left side of the block toolbar menu.
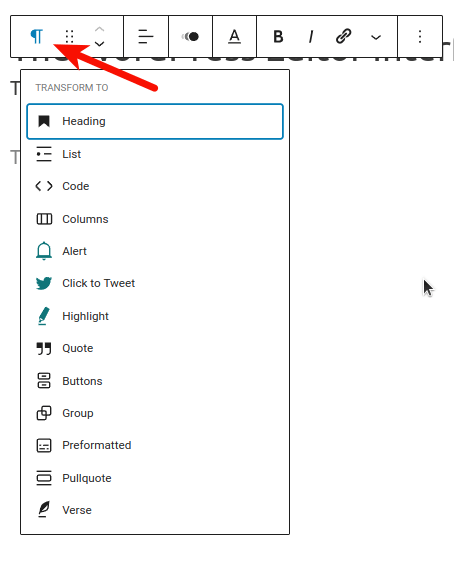
Choose the new block type from the drop-down list.
Remove a WordPress Block
Select the block you want to remove. Click on the three dots on the right end of the block toolbar. Click on the Remove Block options.
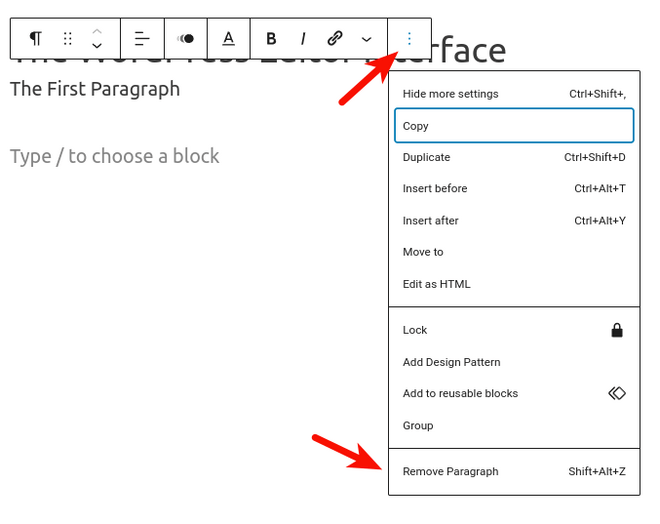
It will delete the selected block permanently.
Organize Blocks in Columns and Groups
The Block columns and groups are one of the best ways to organize your content. It helps you create engaging content layouts.
To organize the blocks in columns and groups in 2 ways:
Using Empty Columns or Group Blocks
To start with an empty column or group block. Click on the add block (+) button next to the block and choose a Column or Group block.
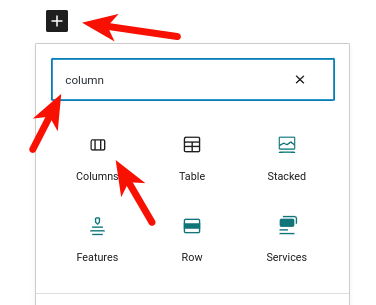
You can now add any type of block to this column or group for creating beautiful layouts.

Organizing Blocks Containing Content
First, select the multiple blocks for organizing them into either columns or groups. Press down the keyboard SHIFT key and click on all the blocks you want to organize.
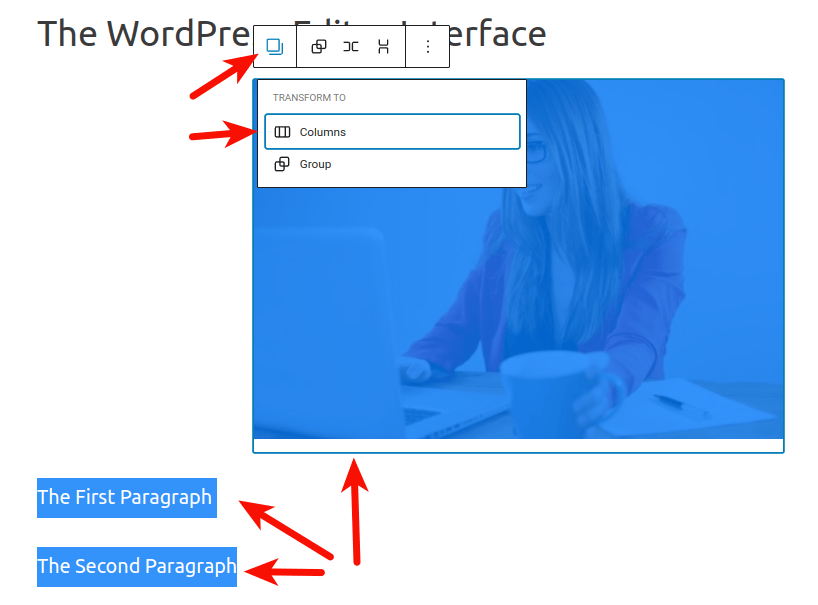
Now, click on the block type button on the block toolbar. From the drop-down menu choose the Columns or Groups options.
You can style the columns and groups using settings on the block toolbar and sidebar.
Reuse and Save Blocks in Gutenberg Editor
As content creators, you need a specific type of block for your content. You can create a customized block and then save and reuse the block.
Saving a reusable block
First, add a block and design it to your taste. Click on the three dots on the right corner of the blocks’ toolbar.

From the drop-down menu. Select the ‘Add to Reusable blocks’ option. Next, you have to name the reusable block. This will help you in identifying the block while reusing.
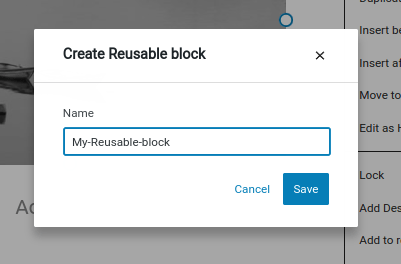
Your block is now added to the block editor reusable blocks.
Reusing the block
For reusing the block, go to the page or post where you want to reuse the block. Click on the add new block (+) button.
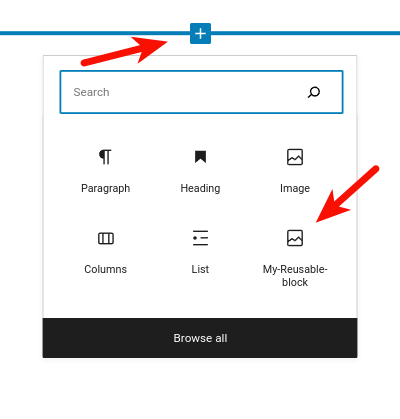
Hover the mouse over the reusable block. It will show you the live preview of the block. Next, click on the Reusable tab to insert the reusable block.
There is a Manage Reusable blocks option below the reusable blocks. Clicking on this link loads the block manager page.
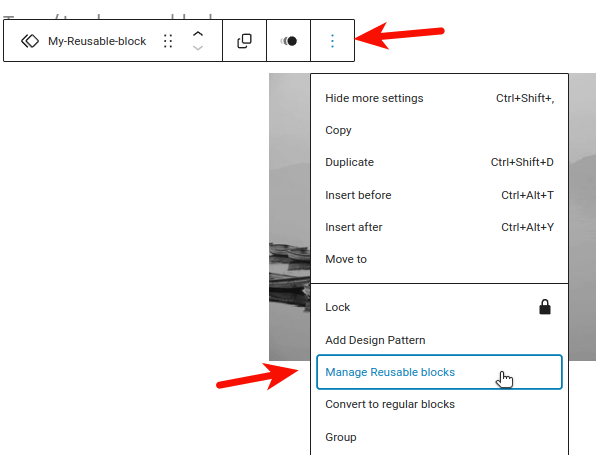
The block manager enables you to edit and delete the reusable blocks. It allows you to export the reusable blocks and reuse them on other WordPress sites.

It allows you to save the entire sections as reusable blocks. For example, the entire columns and groups can be saved as reusable blocks.
The WordPress Plugin Options in Gutenberg Editor
Using the WordPress plugin options. You can add the plugin-specific blocks to the editor.
Some of the plugins integrate with the Gutenberg editor. They provide you with blocks to add the plugin functionality within your content.
For example,
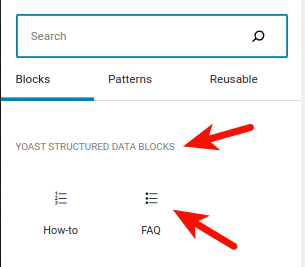
- The YoastSEO for WordPress provides SEO settings within the block editor.
- The WPForms plugin allows you to add forms to your content using the blocks.
- Woocommerce provides its own blocks for WordPress pages and posts.
Add Common Blocks in the WordPress Block Editor
A block editor is a powerful tool for creating great content layouts. Let’s add some of the most common blocks you encounter while creating content.
Add Image to the WordPress block editor
You can add an image to the WordPress block editor using 2 methods.
1. Add an image block from the block editor.
The image block has 3 options for adding an image
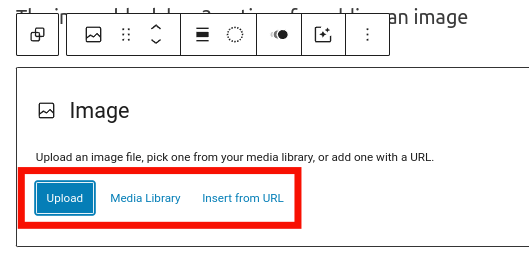
- Upload from your computer
- Use images from the Media library
- Insert image from a URL
2. By dragging an image from your computer and dropping it over to the editor. The editor will automatically create an image block and upload the image.
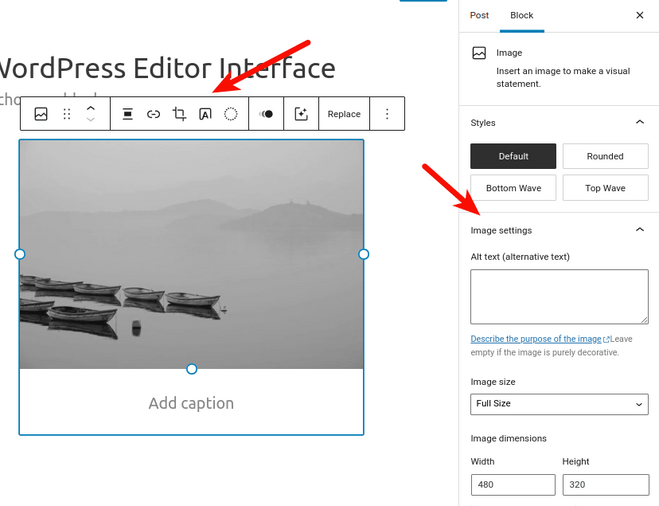
After uploading the image. You can edit and customize the image using the toolbar and sidebar settings.
Add Link in the Block Editor
Most of the text blocks have a link button on the toolbar. For example, paragraph blocks, one of the most common text blocks, have an insert link button.
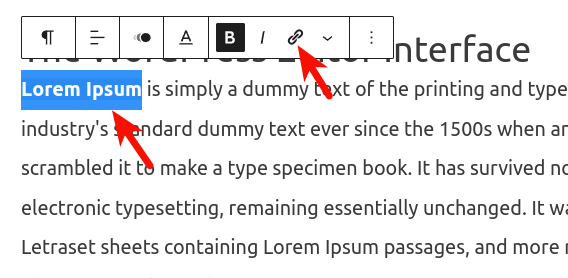
Select the text from the paragraph and then click on the insert link button. Add the linking URL and press Enter.
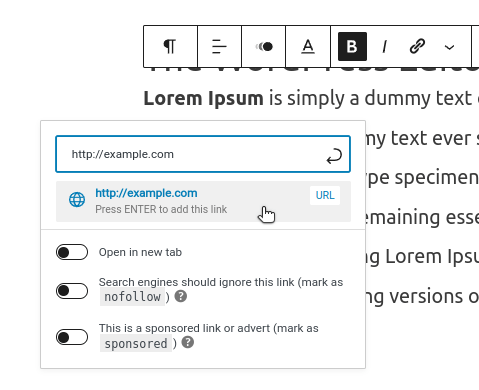
To insert a link using the keyboard shortcut. Select the text you want to link to and then use CTRL + K on Windows computers and Command + K for Mac. It will show you the bar for entering the linking URL.
Add an Image Gallery in Gutenberg Editor
To add an image gallery, click on the add a block (+) button and select the Gallery block.
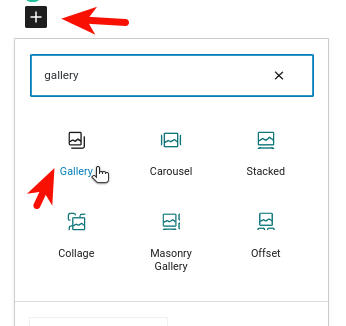
The Gallery block is like the image block. The only difference is, that it allows you to add multiple images.
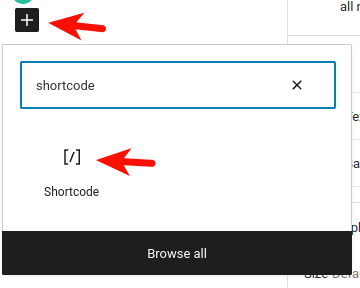
Add Shortcodes in WordPress Posts Using the New Editor
Shortcodes allow you to add more features to your site. They do so without using complex computer code. We write a shortcode within two square brackets.
You can add the shortcode using the shortcode block or a paragraph block
The Gutenberg block editor keeps adding new content blocks. The blocks are useful in improving and creating engaging content layouts.
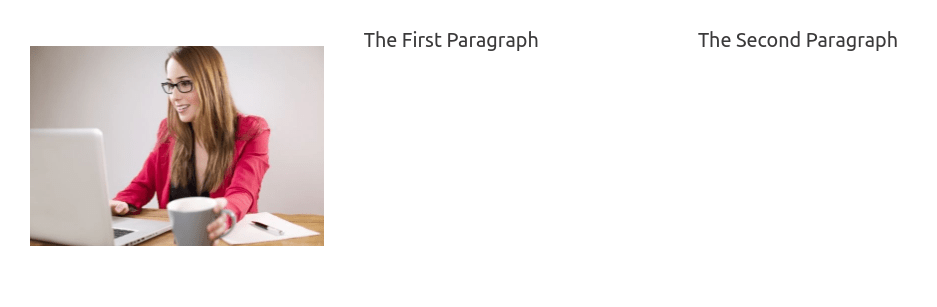
Adding an Image Next to Some Text in WordPress
In the classic editor, you have to align the image to place it next to the text. In the blocks editor, you use a Media & Text block.
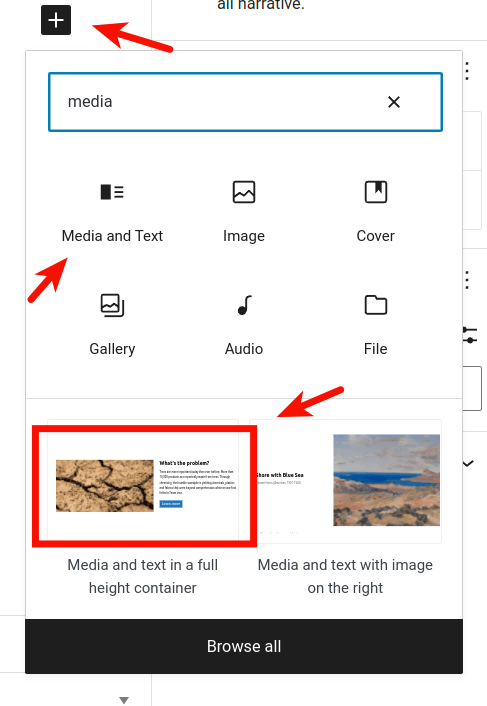
The Media & Text block consists of 2 blocks in a row. You add an image in one block and text in the other block.
Add a Button to a WordPress Page or Post
In the old editor, adding a button to your blog post was a tedious task. You had to switch to HTML mode and write button code. Or you had to install a plugin for buttons that created shortcodes for buttons.
The new Gutenberg editor has a button block. It allows you to add a button to any page or post.
The button block settings include the option to add a link to the button. You can change the colour, border, styles and many other settings.
Add Cover Images in Blog Posts and Landing Pages
If you want to add a wider image at the beginning of the story or a new section on the page. You can use a ‘Cover block’ to add a cover image or colour background images to your pages and post.
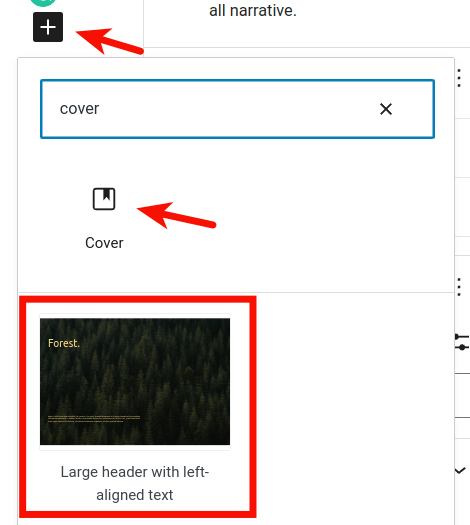
For creating a cover image on a blog post or landing page. Add a cover block, and upload the image you want to use as a cover. The block settings allow you to make the background image fix. It creates a parallax effect while the user scrolls down the page.
Creating Tables in WordPress Posts or Pages
There was no option of adding tables to your WordPress posts in the old editor. You had to install a table plugin or use the HTML editor mode to create one.
The block editor has a built-in table block. The table blocks allow you to add tables to your pages and posts.
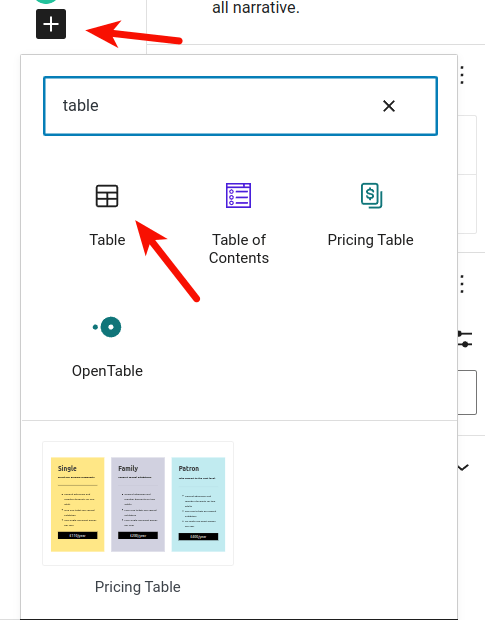
You have to add the block and choose the number of rows and columns you need. The table block settings allow you to create a table with a header section. You can use the default table style or the one with stripes.
Creating Multi-Column Content
It was very difficult to create multi-column content in the classic editor. But, using the block editor you can add a column block. The columns block adds 2 columns of paragraph blocks
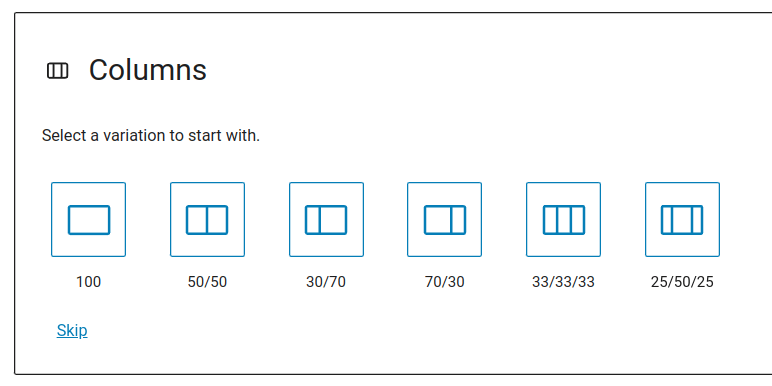
The column blocks allow you to add up to 6 columns in a row. You can even add more blocks inside each column.
Tips To Become Gutenberg Editor Power User
The Gutenberg editor is a very fast and easy-to-use editor. Once you get the hang, you will be able to generate content effortlessly.
Some of the tips that will make you a Gutenberg editor power user are:
Move the Block Toolbar to the Top of the Editor
The block toolbar appears on the top of the selected block. You should move this toolbar to the top of the editor. It is faster and easier to access the menu sticking to a fixed place.
To move the block toolbar to the top of the editor, click on the three dots near the cogwheel icon. From the drop-down menu select the Top toolbar option.
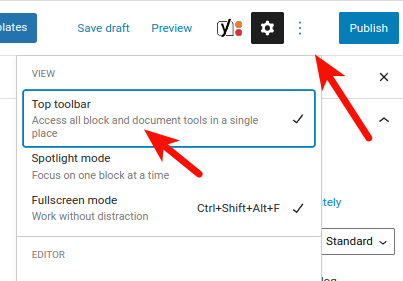
This will fix the toolbar to the top of the WordPress block editor.
Drag and Drop Media to Create Media Blocks
One of the handy tips allows you to add media blocks quickly. Drag and drop the image files on the block editor, it will create an image block and upload the image.
If you select and drop multiple images, it will create a gallery block. Same way, you can create and embed video blocks by dropping a video file.
Use Keyboard Shortcuts
Keyboard shortcuts allow you to write and create content faster. The new Gutenberg block editor shortcuts dramatically improve your productivity.
For example, when you start typing with / followed by the name of the block. It will show you the list of blocks to add instantly.
To access all the WordPress block editor shortcuts, click on the three dots near the cog icon (Settings).
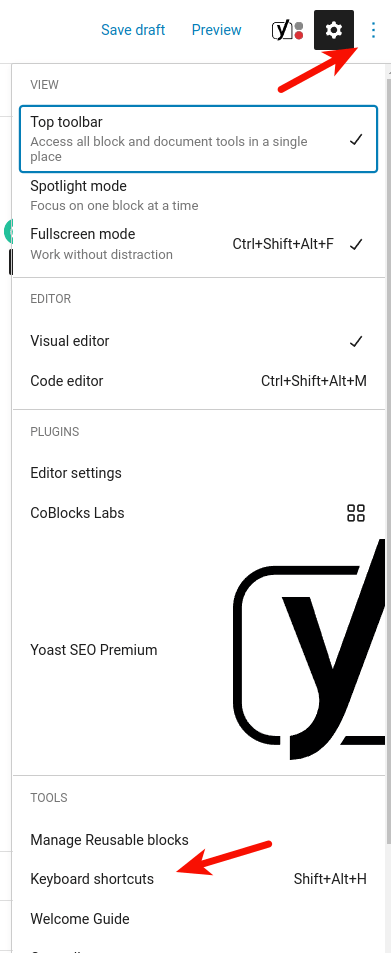
Here is the list of all the Gutenberg editor keyboard shortcuts:
Keyboard Shortcuts
| Display the Keyword Shortcuts | Shift+Alt+H |
Global Shortcuts
| Switch between visual editor and code editor | Ctrl+Shift+Alt+M |
| Toggle fullscreen mode | Ctrl+Shift+Alt+F |
| Open the block list view | Shift+Alt+O |
| Show or hide the settings sidebar | Ctrl+Shift+ |
| Navigate to the next part of the editor | Ctrl+’ Shift+Alt+N |
| Navigate to the previous part of the editor | Ctrl+Shift+` Shift+Alt+P |
| Navigate to the nearest toolbar | Alt+F10 |
| Save your changes | Ctrl+S |
| Undo your last changes | Ctrl+Z |
| Redo your last undo | Ctrl+Shift+Z |
Selection Shortcuts
| Select all text when typing. Press again to select all blocks | Ctrl+A |
| Clear Selection | Escape |
Block Shortcuts
| Duplicate the selected block(s) | Ctrl+Shift+D |
| Remove the selected block(s) | Shift+Alt+Z |
| Insert a new block before the selected block(s) | Ctrl+Alt+T |
| Insert a new block after the selected block(s) | Ctrl+Alt+Y |
| Delete selection | del backspace |
| Move the selected block(s) up | Ctrl+Shift+Alt+T |
| Move the selected block(s) down | Ctrl+Shift+Alt+Y |
| Change the block type after adding a new paragraph | / |
Text Formatting
| Make the selected text bold | Ctrl+B |
| Make the selected text italic | Ctrl+I |
| Convert the selected text into a link | Ctrl+K |
| Remove a link | Ctrl+Shift+K |
| Insert a link to a post or page | [[ |
| Underline the selected text | Ctrl+U |
Embed Videos from YouTube, Vimeo, Twitter and Others
Copy the URL of the video and drop it over the block editor. It will automatically create a YouTube embed block for displaying video.
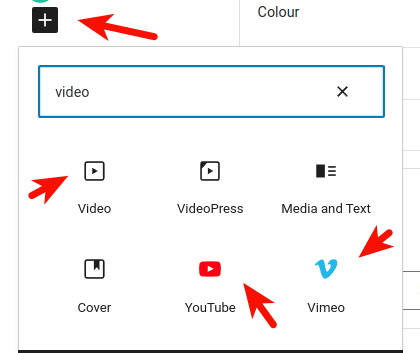
The block editor has blocks for all the popular media services. You can simply add the media block for each of the services and upload the related content.
Add More Blocks to Gutenberg Block Editor in WordPress
To add more blocks to the Gutenberg block editor in WordPress. You have to install plugins providing you with new blocks.
Some of the most popular WordPress block add-on plugins are:
Spectra (Ultimate Addons for Gutenberg)
Spectra (Formerly, Ultimate Addons for Gutenberg) plugin is a library of blocks. It contains advanced blocks for creating more designs and layouts.
One of the first addon plugins for Gutenberg editor. Brainstorm Force developed this plugin. It is the team behind the Astra WordPress theme.
It contains creative, social, content, SEO and post blocks. This powerful add-on helps to design beautiful web pages.
PublishPress Blocks
PublishPress blocks plugin is another useful block library. It has a block layout and page builder features. With over 20 extra Gutenberg blocks. It provides many options for creating beautiful pages.
The plugins include many options. E.g, beautiful layouts, image galleries, sliders, testimonials, maps, accordions, tabs and more.
Stackable – Gutenberg Blocks

Stackable – Gutenberg blocks offer a library of beautifully designed blocks. You can use these blocks on your site to create engaging content.
Some of the blocks are. Container blocks, feature grids, image boxes, accordions, posts, icon lists, calls to action and more.
Conclusion
The WordPress block editor is a new-age editor for WordPress. It contains a block for each type of content element. E.g, text, image, audio, video etc.
This editor offers a simple way to add different types of content to posts/pages. It is very easy to learn and use. You can use it to create beautiful designs and layouts.
We have covered the various blocks and how to add them.
I hope now you know how to use the WordPress block editor. Don’t forget to leave your comments below.
![Read more about the article How To Install a WordPress Theme For Beginners [2023]](https://startblogpro.com/wp-content/uploads/2022/09/How-to-install-wordpress-theme-300x169.png)

Pingback: How To Create a Blog? Easy Blog Set-Up | StartBlogPro
Pingback: How To Start a Blog In 2022? | StartBlogPro
This is so detailed and easily explained blog on Gutenberg editor…
Any beginner may use Gutenberg with this blog.
Gained lot knowledge as I am a beginner and is using Gutenberg .
Would love to see your blog on Elementor too.
Hi Rupjyoti,
I am glad that you find this post useful. I will try to cover Elementor soon.
Pingback: How To Change Font In WordPress? | StartBlogPro
Pingback: How to Embed Video in WordPress? | StartBlogPro